Soundcard Isolation Project - VA3CR
Soundcard Isolation Project - VA3CR
Soundcard Isolation Project - VA3CR

Create successful ePaper yourself
Turn your PDF publications into a flip-book with our unique Google optimized e-Paper software.
7.4 Transmit Settings -<br />
7.4.1 PC Tx Level Adjust - Go to the Hamscope Screen, and select “Setting/Tx Level Adjust”.<br />
The volume control panel for the sound card volume control should appear. On that screen<br />
select “Options/Properties”. The Button for “Playback” should be set. In the panel at the bottom,<br />
click on all of the sources so you can view their settings. Click “OK”. The full Volume Control<br />
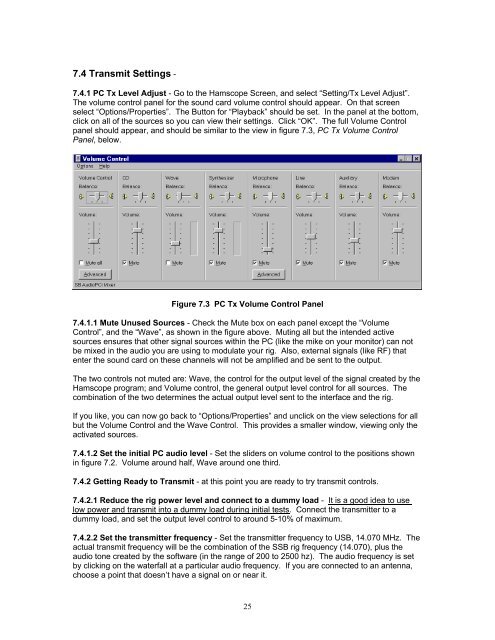
panel should appear, and should be similar to the view in figure 7.3, PC Tx Volume Control<br />
Panel, below.<br />
Figure 7.3 PC Tx Volume Control Panel<br />
7.4.1.1 Mute Unused Sources - Check the Mute box on each panel except the “Volume<br />
Control”, and the “Wave”, as shown in the figure above. Muting all but the intended active<br />
sources ensures that other signal sources within the PC (like the mike on your monitor) can not<br />
be mixed in the audio you are using to modulate your rig. Also, external signals (like RF) that<br />
enter the sound card on these channels will not be amplified and be sent to the output.<br />
The two controls not muted are: Wave, the control for the output level of the signal created by the<br />
Hamscope program; and Volume control, the general output level control for all sources. The<br />
combination of the two determines the actual output level sent to the interface and the rig.<br />
If you like, you can now go back to “Options/Properties” and unclick on the view selections for all<br />
but the Volume Control and the Wave Control. This provides a smaller window, viewing only the<br />
activated sources.<br />
7.4.1.2 Set the initial PC audio level - Set the sliders on volume control to the positions shown<br />
in figure 7.2. Volume around half, Wave around one third.<br />
7.4.2 Getting Ready to Transmit - at this point you are ready to try transmit controls.<br />
7.4.2.1 Reduce the rig power level and connect to a dummy load - It is a good idea to use<br />
low power and transmit into a dummy load during initial tests. Connect the transmitter to a<br />
dummy load, and set the output level control to around 5-10% of maximum.<br />
7.4.2.2 Set the transmitter frequency - Set the transmitter frequency to USB, 14.070 MHz. The<br />
actual transmit frequency will be the combination of the SSB rig frequency (14.070), plus the<br />
audio tone created by the software (in the range of 200 to 2500 hz). The audio frequency is set<br />
by clicking on the waterfall at a particular audio frequency. If you are connected to an antenna,<br />
choose a point that doesn’t have a signal on or near it.<br />
25