OPERATING AND MAINTENANCE INSTRUCTIONS MINICOLOR
OPERATING AND MAINTENANCE INSTRUCTIONS MINICOLOR
OPERATING AND MAINTENANCE INSTRUCTIONS MINICOLOR
- No tags were found...

You also want an ePaper? Increase the reach of your titles
YUMPU automatically turns print PDFs into web optimized ePapers that Google loves.
Operation<br />
<strong>MINICOLOR</strong><br />
M SET = Dosing throughput of the dosing station<br />
in kg/h preset nominal value of production<br />
M Batch = Additive component per shot in g<br />
t inject = Dosing time in seconds<br />
(preset by the external contact)<br />
3,6 = Conversion factor<br />
M Batch x 3,6<br />
Formula 2<br />
t inject<br />
= M SET<br />
Example: i = 30:1<br />
Presumption: Shot weight = 100 g<br />
Masterbatch (or additive share) = 3%<br />
- Additive component in shot = 3 g M BATCH<br />
- Dosing time = 5 s t inject<br />
Required: - Dosing throughput in kg/h<br />
Result: = 2,16 kg/h ( use dosing screw G2)<br />
Example<br />
3 x 3,6<br />
5<br />
= 2,16 kg/h<br />
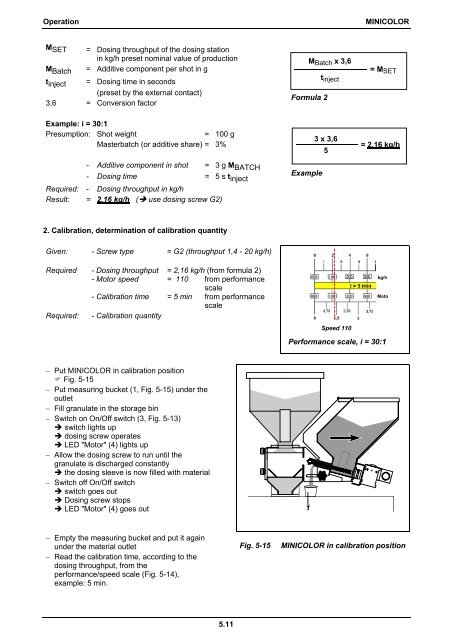
2. Calibration, determination of calibration quantity<br />
Given: - Screw type = G2 (throughput 1,4 - 20 kg/h)<br />
Required - Dosing throughput = 2,16 kg/h (from formula 2)<br />
- Motor speed = 110 from performance<br />
scale<br />
- Calibration time = 5 min from performance<br />
scale<br />
Required: - Calibration quantity<br />
kg/h<br />
Moto<br />
Speed 270<br />
Speed 110<br />
Performance scale, i = 30:1<br />
− Put <strong>MINICOLOR</strong> in calibration position<br />
Fig. 5-15<br />
− Put measuring bucket (1, Fig. 5-15) under the<br />
outlet<br />
− Fill granulate in the storage bin<br />
− Switch on On/Off switch (3, Fig. 5-13)<br />
switch lights up<br />
dosing screw operates<br />
LED "Motor" (4) lights up<br />
− Allow the dosing screw to run until the<br />
granulate is discharged constantly<br />
the dosing sleeve is now filled with material<br />
− Switch off On/Off switch<br />
switch goes out<br />
Dosing screw stops<br />
LED "Motor" (4) goes out<br />
1<br />
− Empty the measuring bucket and put it again<br />
under the material outlet<br />
− Read the calibration time, according to the<br />
dosing throughput, from the<br />
performance/speed scale (Fig. 5-14),<br />
example: 5 min.<br />
Fig. 5-15<br />
<strong>MINICOLOR</strong> in calibration position<br />
5.11