OPERATING AND MAINTENANCE INSTRUCTIONS MINICOLOR
OPERATING AND MAINTENANCE INSTRUCTIONS MINICOLOR
OPERATING AND MAINTENANCE INSTRUCTIONS MINICOLOR
- No tags were found...

You also want an ePaper? Increase the reach of your titles
YUMPU automatically turns print PDFs into web optimized ePapers that Google loves.
Design and mode of operation<br />
<strong>MINICOLOR</strong><br />
3 Design and mode of operation<br />
3.1 Function principle<br />
The <strong>MINICOLOR</strong> pigment mixing unit mixes the masterbatch into the main material flow.<br />
It can be operated with one or two dosing units, i.e. two color components can can be handled.<br />
The control unit receives a signal from the processing machine. The control unit converts this signal and<br />
transmits it to the dosing motor. As long as the signal is active, the dosing motor operates with the preset<br />
speed.<br />
If the control unit is equipped with a timer, the operation period of the dosing motor can be set when a start<br />
signal is issued.<br />
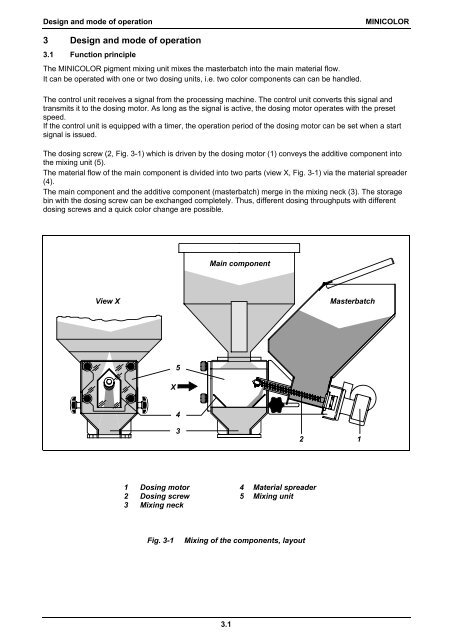
The dosing screw (2, Fig. 3-1) which is driven by the dosing motor (1) conveys the additive component into<br />
the mixing unit (5).<br />
The material flow of the main component is divided into two parts (view X, Fig. 3-1) via the material spreader<br />
(4).<br />
The main component and the additive component (masterbatch) merge in the mixing neck (3). The storage<br />
bin with the dosing screw can be exchanged completely. Thus, different dosing throughputs with different<br />
dosing screws and a quick color change are possible.<br />
Main component<br />
View X<br />
Masterbatch<br />
5<br />
X<br />
4<br />
3<br />
2 1<br />
1 Dosing motor<br />
2 Dosing screw<br />
3 Mixing neck<br />
4 Material spreader<br />
5 Mixing unit<br />
Fig. 3-1<br />
Mixing of the components, layout<br />
3.1