

Getting Started with Keystone® 600N - Best Access Systems
Getting Started with Keystone® 600N - Best Access Systems
Getting Started with Keystone® 600N - Best Access Systems

Create successful ePaper yourself
Turn your PDF publications into a flip-book with our unique Google optimized e-Paper software.
Adding records<br />
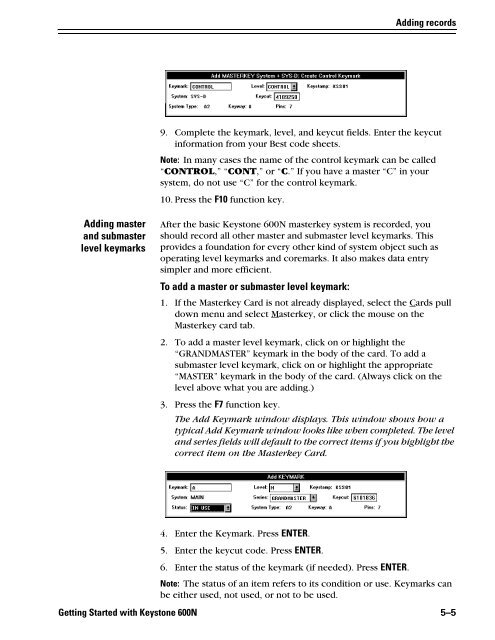
9. Complete the keymark, level, and keycut fields. Enter the keycut<br />
information from your <strong>Best</strong> code sheets.<br />
Note: In many cases the name of the control keymark can be called<br />
“CONTROL,” “CONT,” or “C.” If you have a master “C” in your<br />
system, do not use “C” for the control keymark.<br />
10. Press the F10 function key.<br />
Adding master<br />
and submaster<br />
level keymarks<br />
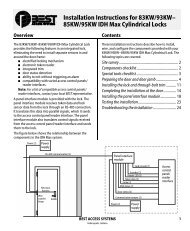
After the basic Keystone <strong>600N</strong> masterkey system is recorded, you<br />
should record all other master and submaster level keymarks. This<br />
provides a foundation for every other kind of system object such as<br />
operating level keymarks and coremarks. It also makes data entry<br />
simpler and more efficient.<br />
To add a master or submaster level keymark:<br />
1. If the Masterkey Card is not already displayed, select the Cards pull<br />
down menu and select Masterkey, or click the mouse on the<br />
Masterkey card tab.<br />
2. To add a master level keymark, click on or highlight the<br />
“GRANDMASTER” keymark in the body of the card. To add a<br />
submaster level keymark, click on or highlight the appropriate<br />
“MASTER” keymark in the body of the card. (Always click on the<br />
level above what you are adding.)<br />
3. Press the F7 function key.<br />
The Add Keymark window displays. This window shows how a<br />
typical Add Keymark window looks like when completed. The level<br />
and series fields will default to the correct items if you highlight the<br />
correct item on the Masterkey Card.<br />
4. Enter the Keymark. Press ENTER.<br />
5. Enter the keycut code. Press ENTER.<br />
6. Enter the status of the keymark (if needed). Press ENTER.<br />
Note: The status of an item refers to its condition or use. Keymarks can<br />
be either used, not used, or not to be used.<br />
<strong>Getting</strong> <strong>Started</strong> <strong>with</strong> Keystone <strong>600N</strong> 5–5


![B.A.S.I.S. G Service Manual [T63300] - Best Access Systems](https://img.yumpu.com/48375082/1/190x245/basis-g-service-manual-t63300-best-access-systems.jpg?quality=85)

