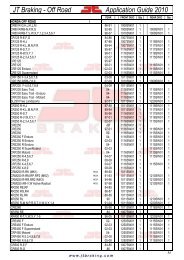
DID 60 standard roller chain - Big Bike Webshop
DID 60 standard roller chain - Big Bike Webshop
DID 60 standard roller chain - Big Bike Webshop

Create successful ePaper yourself
Turn your PDF publications into a flip-book with our unique Google optimized e-Paper software.
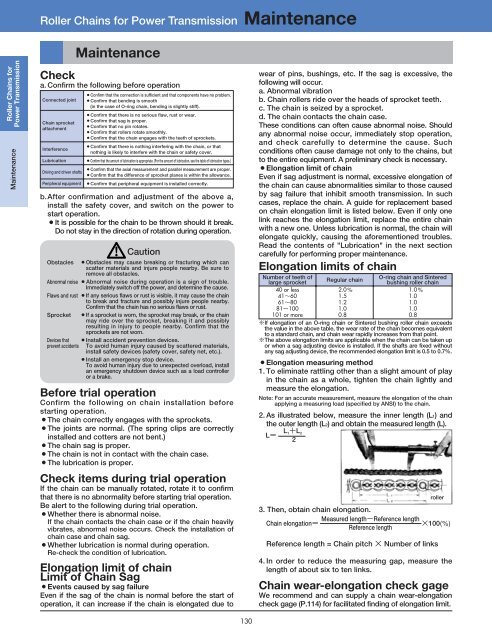
Roller Chains for Power Transmission Maintenance<br />
Roller Chains for<br />
Power Transmission<br />
Maintenance<br />
Check<br />
a. Confirm the following before operation<br />
Connected joint<br />
Chain sprocket<br />
attachment<br />
Interference<br />
Lubrication<br />
Driving and driven shafts<br />
Peripheral equipment<br />
Maintenance<br />
¡Confirm that the connection is sufficient and that components have no problem.<br />
¡Confirm that bending is smooth<br />
(in the case of O-ring <strong>chain</strong>, bending is slightly stiff).<br />
¡Confirm that there is no serious flaw, rust or wear.<br />
¡Confirm that sag is proper.<br />
¡Confirm that no pin rotates.<br />
¡Confirm that <strong>roller</strong>s rotate smoothly.<br />
¡Confirm that the <strong>chain</strong> engages with the teeth of sprockets.<br />
¡Confirm that there is nothing interfering with the <strong>chain</strong>, or that<br />
nothing is likely to interfere with the <strong>chain</strong> or safety cover.<br />
¡Confirm that the amount of lubrication is appropriate. (For the amount of lubrication, see the table of lubrication types.)<br />
¡Confirm that the axial measurement and parallel measurement are proper.<br />
¡Confirm that the difference of sprocket planes is within the allowance.<br />
¡Confirm that peripheral equipment is installed correctly.<br />
b.After confirmation and adjustment of the above a,<br />
install the safety cover, and switch on the power to<br />
start operation.<br />
¡It is possible for the <strong>chain</strong> to be thrown should it break.<br />
Do not stay in the direction of rotation during operation.<br />
Caution<br />
Obstacles ¡Obstacles may cause breaking or fracturing which can<br />
scatter materials and injure people nearby. Be sure to<br />
remove all obstacles.<br />
Abnormal noise ¡Abnormal noise during operation is a sign of trouble.<br />
Immediately switch off the power, and determine the cause.<br />
Flaws and rust ¡If any serious flaws or rust is visible, it may cause the <strong>chain</strong><br />
to break and fracture and possibly injure people nearby.<br />
Confirm that the <strong>chain</strong> has no serious flaws or rust.<br />
Sprocket ¡If a sprocket is worn, the sprocket may break, or the <strong>chain</strong><br />
may ride over the sprocket, breaking it and possibly<br />
resulting in injury to people nearby. Confirm that the<br />
sprockets are not worn.<br />
Devices that ¡Install accident prevention devices.<br />
prevent accidents To avoid human injury caused by scattered materials,<br />
install safety devices (safety cover, safety net, etc.).<br />
¡Install an emergency stop device.<br />
To avoid human injury due to unexpected overload, install<br />
an emergency shutdown device such as a load cont<strong>roller</strong><br />
or a brake.<br />
Before trial operation<br />
Confirm the following on <strong>chain</strong> installation before<br />
starting operation.<br />
¡The <strong>chain</strong> correctly engages with the sprockets.<br />
¡The joints are normal. (The spring clips are correctly<br />
installed and cotters are not bent.)<br />
¡The <strong>chain</strong> sag is proper.<br />
¡The <strong>chain</strong> is not in contact with the <strong>chain</strong> case.<br />
¡The lubrication is proper.<br />
Check items during trial operation<br />
If the <strong>chain</strong> can be manually rotated, rotate it to confirm<br />
that there is no abnormality before starting trial operation.<br />
Be alert to the following during trial operation.<br />
¡Whether there is abnormal noise.<br />
If the <strong>chain</strong> contacts the <strong>chain</strong> case or if the <strong>chain</strong> heavily<br />
vibrates, abnormal noise occurs. Check the installation of<br />
<strong>chain</strong> case and <strong>chain</strong> sag.<br />
¡Whether lubrication is normal during operation.<br />
Re-check the condition of lubrication.<br />
Elongation limit of <strong>chain</strong><br />
Limit of Chain Sag<br />
¡Events caused by sag failure<br />
Even if the sag of the <strong>chain</strong> is normal before the start of<br />
operation, it can increase if the <strong>chain</strong> is elongated due to<br />
wear of pins, bushings, etc. If the sag is excessive, the<br />
following will occur.<br />
a. Abnormal vibration<br />
b. Chain <strong>roller</strong>s ride over the heads of sprocket teeth.<br />
c. The <strong>chain</strong> is seized by a sprocket.<br />
d. The <strong>chain</strong> contacts the <strong>chain</strong> case.<br />
These conditions can often cause abnormal noise. Should<br />
any abnormal noise occur, immediately stop operation,<br />
and check carefully to determine the cause. Such<br />
conditions often cause damage not only to the <strong>chain</strong>s, but<br />
to the entire equipment. A preliminary check is necessary.<br />
¡Elongation limit of <strong>chain</strong><br />
Even if sag adjustment is normal, excessive elongation of<br />
the <strong>chain</strong> can cause abnormalities similar to those caused<br />
by sag failure that inhibit smooth transmission. In such<br />
cases, replace the <strong>chain</strong>. A guide for replacement based<br />
on <strong>chain</strong> elongation limit is listed below. Even if only one<br />
link reaches the elongation limit, replace the entire <strong>chain</strong><br />
with a new one. Unless lubrication is normal, the <strong>chain</strong> will<br />
elongate quickly, causing the aforementioned troubles.<br />
Read the contents of "Lubrication" in the next section<br />
carefully for performing proper maintenance.<br />
Elongation limits of <strong>chain</strong><br />
Number of teeth of<br />
large sprocket<br />
40 or less<br />
41<strong>60</strong><br />
6180<br />
81100<br />
101 or more<br />
2.0<br />
1.5<br />
1.2<br />
1.0<br />
0.8<br />
0.8<br />
If elongation of an O-ring <strong>chain</strong> or Sintered bushing <strong>roller</strong> <strong>chain</strong> exceeds<br />
the value in the above table, the wear rate of the <strong>chain</strong> becomes equivalent<br />
to a <strong>standard</strong> <strong>chain</strong>, and <strong>chain</strong> wear rapidly increases from that point.<br />
The above elongation limits are applicable when the <strong>chain</strong> can be taken up<br />
or when a sag adjusting device is installed. If the shafts are fixed without<br />
any sag adjusting device, the recommended elongation limit is 0.5 to 0.7%.<br />
¡Elongation measuring method<br />
1. To eliminate rattling other than a slight amount of play<br />
in the <strong>chain</strong> as a whole, tighten the <strong>chain</strong> lightly and<br />
measure the elongation.<br />
Note: For an accurate measurement, measure the elongation of the <strong>chain</strong><br />
applying a measuring load (specified by ANSI) to the <strong>chain</strong>.<br />
2. As illustrated below, measure the inner length (L1) and<br />
the outer length (L2) and obtain the measured length (L).<br />
L L 1L 2<br />
2<br />
Regular <strong>chain</strong><br />
3. Then, obtain <strong>chain</strong> elongation.<br />
O-ring <strong>chain</strong> and Sintered<br />
bushing <strong>roller</strong> <strong>chain</strong><br />
1.0<br />
1.0<br />
1.0<br />
1.0<br />
Reference length = Chain pitch Number of links<br />
<strong>roller</strong><br />
Chain elongation Measured lengthReference length 100<br />
Reference length<br />
4. In order to reduce the measuring gap, measure the<br />
length of about six to ten links.<br />
Chain wear-elongation check gage<br />
We recommend and can supply a <strong>chain</strong> wear-elongation<br />
check gage (P.114) for facilitated finding of elongation limit.<br />
130