DCT5280 - at Uniden
DCT5280 - at Uniden
DCT5280 - at Uniden

Create successful ePaper yourself
Turn your PDF publications into a flip-book with our unique Google optimized e-Paper software.
• To use the DCX520,<br />
register it to the<br />
<strong>DCT5280</strong> series base.<br />
• Save this manual for<br />
the detailed oper<strong>at</strong>ion.<br />
• All of the handsets<br />
ring when a call<br />
is received.<br />
Expanding Your Phone<br />
Your phone supports up to 4 handsets (including the handset(s) supplied with your<br />
phone). You can now place a fully fe<strong>at</strong>ured cordless handset anywhere AC power is<br />
available to connect the handset charger.<br />
Effective combin<strong>at</strong>ions, for example:<br />
- 4-way conferencing (the base, 2 handsets, and one outside line), while on an intercom<br />
call using the other 2 handsets, or<br />
- 4-way conferencing (3 handsets and an outside line)<br />
IMPORTANT:<br />
• If you purchase a DCX520 extra handset, please register the handset to the <strong>DCT5280</strong><br />
series base before use. The DCX520 will not oper<strong>at</strong>e until it is registered.<br />
• If you change a setting of the Global Setup menu in one of the handsets, you<br />
change settings for all the handsets. For all other fe<strong>at</strong>ures they must be set<br />
separ<strong>at</strong>ely through each handset.<br />
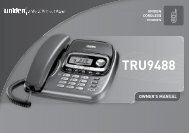
Connecting the Charger<br />
1) Connect the AC adapter to the DC IN<br />
9V jack and to a standard 120V AC<br />
wall outlet.<br />
2) Set the charger on a desk or tabletop,<br />
and place the handset in the charger<br />
with the keypad facing forward.<br />
(See “B. Install the AA b<strong>at</strong>teries into<br />
the handset” on page 13).<br />
[ 64 ]<br />
EXPANDING YOUR PHONE