6 - Association of Interior Specialists
6 - Association of Interior Specialists
6 - Association of Interior Specialists
- No tags were found...

Create successful ePaper yourself
Turn your PDF publications into a flip-book with our unique Google optimized e-Paper software.
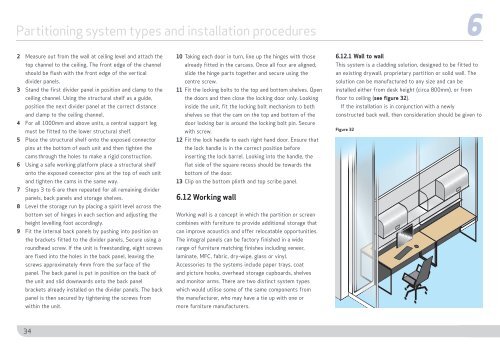
Partitioning system types and installation procedures 62 Measure out from the wall at ceiling level and attach thetop channel to the ceiling. The front edge <strong>of</strong> the channelshould be flush with the front edge <strong>of</strong> the verticaldivider panels.3 Stand the first divider panel in position and clamp to theceiling channel. Using the structural shelf as a guide,position the next divider panel at the correct distanceand clamp to the ceiling channel.4 For all 1000mm and above units, a central support legmust be fitted to the lower structural shelf.5 Place the structural shelf onto the exposed connectorpins at the bottom <strong>of</strong> each unit and then tighten thecams through the holes to make a rigid construction.6 Using a safe working platform place a structural shelfonto the exposed connector pins at the top <strong>of</strong> each unitand tighten the cams in the same way.7 Steps 3 to 6 are then repeated for all remaining dividerpanels, back panels and storage shelves.8 Level the storage run by placing a spirit level across thebottom set <strong>of</strong> hinges in each section and adjusting theheight levelling foot accordingly.9 Fit the internal back panels by pushing into position onthe brackets fitted to the divider panels. Secure using aroundhead screw. If the unit is freestanding, eight screwsare fixed into the holes in the back panel, leaving thescrews approximately 4mm from the surface <strong>of</strong> thepanel. The back panel is put in position on the back <strong>of</strong>the unit and slid downwards onto the back panelbrackets already installed on the divider panels. The backpanel is then secured by tightening the screws fromwithin the unit.10 Taking each door in turn, line up the hinges with thosealready fitted in the carcass. Once all four are aligned,slide the hinge parts together and secure using thecentre screw.11 Fit the locking bolts to the top and bottom shelves. Openthe doors and then close the locking door only. Lookinginside the unit, fit the locking bolt mechanism to bothshelves so that the cam on the top and bottom <strong>of</strong> thedoor locking bar is around the locking bolt pin. Securewith screw.12 Fit the lock handle to each right hand door. Ensure thatthe lock handle is in the correct position beforeinserting the lock barrel. Looking into the handle, theflat side <strong>of</strong> the square recess should be towards thebottom <strong>of</strong> the door.13 Clip on the bottom plinth and top scribe panel.6.12 Working wallWorking wall is a concept in which the partition or screencombines with furniture to provide additional storage thatcan improve acoustics and <strong>of</strong>fer relocatable opportunities.The integral panels can be factory finished in a widerange <strong>of</strong> furniture matching finishes including veneer,laminate, MFC, fabric, dry-wipe, glass or vinyl.Accessories to the systems include paper trays, coatand picture hooks, overhead storage cupboards, shelvesand monitor arms. There are two distinct system typeswhich would utilise some <strong>of</strong> the same components fromthe manufacturer, who may have a tie up with one ormore furniture manufacturers.6.12.1 Wall to wallThis system is a cladding solution, designed to be fitted toan existing drywall, proprietary partition or solid wall. Thesolution can be manufactured to any size and can beinstalled either from desk height (circa 800mm), or fromfloor to ceiling (see figure 32).If the installation is in conjunction with a newlyconstructed back wall, then consideration should be given toFigure 3234