- Page 2 and 3:
This page intentionally left blank.
- Page 4 and 5:
CopyrightDrake Software User’s Ma
- Page 6 and 7:
Table of ContentsDrake Software Use
- Page 8 and 9:
Table of ContentsDrake Software Use
- Page 10 and 11:
What’s New in Drake for 2008Drake
- Page 12 and 13:
What’s New in Drake for 2008Drake
- Page 14 and 15:
Contacting Drake SupportDrake Softw
- Page 16 and 17:
InstallationDrake Software User’s
- Page 18 and 19:
Running Drake on a NetworkDrake Sof
- Page 20 and 21:
Running Drake on a NetworkDrake Sof
- Page 22 and 23:
Software SetupDrake Software User
- Page 24 and 25:
Software SetupDrake Software User
- Page 26 and 27:
Software SetupDrake Software User
- Page 28 and 29:
Software SetupDrake Software User
- Page 30 and 31:
Software SetupDrake Software User
- Page 32 and 33:
Software SetupDrake Software User
- Page 34 and 35:
Software SetupDrake Software User
- Page 36 and 37:
Software SetupDrake Software User
- Page 38 and 39:
Software SetupDrake Software User
- Page 40 and 41:
Software SetupDrake Software User
- Page 42 and 43:
Software SetupDrake Software User
- Page 44 and 45:
Software SetupDrake Software User
- Page 46 and 47:
Software SetupDrake Software User
- Page 48 and 49:
Software SetupDrake Software User
- Page 50 and 51:
Software SetupDrake Software User
- Page 52 and 53:
Software SetupDrake Software User
- Page 54 and 55: Making Changes on the FlyDrake Soft
- Page 56 and 57: Making Changes on the FlyDrake Soft
- Page 58 and 59: Making Changes on the FlyDrake Soft
- Page 60 and 61: Making Changes on the FlyDrake Soft
- Page 62 and 63: Logging In and OutDrake Software Us
- Page 64 and 65: Creating and Opening ReturnsDrake S
- Page 66 and 67: Data EntryDrake Software User’s M
- Page 68 and 69: Data EntryDrake Software User’s M
- Page 70 and 71: Data EntryDrake Software User’s M
- Page 72 and 73: Data EntryDrake Software User’s M
- Page 74 and 75: About State ReturnsDrake Software U
- Page 76 and 77: Prior-Year UpdatesDrake Software Us
- Page 78 and 79: Prior-Year UpdatesDrake Software Us
- Page 80 and 81: Organizers and ProformasDrake Softw
- Page 82 and 83: SchedulerDrake Software User’s Ma
- Page 84 and 85: SchedulerDrake Software User’s Ma
- Page 86 and 87: SchedulerDrake Software User’s Ma
- Page 88 and 89: SchedulerDrake Software User’s Ma
- Page 90 and 91: E-filing PreparationDrake Software
- Page 92 and 93: Taxpayer DemographicsDrake Software
- Page 94 and 95: ExemptionsDrake Software User’s M
- Page 96 and 97: Personal Service Income (W-2, 1099-
- Page 98 and 99: Passive and Investment Income (1099
- Page 100 and 101: Passive and Investment Income (1099
- Page 102 and 103: Self-Employment Income (Schedule C)
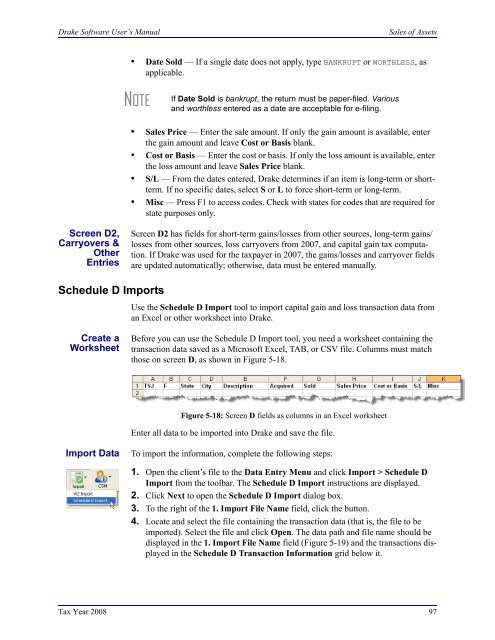
- Page 106 and 107: Sales of AssetsDrake Software User
- Page 108 and 109: Sales of AssetsDrake Software User
- Page 110 and 111: Retirement Income (1099-R, etc.)Dra
- Page 112 and 113: Supplemental IncomeDrake Software U
- Page 114 and 115: Farm IncomeDrake Software User’s
- Page 116 and 117: Social Security and Railroad Benefi
- Page 118 and 119: Educator ExpensesDrake Software Use
- Page 120 and 121: Self-Employment AdjustmentsDrake So
- Page 122 and 123: PenaltiesDrake Software User’s Ma
- Page 124 and 125: Domestic Production Activities Dedu
- Page 126 and 127: Alternative Minimum TaxDrake Softwa
- Page 128 and 129: Elderly/Disabled CreditDrake Softwa
- Page 130 and 131: Retirement Savings Contributions Cr
- Page 132 and 133: Household Employment TaxesDrake Sof
- Page 134 and 135: Estimated TaxesDrake Software User
- Page 136 and 137: Estimated TaxesDrake Software User
- Page 138 and 139: Earned Income Credit (EIC)Drake Sof
- Page 140 and 141: Additional Child Tax Credit and Com
- Page 142 and 143: Recovery Rebate CreditDrake Softwar
- Page 144 and 145: Electronic Funds Withdrawal (Direct
- Page 146 and 147: Third Party DesigneeDrake Software
- Page 148 and 149: DepreciationDrake Software User’s
- Page 150 and 151: DepreciationDrake Software User’s
- Page 152 and 153: DepreciationDrake Software User’s
- Page 154 and 155:
Auto ExpensesDrake Software User’
- Page 156 and 157:
Auto ExpensesDrake Software User’
- Page 158 and 159:
Office in HomeDrake Software User
- Page 160 and 161:
Net Operating LossesDrake Software
- Page 162 and 163:
Special ReturnsDrake Software User
- Page 164 and 165:
Requests, Claims, and Other FormsDr
- Page 166 and 167:
Requests, Claims, and Other FormsDr
- Page 168 and 169:
Special Features in Data EntryDrake
- Page 170 and 171:
Special Features in Data EntryDrake
- Page 172 and 173:
Special Features in Data EntryDrake
- Page 174 and 175:
Calculation ResultsDrake Software U
- Page 176 and 177:
Viewing and Printing a ReturnDrake
- Page 178 and 179:
Viewing and Printing a ReturnDrake
- Page 180 and 181:
Viewing and Printing a ReturnDrake
- Page 182 and 183:
Setting Up View/Print OptionsDrake
- Page 184 and 185:
Archive ManagerDrake Software User
- Page 186 and 187:
Archive ManagerDrake Software User
- Page 188 and 189:
Preparing to E-FileDrake Software U
- Page 190 and 191:
E-filing a ReturnDrake Software Use
- Page 192 and 193:
E-filing a ReturnDrake Software Use
- Page 194 and 195:
E-filing a ReturnDrake Software Use
- Page 196 and 197:
EF Override Options in Data EntryDr
- Page 198 and 199:
EF Override Options in Data EntryDr
- Page 200 and 201:
EF DatabaseDrake Software User’s
- Page 202 and 203:
Online EF DatabaseDrake Software Us
- Page 204 and 205:
Online EF DatabaseDrake Software Us
- Page 206 and 207:
Online EF DatabaseDrake Software Us
- Page 208 and 209:
About State FilingDrake Software Us
- Page 210 and 211:
About Bank ProductsDrake Software U
- Page 212 and 213:
About Bank ProductsDrake Software U
- Page 214 and 215:
About Bank ProductsDrake Software U
- Page 216 and 217:
Preparing to Offer Bank ProductsDra
- Page 218 and 219:
Bank Product TransmissionDrake Soft
- Page 220 and 221:
Processing the Loan CheckDrake Soft
- Page 222 and 223:
Troubleshooting Check PrintingDrake
- Page 224 and 225:
Cancellations, Tracking, & Post-Sea
- Page 226 and 227:
About Client StatusesDrake Software
- Page 228 and 229:
Customizing the DisplayDrake Softwa
- Page 230 and 231:
CSM ReportsDrake Software User’s
- Page 232 and 233:
Admin-only FeaturesDrake Software U
- Page 234 and 235:
Online SupportDrake Software User
- Page 236 and 237:
Online SupportDrake Software User
- Page 238 and 239:
Online SupportDrake Software User
- Page 240 and 241:
Online SupportDrake Software User
- Page 242 and 243:
Software SupportDrake Software User
- Page 244 and 245:
Interactive SupportDrake Software U
- Page 246 and 247:
Interactive SupportDrake Software U
- Page 248 and 249:
Interactive SupportDrake Software U
- Page 250 and 251:
Fax Cover Letter for SupportDrake S
- Page 252 and 253:
Install UpdatesDrake Software User
- Page 254 and 255:
Download FontsDrake Software User
- Page 256 and 257:
File MaintenanceDrake Software User
- Page 258 and 259:
File MaintenanceDrake Software User
- Page 260 and 261:
File MaintenanceDrake Software User
- Page 262 and 263:
File MaintenanceDrake Software User
- Page 264 and 265:
File MaintenanceDrake Software User
- Page 266 and 267:
LettersDrake Software User’s Manu
- Page 268 and 269:
AmortizationDrake Software User’s
- Page 270 and 271:
Install State ProgramsDrake Softwar
- Page 272 and 273:
Quick EstimatorDrake Software User
- Page 274 and 275:
Report ManagerDrake Software User
- Page 276 and 277:
Setting Up a ReportDrake Software U
- Page 278 and 279:
Setting Up a ReportDrake Software U
- Page 280 and 281:
Filter ManagerDrake Software User
- Page 282 and 283:
Filter ManagerDrake Software User
- Page 284 and 285:
Report ViewerDrake Software User’
- Page 286 and 287:
Fixed Asset ManagerDrake Software U
- Page 288 and 289:
Hash TotalsDrake Software User’s
- Page 290 and 291:
Document ManagerDrake Software User
- Page 292 and 293:
Document ManagerDrake Software User
- Page 294 and 295:
Document ManagerDrake Software User
- Page 296 and 297:
Document ManagerDrake Software User
- Page 298 and 299:
Document ManagerDrake Software User
- Page 300 and 301:
Tax PlannerDrake Software User’s
- Page 302 and 303:
Tax PlannerDrake Software User’s
- Page 304 and 305:
Tax PlannerDrake Software User’s
- Page 306 and 307:
Client Write-UpDrake Software User
- Page 308 and 309:
Trial Balance ImportDrake Software
- Page 310 and 311:
Trial Balance ImportDrake Software
- Page 312 and 313:
Trial Balance ImportDrake Software
- Page 314 and 315:
Trial Balance ImportDrake Software
- Page 316 and 317:
Trial Balance ImportDrake Software
- Page 318 and 319:
Binary AttachmentsDrake Software Us
- Page 320 and 321:
Binary AttachmentsDrake Software Us
- Page 322 and 323:
Appendix A: Preseason ChecklistDrak
- Page 324 and 325:
Appendix A: Preseason ChecklistDrak
- Page 326 and 327:
PROCESS: E-FILING FEDERAL RETURNSCo
- Page 328 and 329:
Appendix C: KeywordsDrake Software
- Page 330 and 331:
Appendix C: KeywordsDrake Software
- Page 332 and 333:
Appendix C: KeywordsDrake Software
- Page 334 and 335:
Appendix D: Acronyms & Abbreviation
- Page 336 and 337:
Appendix D: Acronyms & Abbreviation
- Page 338 and 339:
Appendix E: State E-filing Mandates
- Page 340 and 341:
Appendix E: State E-filing Mandates
- Page 342 and 343:
Appendix E: State E-filing Mandates
- Page 344 and 345:
Prepare to use TrialBalance ImportC
- Page 346 and 347:
Index2008 Drake Softwarebank name d
- Page 348 and 349:
Index2008 Drake Softwarechanging 18
- Page 350 and 351:
Index2008 Drake Softwareestimating
- Page 352 and 353:
Index2008 Drake SoftwareForm 8867 (
- Page 354 and 355:
Index2008 Drake Softwareand moving
- Page 356 and 357:
Index2008 Drake SoftwareReal-Time L
- Page 358 and 359:
Index2008 Drake SoftwareSSN, see So


