EZ-Guide Plus Lightbar Guidance System Getting Started Guide
EZ-Guide Plus Lightbar Guidance System Getting Started Guide
EZ-Guide Plus Lightbar Guidance System Getting Started Guide
- No tags were found...

Create successful ePaper yourself
Turn your PDF publications into a flip-book with our unique Google optimized e-Paper software.
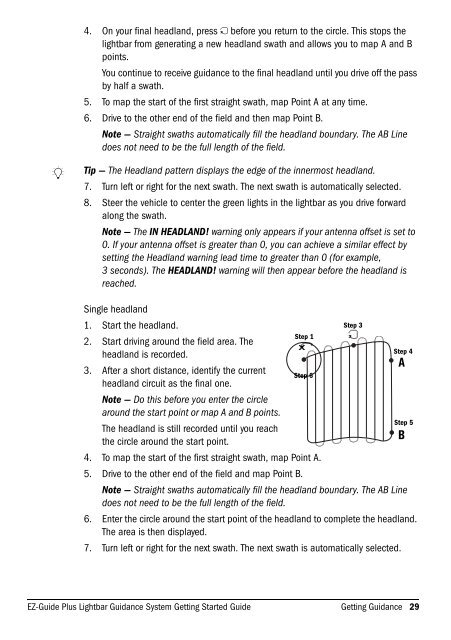
B4. On your final headland, press D before you return to the circle. This stops thelightbar from generating a new headland swath and allows you to map A and Bpoints.You continue to receive guidance to the final headland until you drive off the passby half a swath.5. To map the start of the first straight swath, map Point A at any time.6. Drive to the other end of the field and then map Point B.Note — Straight swaths automatically fill the headland boundary. The AB Linedoes not need to be the full length of the field.Tip — The Headland pattern displays the edge of the innermost headland.7. Turn left or right for the next swath. The next swath is automatically selected.8. Steer the vehicle to center the green lights in the lightbar as you drive forwardalong the swath.Note — The IN HEADLAND! warning only appears if your antenna offset is set to0. If your antenna offset is greater than 0, you can achieve a similar effect bysetting the Headland warning lead time to greater than 0 (for example,3 seconds). The HEADLAND! warning will then appear before the headland isreached.Single headland1. Start the headland.Step 12. Start driving around the field area. The8headland is recorded.3. After a short distance, identify the currentStep 6headland circuit as the final one.Note — Do this before you enter the circlearound the start point or map A and B points.The headland is still recorded until you reachthe circle around the start point.4. To map the start of the first straight swath, map Point A.5. Drive to the other end of the field and map Point B.Step 3DStep 4Note — Straight swaths automatically fill the headland boundary. The AB Linedoes not need to be the full length of the field.6. Enter the circle around the start point of the headland to complete the headland.The area is then displayed.7. Turn left or right for the next swath. The next swath is automatically selected.AStep 5B<strong>EZ</strong>-<strong>Guide</strong> <strong>Plus</strong> <strong>Lightbar</strong> <strong>Guidance</strong> <strong>System</strong> <strong>Getting</strong> <strong>Started</strong> <strong>Guide</strong> <strong>Getting</strong> <strong>Guidance</strong> 29