Create successful ePaper yourself
Turn your PDF publications into a flip-book with our unique Google optimized e-Paper software.
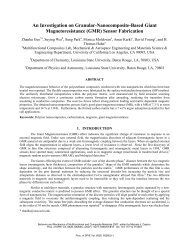
C O M M E R C I A L P R O D U C T S D I V I S I O NDiagram 18Attach the powercord clip.1Cord clipFront panelPower cordIncline lift2CAUTION: To make sure the power cord is not pinched or damaged by theincline lift, attach the power cord to the base frame using the clips provided.15. Attach the power cord clip. Diagram 18, #1. Remove a cord clip from theHardware kit. Wrap it around the power cord near its receptacle and clamp it shut.16. Insert the clip into the base frame. Diagram 18, #2. Insert the serrated portion ofthe cord clip into the hole located under the front panel on the base frame.Diagram 19Install theremainingcord clips.Side railPower cord17. Install the remaining cord clips. Diagram 19. Wrap at least two more cordclips around the power cord and insert the clips into the holes found in theframe beneath the side rail. The holes are spaced a foot apart (approximately31 cm) along the length of the side rail.18. Plug the power cord into a dedicated, grounded circuit. Place the clipsas needed along the length of the power cord while you route it to the poweroutlet.Important: Check the length of the power cord to make sure that it cannotget pinched or damaged by the incline lift movement.CAUTION: The treadmill requires a dedicated, grounded circuit. A 20 ampdedicated circuit is recommended. Make sure that no other product ormachine uses the same circuit as the treadmill. Refer to GroundingInstructions on page 3.page 19