Mali GPU Shader Development Studio User Guide - ARM ...
Mali GPU Shader Development Studio User Guide - ARM ...
Mali GPU Shader Development Studio User Guide - ARM ...
- No tags were found...

You also want an ePaper? Increase the reach of your titles
YUMPU automatically turns print PDFs into web optimized ePapers that Google loves.
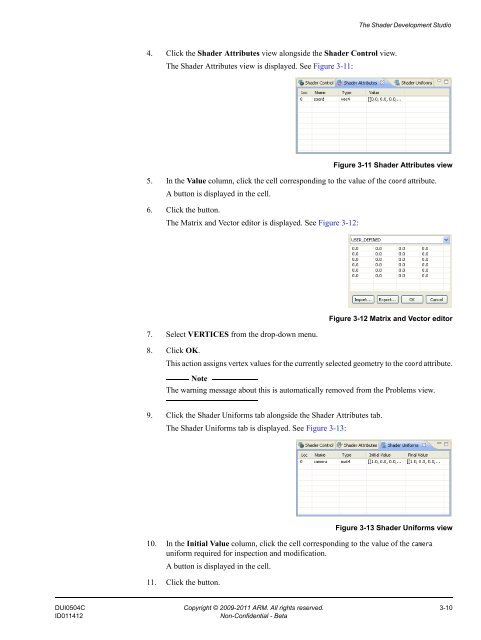
The <strong>Shader</strong> <strong>Development</strong> <strong>Studio</strong>4. Click the <strong>Shader</strong> Attributes view alongside the <strong>Shader</strong> Control view.The <strong>Shader</strong> Attributes view is displayed. See Figure 3-11:Figure 3-11 <strong>Shader</strong> Attributes view5. In the Value column, click the cell corresponding to the value of the coord attribute.A button is displayed in the cell.6. Click the button.The Matrix and Vector editor is displayed. See Figure 3-12:7. Select VERTICES from the drop-down menu.Figure 3-12 Matrix and Vector editor8. Click OK.This action assigns vertex values for the currently selected geometry to the coord attribute.NoteThe warning message about this is automatically removed from the Problems view.9. Click the <strong>Shader</strong> Uniforms tab alongside the <strong>Shader</strong> Attributes tab.The <strong>Shader</strong> Uniforms tab is displayed. See Figure 3-13:Figure 3-13 <strong>Shader</strong> Uniforms view10. In the Initial Value column, click the cell corresponding to the value of the camerauniform required for inspection and modification.A button is displayed in the cell.11. Click the button.DUI0504C Copyright © 2009-2011 <strong>ARM</strong>. All rights reserved. 3-10ID011412Non-Confidential - Beta