LS7 Corvette Mechanical Repair Specs (PDF) - Bakes Online
LS7 Corvette Mechanical Repair Specs (PDF) - Bakes Online
LS7 Corvette Mechanical Repair Specs (PDF) - Bakes Online
- No tags were found...

Create successful ePaper yourself
Turn your PDF publications into a flip-book with our unique Google optimized e-Paper software.
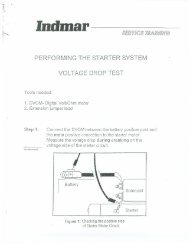
Print Preview Version 8.0 PubTeX output 2006.06.15:1036 File: C:\DOCUME~1\PCOMPO~1.IGS\LOCALS~1\Temp\.aptcache\2006<strong>LS7</strong>/tfa01804.dvi User: PComposer Page: 2562006 Y Car GMX245 <strong>Corvette</strong>7.0L (<strong>LS7</strong>) Engine <strong>Mechanical</strong>18. Oil Pump Screen – Oil TankEngine lubrication is supplied by a gerotor type oil pump assembly. The oil pump assembly consists of 2 pump housings,2 separate gear sets, and 1 pressure relief valve. Refer to Oil Pump Assembly in Disassembled Views . The front or forwardgear set is the secondary pump (15). The rear or rearward gear set is the primary pump (14). The pump assembly ismounted at the front of the engine and driven directly by the crankshaft sprocket. The primary pump (14) gears rotateand draw oil from the engine oil tank (3) through the oil pump screen (18). The oil is pressurized as it passes through theprimary pump and is sent through the engine block lower oil gallery. Contained within the primary pump is a pressure reliefvalve (13) that maintains oil pressure within a specified range. Pressurized oil is directed through the engine block loweroil gallery to the full flow oil filter (10) where harmful contaminants are removed. A bypass valve is incorporated into theoil filter, which permits oil flow in the event the filter becomes restricted. Oil exits the oil filter and is then directed to theexternal oil cooler (1). A bypass valve (9) is incorporated into the oil cooler hose assembly in the event oil flow within thecooler is restricted. Oil returns from the oil cooler and is directed to the upper main oil galleries (6). Oil from the left upperoil gallery is directed to the crankshaft bearings (16) and camshaft bearings (17). Oil that has entered both the upper mainoil galleries also pressurizes the valve lifter assemblies (7), and is then pumped through the pushrods to lubricate the valverocker arms and valve stems. Oil returns to the oil pan (11), where the secondary pump (15) draws oil through a pumpscreen (12). The secondary pump (15) returns oil to the engine oil tank (3). Incorporated within the engine oil tank assemblyare the oil level indicator (4), oil fill cap (5), oil temperature sensor (2), positive crankcase ventilation (PCV) fresh air port,and a serviceable oil pump screen (18). The engine oil pressure sensor (8) is located at the top rear of the engine assembly.Description and Operation1556322Cleanliness and Care• Throughout this section, it should be understood that proper cleaning and protection of machined surfaces andfriction areas is part of the repair procedure. This is considered standard shop practice even if not specifically stated.• When any internal engine parts are serviced, care and cleanliness is important.• When components are removed for service, they should be marked, organized or retained in a specific order forassembly. Refer to Separating Parts .• At the time of installation, components should be installed in the same location and with the same mating surfaceas when removed.• An automobile engine is a combination of many machined, honed, polished and lapped surfaces, with tolerancesthat are measured in millimeters or thousandths of an inch. These surfaces should be covered or protected to avoidcomponent damage.• A liberal coating of clean engine oil should be applied to friction areas during assembly.• Proper lubrication will protect and lubricate friction surfaces during initial operation.Description and Operation1407256Separating PartsImportant:• Many internal engine components will develop specific wear patterns on their friction surfaces.• When disassembling the engine, internal components MUST be separated, marked, or organized in a way toensure installation to their original location and position.Separate, mark, or organize the following components:• Piston and the piston pin• Piston to the specific cylinder bore• Piston rings to the piston• Connecting rod location and orientation to the crankshaft journal• Connecting rod to the bearing capA paint stick or etching/engraving type tool are recommended. Stamping the connecting rod or cap near the bearingbore may affect component geometry.• Crankshaft main and connecting rod bearings• Camshaft and valve lifters• Valve lifters, lifter guides, pushrods and rocker arm assemblies256 of 272