TorqueMaster SD Spring - 9100 9400 9600 - Wayne Dalton
TorqueMaster SD Spring - 9100 9400 9600 - Wayne Dalton
TorqueMaster SD Spring - 9100 9400 9600 - Wayne Dalton
Create successful ePaper yourself
Turn your PDF publications into a flip-book with our unique Google optimized e-Paper software.
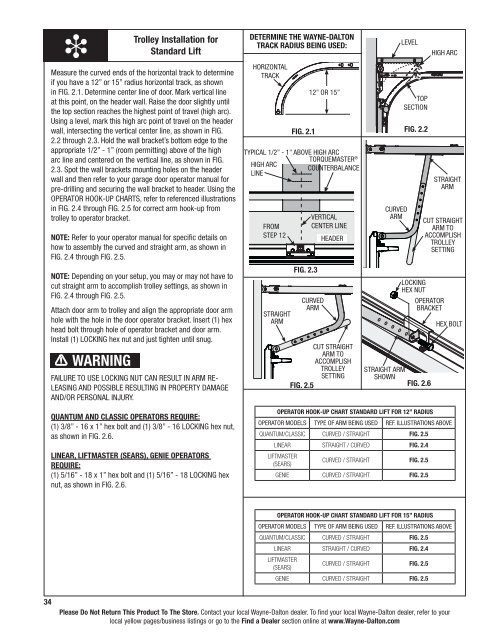
❉Trolley Installation forStandard LiftMeasure the curved ends of the horizontal track to determineif you have a 12” or 15” radius horizontal track, as shownin FIG. 2.1. Determine center line of door. Mark vertical lineat this point, on the header wall. Raise the door slightly untilthe top section reaches the highest point of travel (high arc).Using a level, mark this high arc point of travel on the headerwall, intersecting the vertical center line, as shown in FIG.2.2 through 2.3. Hold the wall bracket’s bottom edge to theappropriate 1/2” - 1” (room permitting) above of the higharc line and centered on the vertical line, as shown in FIG.2.3. Spot the wall brackets mounting holes on the headerwall and then refer to your garage door operator manual forpre-drilling and securing the wall bracket to header. Using theoperator hook-up charts, refer to referenced illustrationsin FIG. 2.4 through FIG. 2.5 for correct arm hook-up fromtrolley to operator bracket.NOTE: Refer to your operator manual for specific details onhow to assembly the curved and straight arm, as shown inFIG. 2.4 through FIG. 2.5.NOTE: Depending on your setup, you may or may not have tocut straight arm to accomplish trolley settings, as shown inFIG. 2.4 through FIG. 2.5.Attach door arm to trolley and align the appropriate door armhole with the hole in the door operator bracket. Insert (1) hexhead bolt through hole of operator bracket and door arm.Install (1) Locking hex nut and just tighten until snug.WARNINGFailure to use locking nut can result in arm releasingand possible resulting in property damageand/or personal injury.Quantum and classic Operators require:(1) 3/8” - 16 x 1” hex bolt and (1) 3/8” - 16 locking hex nut,as shown in FIG. 2.6.Linear, Liftmaster (Sears), Genie Operatorsrequire:(1) 5/16” - 18 x 1” hex bolt and (1) 5/16” - 18 locking hexnut, as shown in FIG. 2.6.Determine the <strong>Wayne</strong>-<strong>Dalton</strong>track radius being used:HorizontaltrackHIGH ARClineFromstep 12StraightarmFIG. 2.112” or 15”Typical 1/2” - 1” above high arcFIG. 2.3Torquemaster ®CounterbalanceVerticalcenter lineCURVEDarmHeaderCut Straightarm toaccomplishtrolleysettingFIG. 2.5CurvedarmStraight armshownLevelTOPSECTIONFIG. 2.2Lockinghex nutOperatorBracketFIG. 2.6HIGH ARCStraightarmCut Straightarm toaccomplishtrolleysettingHex boltOperator hook-up chart Standard lift For 12” radiusOperator models Type of arm Being used Ref. Illustrations aboveQuantum/classic Curved / Straight Fig. 2.5Linear Straight / Curved Fig. 2.4Liftmaster(sears)Curved / Straight Fig. 2.5Genie Curved / Straight Fig. 2.5Operator hook-up chart Standard lift For 15” radiusOperator models Type of arm Being used Ref. Illustrations aboveQuantum/classic Curved / Straight Fig. 2.5Linear Straight / Curved Fig. 2.4Liftmaster(sears)Curved / Straight Fig. 2.5Genie Curved / Straight Fig. 2.534Please Do Not Return This Product To The Store. Contact your local <strong>Wayne</strong>-<strong>Dalton</strong> dealer. To find your local <strong>Wayne</strong>-<strong>Dalton</strong> dealer, refer to yourlocal yellow pages/business listings or go to the Find a Dealer section online at www.<strong>Wayne</strong>-<strong>Dalton</strong>.com


