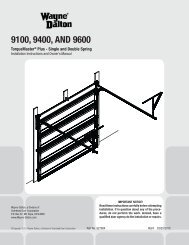
TorqueMaster SD Spring - 9100 9400 9600 - Wayne Dalton
TorqueMaster SD Spring - 9100 9400 9600 - Wayne Dalton
TorqueMaster SD Spring - 9100 9400 9600 - Wayne Dalton

You also want an ePaper? Increase the reach of your titles
YUMPU automatically turns print PDFs into web optimized ePapers that Google loves.
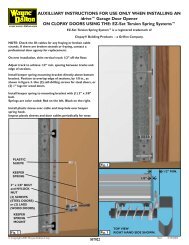
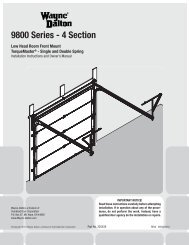
P1Tools Needed:ApprovedWinding Bars3/8” WrenchVice ClampRecommendedtools frompage 5Torsion <strong>Spring</strong> RemovalFor Standard LiftWARNINGFailure to use approvedwinding bars can causespring energy to be releasedsuddenly, resulting in severeor fatal injury.WARNINGCOUNTERBALANCE SPRINGTENSION MUST BE RELIEVEDBEFORE REMOVING ANYHARDWARE. A POWERFULSPRING RELEASING IT’S ENERGYSUDDENLY CAN CAUSE SEVERE ORFATAL INJURY.Do not release the torsion spring tensionunless you are qualified and experienceddoor technician, but have a professionaldoor agency release the tension.Step 1: Close the door and place viceclamps to the back legs on both verticaltracks, above the third roller to preventthe door from lifting as you unwind thesprings. Use only approved winding barsavailable from your dealer. Do not useundersized steel rods, screw drivers oranything else to unwind the springs.Position the ladder just off to the sideof the winding cone. The winding coneshould be easy to reach without puttingyour body directly in front of it.Step 2: Insert a winding bar into oneof the holes in the winding cone. Exertupward pressure. Using caution, loosenthe two (2) set screws in the windingcone. Be prepared to support the fulltorsional force of the spring when the setscrews are loosened.Step 3: Once set screws are loose, slowlyand carefully lower the winding rod until itrests against the door. Insert other windingbar into the upper hole. Push up andremove lower bar. Carefully lower upperwinding bar until it rests against the door.Repeat process until all tension is relieved.If your door is equipped with two (2)torsion springs, follow the same procedureto relieve tension on the second spring.Step 4: Remove vice clamps from tracks,unbolt torsion shaft assembly and removefrom work area.NOTE: Continue with “P4” on page 9 aftercompleting this step.APPROVED WINDING BARWINDING CONESET SCREWSTORSION ASSEMBLYfirmly hold winding bars andcautiously loosen set screws6Please Do Not Return This Product To The Store. Contact your local <strong>Wayne</strong>-<strong>Dalton</strong> dealer. To find your local <strong>Wayne</strong>-<strong>Dalton</strong> dealer, refer to yourlocal yellow pages/business listings or go to the Find a Dealer section online at www.<strong>Wayne</strong>-<strong>Dalton</strong>.com