Operations Manual
Download - BAUER-Pileco
Download - BAUER-Pileco

You also want an ePaper? Increase the reach of your titles
YUMPU automatically turns print PDFs into web optimized ePapers that Google loves.
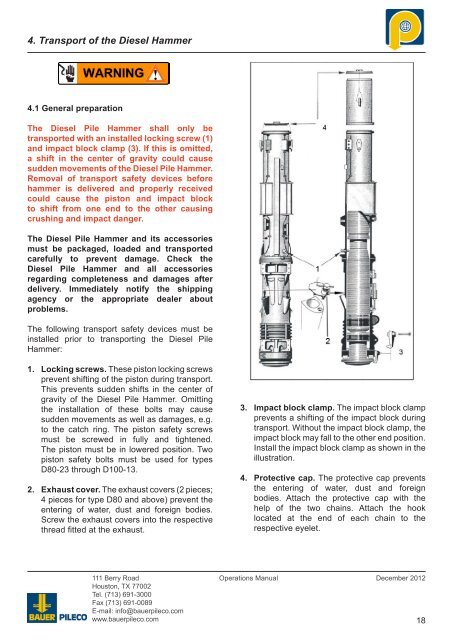
4. Transport of the Diesel Hammer<br />
4.1 General preparation<br />
The Diesel Pile Hammer shall only be<br />
transported with an installed locking screw (1)<br />
and impact block clamp (3). If this is omitted,<br />
a shift in the center of gravity could cause<br />
sudden movements of the Diesel Pile Hammer.<br />
Removal of transport safety devices before<br />
hammer is delivered and properly received<br />
could cause the piston and impact block<br />
to shift from one end to the other causing<br />
crushing and impact danger.<br />
The Diesel Pile Hammer and its accessories<br />
must be packaged, loaded and transported<br />
carefully to prevent damage. Check the<br />
Diesel Pile Hammer and all accessories<br />
regarding completeness and damages after<br />
delivery. Immediately notify the shipping<br />
agency or the appropriate dealer about<br />
problems.<br />
The following transport safety devices must be<br />
installed prior to transporting the Diesel Pile<br />
Hammer:<br />
1. Locking screws. These piston locking screws<br />
prevent shifting of the piston during transport.<br />
This prevents sudden shifts in the center of<br />
gravity of the Diesel Pile Hammer. Omitting<br />
the installation of these bolts may cause<br />
sudden movements as well as damages, e.g.<br />
to the catch ring. The piston safety screws<br />
must be screwed in fully and tightened.<br />
The piston must be in lowered position. Two<br />
piston safety bolts must be used for types<br />
D80-23 through D100-13.<br />
2. Exhaust cover. The exhaust covers (2 pieces;<br />
4 pieces for type D80 and above) prevent the<br />
entering of water, dust and foreign bodies.<br />
Screw the exhaust covers into the respective<br />
thread fitted at the exhaust.<br />
3. Impact block clamp. The impact block clamp<br />
prevents a shifting of the impact block during<br />
transport. Without the impact block clamp, the<br />
impact block may fall to the other end position.<br />
Install the impact block clamp as shown in the<br />
illustration.<br />
4. Protective cap. The protective cap prevents<br />
the entering of water, dust and foreign<br />
bodies. Attach the protective cap with the<br />
help of the two chains. Attach the hook<br />
located at the end of each chain to the<br />
respective eyelet.<br />
111 Berry Road<br />
Houston, TX 77002<br />
Tel. (713) 691-3000<br />
Fax (713) 691-0089<br />
E-mail: info@bauerpileco.com<br />
www.bauerpileco.com<br />
<strong>Operations</strong> <strong>Manual</strong> December 2012<br />
18