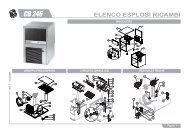
m return - mbm-Service GmbH
m return - mbm-Service GmbH
m return - mbm-Service GmbH

Create successful ePaper yourself
Turn your PDF publications into a flip-book with our unique Google optimized e-Paper software.
GB<br />
4.4. START OF COOKING CYCLE<br />
- Make sure the oven door is closed.<br />
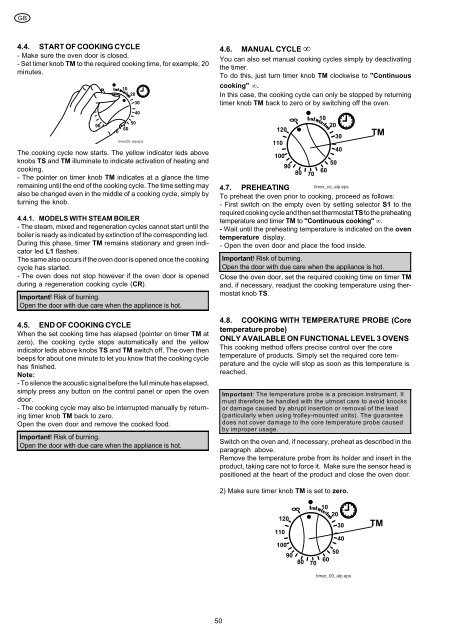
- Set timer knob TM to the required cooking time, for example, 20<br />
minutes.<br />
10<br />
90<br />
80 70<br />
20<br />
30<br />
40<br />
50<br />
60<br />
timer20_alp.eps<br />
The cooking cycle now starts. The yellow indicator leds above<br />
knobs TS and TM illuminate to indicate activation of heating and<br />
cooking.<br />
- The pointer on timer knob TM indicates at a glance the time<br />
remaining until the end of the cooking cycle. The time setting may<br />
also be changed even in the middle of a cooking cycle, simply by<br />
turning the knob.<br />
4.4.1. MODELS WITH STEAM BOILER<br />
- The steam, mixed and regeneration cycles cannot start until the<br />
boiler is ready as indicated by extinction of the corresponding led.<br />
During this phase, timer TM remains stationary and green indicator<br />
led L1 flashes.<br />
The same also occurs if the oven door is opened once the cooking<br />
cycle has started.<br />
- The oven does not stop however if the oven door is opened<br />
during a regeneration cooking cycle (CR).<br />
Important! Risk of burning.<br />
Open the door with due care when the appliance is hot.<br />
4.5. END OF COOKING CYCLE<br />
When the set cooking time has elapsed (pointer on timer TM at<br />
zero), the cooking cycle stops automatically and the yellow<br />
indicator leds above knobs TS and TM switch off. The oven then<br />
beeps for about one minute to let you know that the cooking cycle<br />
has finished.<br />
Note:<br />
- To silence the acoustic signal before the full minute has elapsed,<br />
simply press any button on the control panel or open the oven<br />
door.<br />
- The cooking cycle may also be interrupted manually by <strong>return</strong>ing<br />
timer knob TM back to zero.<br />
Open the oven door and remove the cooked food.<br />
Important! Risk of burning.<br />
Open the door with due care when the appliance is hot.<br />
4.6. MANUAL CYCLE �<br />
You can also set manual cooking cycles simply by deactivating<br />
the timer.<br />
To do this, just turn timer knob TM clockwise to "Continuous<br />
cooking" ��<br />
In this case, the cooking cycle can only be stopped by <strong>return</strong>ing<br />
timer knob TM back to zero or by switching off the oven.<br />
50<br />
10<br />
120<br />
110<br />
100<br />
20<br />
30<br />
40<br />
TM<br />
90<br />
80 70<br />
50<br />
60<br />
4.7. PREHEATING<br />
timer_co_alp.eps<br />
To preheat the oven prior to cooking, proceed as follows:<br />
- First switch on the empty oven by setting selector S1 to the<br />
required cooking cycle and then set thermostat TS to the preheating<br />
temperature and timer TM to "Continuous cooking" �.<br />
- Wait until the preheating temperature is indicated on the oven<br />
temperature display.<br />
- Open the oven door and place the food inside.<br />
Important! Risk of burning.<br />
Open the door with due care when the appliance is hot.<br />
Close the oven door, set the required cooking time on timer TM<br />
and, if necessary, readjust the cooking temperature using thermostat<br />
knob TS.<br />
4.8. COOKING WITH TEMPERATURE PROBE (Core<br />
temperature probe)<br />
ONLY AVAILABLE ON FUNCTIONAL LEVEL 3 OVENS<br />
This cooking method offers precise control over the core<br />
temperature of products. Simply set the required core temperature<br />
and the cycle will stop as soon as this temperature is<br />
reached.<br />
Important: The temperature probe is a precision instrument. It<br />
must therefore be handled with the utmost care to avoid knocks<br />
or damage caused by abrupt insertion or removal of the lead<br />
(particularly when using trolley-mounted units). The guarantee<br />
does not cover damage to the core temperature probe caused<br />
by improper usage.<br />
Switch on the oven and, if necessary, preheat as described in the<br />
paragraph above.<br />
Remove the temperature probe from its holder and insert in the<br />
product, taking care not to force it. Make sure the sensor head is<br />
positioned at the heart of the product and close the oven door.<br />
2) Make sure timer knob TM is set to zero.<br />
120<br />
110<br />
100<br />
90<br />
80<br />
70<br />
10<br />
20<br />
30<br />
50<br />
60<br />
40<br />
timer_00_alp.eps<br />
TM