m return - mbm-Service GmbH
m return - mbm-Service GmbH
m return - mbm-Service GmbH

You also want an ePaper? Increase the reach of your titles
YUMPU automatically turns print PDFs into web optimized ePapers that Google loves.
GB<br />
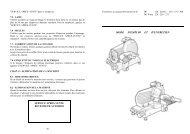
Changing the oven bulb (Fig. "20")<br />
If the oven bulb burns out, replace as follows:<br />
• Disconnect the appliance from the power supply.<br />
• Unscrew the four screws fixing ring nut "A" to the light fixture and<br />
remove glass shield "V" together with seal "G".<br />
• Wrap a clean piece of paper/cloth around halogen bulb "L" to<br />
prevent burning your fingers when removing it and replace with<br />
one with the same characteristics (12V - 20W - 300°C).<br />
• Make sure the safety glass is correctly fitted inside the seal and<br />
remount in the fixture. This done, fix the ring nut using the four<br />
screws, after first lubricating the seal with non-toxic silicon grease.<br />
Replacing the oven door seal (Fig. "21")<br />
N.B.: The oven door seal is prone to normal wear and should be<br />
replaced whenever it starts to harden or crack.<br />
To change the oven door seal proceed as follows:<br />
• Prise the seal off its seat and remove any trace of old silicon.<br />
• Apply silicon sealant to points "1" and "2" along the seal support<br />
frame.<br />
• Fit the new seal by first pushing inside edge "1" over the<br />
corresponding seat edge, taking care to press it round the corners<br />
first.<br />
• Then, using a hook, stretch outside edge "2" of the seal over the<br />
other seat edge.<br />
Condensation collection tray (Fig. "22")<br />
20<br />
21<br />
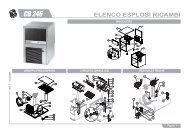
If condensation collection tray “R” fills with water, check the<br />
condition of rubber hose "T" or the fitting connecting it to the drain<br />
pipe. To do this, detach hose "T" from the hose connector and<br />
clean thoroughly.<br />
Condensation collection tray “R” may be extracted from the front<br />
of the appliance simply by detaching drain hose "T" and undoing<br />
stop screw "F" underneath the oven.<br />
Cleaning and checking the drain system<br />
Periodically clean the drain pipe and check for obstructions<br />
which may prevent the water from draining.<br />
Cleaning the inner glass panes of the oven door (Fig. "23")<br />
Only clean the inner glass panes when the glass is cold and never<br />
use abrasive cloths or detergents.<br />
To access the internal door cavity, open the internal glass pane<br />
hinged to the door.<br />
• To do this, open the oven door and rotate upper and lower stops<br />
"F" through 180°. For this purpose, insert the rounded end of a<br />
table knife in the stop slots. This done, open the internal glass<br />
pane.<br />
A special latch is mounted on the bottom hinge to limit the<br />
opening radius of the internal glass pane.<br />
After cleaning, close the internal glass pane so that it is flush<br />
against the rubber buffers and rotate the stops back through 180°.<br />
62<br />
22<br />
23