m return - mbm-Service GmbH
m return - mbm-Service GmbH
m return - mbm-Service GmbH
Create successful ePaper yourself
Turn your PDF publications into a flip-book with our unique Google optimized e-Paper software.
GB<br />
7. ALL MODELS<br />
7.1. ALARM AND DIAGNOSTICS MESSAGES<br />
Any malfunctions or faults detected by the oven are displayed as<br />
error codes on the various displays.<br />
• The different error codes and their corresponding faults are<br />
listed below.<br />
EPt1 - Oven chamber sensor disconnected or shorted.<br />
EPt2 - Steam boiler sensor disconnected or shorted.<br />
EPt3 - Temperature probe sensor disconnected or shorted.<br />
EPt4 - Bypass sensor disconnected or shorted.<br />
EPt8 - Electronic programmer temperature sensor damaged.<br />
ESCH - Control circuit cooling devices faulty.<br />
Etub - Steam boiler temperature thermostat tripped (150°C).<br />
Etuc - Oven chamber temperature thermostat tripped (320°C).<br />
EFLP - Motorised oven steam vent valve faulty. (Functional level<br />
C6 only)<br />
IMPORTANT!<br />
If an error code is displayed during a cooking cycle, the oven<br />
emits a continuous acoustic warning signal and the cooking<br />
cycle is interrupted.<br />
Thereafter, the oven may only be used if the cooking cycle<br />
selected does not use the damaged component which caused<br />
the alarm to trip in the first place.<br />
Notify your Technical <strong>Service</strong> Centre of the alarm code displayed.<br />
7.2. TURNING OFF IN THE EVENT OF A FAULT<br />
If the appliance malfunctions, switch off the appliance as follows:<br />
• Disconnect the mains cutout switch upstream of the appliance<br />
and close the water and gas cocks.<br />
• Contact a technical service centre with personnel trained and<br />
authorised by the manufacturer.<br />
7.3. CARE AND MAINTENANCE<br />
• At the end of each day clean the oven interior with an oven<br />
cleaner, following the product supplier's directions.<br />
• Do not wash the appliance with water jets.<br />
• Do not use products containing chlorine (bleach, hydrochloric<br />
acid etc.) even diluted, to clean steel surfaces.<br />
• Do not use corrosive substances (i.e. muriatic acid) to clean the<br />
floor under the appliance.<br />
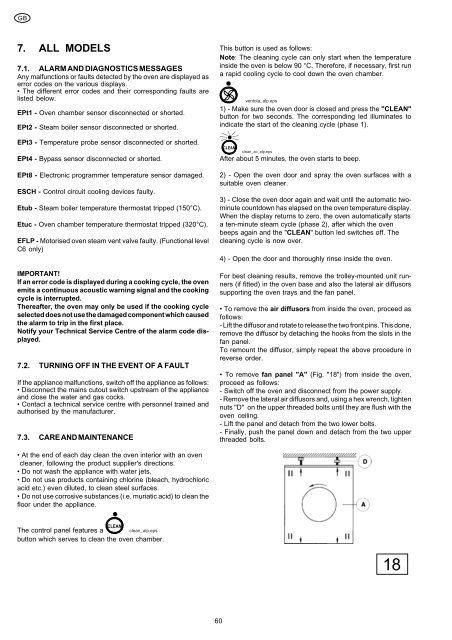
The control panel features a CLEAN<br />
clean_alp.eps<br />
button which serves to clean the oven chamber.<br />
This button is used as follows:<br />
Note: The cleaning cycle can only start when the temperature<br />
inside the oven is below 90 °C. Therefore, if necessary, first run<br />
a rapid cooling cycle to cool down the oven chamber.<br />
ventola_alp.eps<br />
1) - Make sure the oven door is closed and press the "CLEAN"<br />
button for two seconds. The corresponding led illuminates to<br />
indicate the start of the cleaning cycle (phase 1).<br />
60<br />
CLEAN<br />
clean_ac_alp.eps<br />
After about 5 minutes, the oven starts to beep.<br />
2) - Open the oven door and spray the oven surfaces with a<br />
suitable oven cleaner.<br />
3) - Close the oven door again and wait until the automatic twominute<br />
countdown has elapsed on the oven temperature display.<br />
When the display <strong>return</strong>s to zero, the oven automatically starts<br />
a ten-minute steam cycle (phase 2), after which the oven<br />
beeps again and the "CLEAN" button led switches off. The<br />
cleaning cycle is now over.<br />
4) - Open the door and thoroughly rinse inside the oven.<br />
For best cleaning results, remove the trolley-mounted unit runners<br />
(if fitted) in the oven base and also the lateral air diffusors<br />
supporting the oven trays and the fan panel.<br />
• To remove the air diffusors from inside the oven, proceed as<br />
follows:<br />
- Lift the diffusor and rotate to release the two front pins. This done,<br />
remove the diffusor by detaching the hooks from the slots in the<br />
fan panel.<br />
To remount the diffusor, simply repeat the above procedure in<br />
reverse order.<br />
• To remove fan panel "A" (Fig. "18") from inside the oven,<br />
proceed as follows:<br />
- Switch off the oven and disconnect from the power supply.<br />
- Remove the lateral air diffusors and, using a hex wrench, tighten<br />
nuts "D" on the upper threaded bolts until they are flush with the<br />
oven ceiling.<br />
- Lift the panel and detach from the two lower bolts.<br />
- Finally, push the panel down and detach from the two upper<br />
threaded bolts.<br />
18


