m return - mbm-Service GmbH
m return - mbm-Service GmbH
m return - mbm-Service GmbH

Create successful ePaper yourself
Turn your PDF publications into a flip-book with our unique Google optimized e-Paper software.
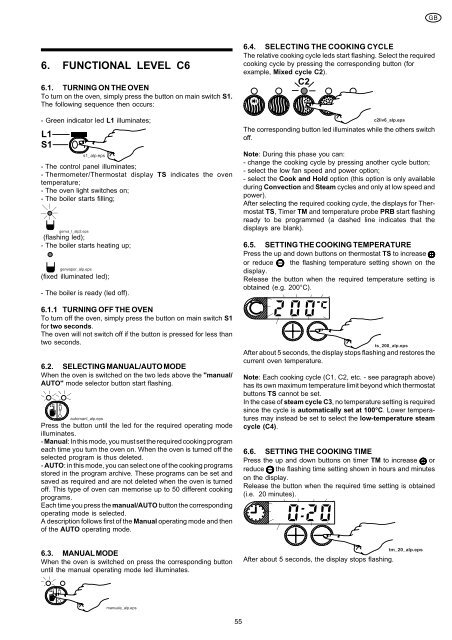
6. FUNCTIONAL LEVEL C6<br />
6.1. TURNING ON THE OVEN<br />
To turn on the oven, simply press the button on main switch S1.<br />
The following sequence then occurs:<br />
- Green indicator led L1 illuminates;<br />
L1<br />
S1<br />
s1_alp.eps<br />
- The control panel illuminates;<br />
- Thermometer/Thermostat display TS indicates the oven<br />
temperature;<br />
- The oven light switches on;<br />
- The boiler starts filling;<br />
genva_l_alp2.eps<br />
(flashing led);<br />
- The boiler starts heating up;<br />
genvapor_alp.eps<br />
(fixed illuminated led);<br />
- The boiler is ready (led off).<br />
6.1.1 TURNING OFF THE OVEN<br />
To turn off the oven, simply press the button on main switch S1<br />
for two seconds.<br />
The oven will not switch off if the button is pressed for less than<br />
two seconds.<br />
6.2. SELECTING MANUAL/AUTO MODE<br />
When the oven is switched on the two leds above the "manual/<br />
AUTO" mode selector button start flashing.<br />
A<br />
U<br />
T<br />
O<br />
automanl_alp.eps<br />
Press the button until the led for the required operating mode<br />
illuminates.<br />
- Manual: In this mode, you must set the required cooking program<br />
each time you turn the oven on. When the oven is turned off the<br />
selected program is thus deleted.<br />
- AUTO: in this mode, you can select one of the cooking programs<br />
stored in the program archive. These programs can be set and<br />
saved as required and are not deleted when the oven is turned<br />
off. This type of oven can memorise up to 50 different cooking<br />
programs.<br />
Each time you press the manual/AUTO button the corresponding<br />
operating mode is selected.<br />
A description follows first of the Manual operating mode and then<br />
of the AUTO operating mode.<br />
6.3. MANUAL MODE<br />
When the oven is switched on press the corresponding button<br />
until the manual operating mode led illuminates.<br />
A<br />
U<br />
T<br />
O<br />
manuale_alp.eps<br />
55<br />
6.4. SELECTING THE COOKING CYCLE<br />
The relative cooking cycle leds start flashing. Select the required<br />
cooking cycle by pressing the corresponding button (for<br />
example, Mixed cycle C2).<br />
C2<br />
PAUSE<br />
c2liv6_alp.eps<br />
The corresponding button led illuminates while the others switch<br />
off.<br />
Note: During this phase you can:<br />
- change the cooking cycle by pressing another cycle button;<br />
- select the low fan speed and power option;<br />
- select the Cook and Hold option (this option is only available<br />
during Convection and Steam cycles and only at low speed and<br />
power).<br />
After selecting the required cooking cycle, the displays for Thermostat<br />
TS, Timer TM and temperature probe PRB start flashing<br />
ready to be programmed (a dashed line indicates that the<br />
displays are blank).<br />
6.5. SETTING THE COOKING TEMPERATURE<br />
Press the up and down buttons on thermostat TS to increase<br />
or reduce the flashing temperature setting shown on the<br />
display.<br />
Release the button when the required temperature setting is<br />
obtained (e.g. 200°C).<br />
ts_200_alp.eps<br />
After about 5 seconds, the display stops flashing and restores the<br />
current oven temperature.<br />
Note: Each cooking cycle (C1, C2, etc. - see paragraph above)<br />
has its own maximum temperature limit beyond which thermostat<br />
buttons TS cannot be set.<br />
In the case of steam cycle C3, no temperature setting is required<br />
since the cycle is automatically set at 100°C. Lower temperatures<br />
may instead be set to select the low-temperature steam<br />
cycle (C4).<br />
6.6. SETTING THE COOKING TIME<br />
Press the up and down buttons on timer TM to increase or<br />
reduce the flashing time setting shown in hours and minutes<br />
on the display.<br />
Release the button when the required time setting is obtained<br />
(i.e. 20 minutes).<br />
After about 5 seconds, the display stops flashing.<br />
tm_20_alp.eps<br />
GB