

Digital_Camera_World_Issue_192_July_2017

You also want an ePaper? Increase the reach of your titles
YUMPU automatically turns print PDFs into web optimized ePapers that Google loves.
4<br />
EXPERT<br />
TIP<br />
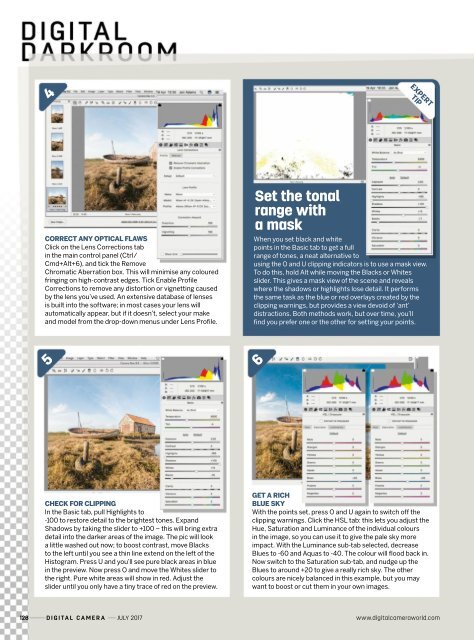
correct Any opticAl flAws<br />
Click on the Lens Corrections tab<br />
in the main control panel (Ctrl/<br />
Cmd+Alt+6), and tick the Remove<br />
Chromatic Aberration box. This will minimise any coloured<br />
fringing on high-contrast edges. Tick Enable Profile<br />
Corrections to remove any distortion or vignetting caused<br />
by the lens you’ve used. An extensive database of lenses<br />
is built into the software; in most cases your lens will<br />
automatically appear, but if it doesn’t, select your make<br />
and model from the drop-down menus under Lens Profile.<br />
Set the tonal<br />
range with<br />
a mask<br />
When you set black and white<br />
points in the Basic tab to get a full<br />
range of tones, a neat alternative to<br />
using the O and U clipping indicators is to use a mask view.<br />
To do this, hold Alt while moving the Blacks or Whites<br />
slider. This gives a mask view of the scene and reveals<br />
where the shadows or highlights lose detail. It performs<br />
the same task as the blue or red overlays created by the<br />
clipping warnings, but provides a view devoid of ‘ant’<br />
distractions. Both methods work, but over time, you’ll<br />
find you prefer one or the other for setting your points.<br />
5<br />
6<br />
check for clipping<br />
In the Basic tab, pull Highlights to<br />
-100 to restore detail to the brightest tones. Expand<br />
Shadows by taking the slider to +100 – this will bring extra<br />
detail into the darker areas of the image. The pic will look<br />
a little washed out now; to boost contrast, move Blacks<br />
to the left until you see a thin line extend on the left of the<br />
Histogram. Press U and you’ll see pure black areas in blue<br />
in the preview. Now press O and move the Whites slider to<br />
the right. Pure white areas will show in red. Adjust the<br />
slider until you only have a tiny trace of red on the preview.<br />
get A rich<br />
blue sky<br />
With the points set, press O and U again to switch off the<br />
clipping warnings. Click the HSL tab: this lets you adjust the<br />
Hue, Saturation and Luminance of the individual colours<br />
in the image, so you can use it to give the pale sky more<br />
impact. With the Luminance sub-tab selected, decrease<br />
Blues to -60 and Aquas to -40. The colour will flood back in.<br />
Now switch to the Saturation sub-tab, and nudge up the<br />
Blues to around +20 to give a really rich sky. The other<br />
colours are nicely balanced in this example, but you may<br />
want to boost or cut them in your own images.<br />
128 <strong>Digital</strong> <strong>Camera</strong> JULY <strong>2017</strong> www.digitalcameraworld.com


