

Digital_Camera_World_Issue_192_July_2017

You also want an ePaper? Increase the reach of your titles
YUMPU automatically turns print PDFs into web optimized ePapers that Google loves.
Photo<br />
ProjeCts<br />
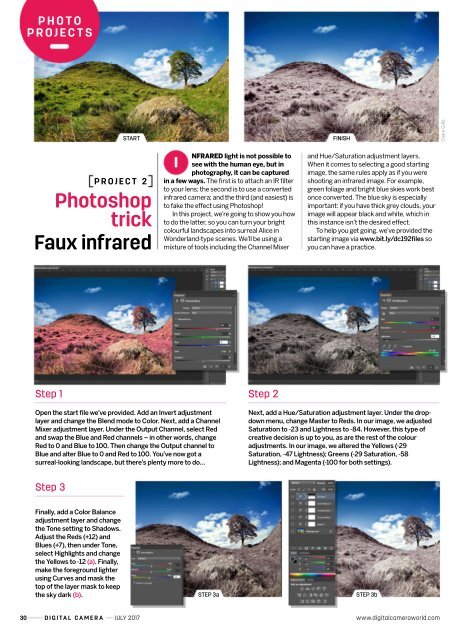
START<br />
FINISH<br />
Claire Gillo<br />
ProjeCt 2<br />
Photoshop<br />
trick<br />
Faux infrared<br />
I<br />
nfrared light is not possible to<br />
see with the human eye, but in<br />
photography, it can be captured<br />
in a few ways. The first is to attach an IR filter<br />
to your lens; the second is to use a converted<br />
infrared camera; and the third (and easiest) is<br />
to fake the effect using Photoshop!<br />
In this project, we’re going to show you how<br />
to do the latter, so you can turn your bright<br />
colourful landscapes into surreal Alice in<br />
Wonderland-type scenes. We’ll be using a<br />
mixture of tools including the Channel Mixer<br />
and Hue/Saturation adjustment layers.<br />
When it comes to selecting a good starting<br />
image, the same rules apply as if you were<br />
shooting an infrared image. For example,<br />
green foliage and bright blue skies work best<br />
once converted. The blue sky is especially<br />
important: if you have thick grey clouds, your<br />
image will appear black and white, which in<br />
this instance isn’t the desired effect.<br />
To help you get going, we’ve provided the<br />
starting image via www.bit.ly/dc<strong>192</strong>files so<br />
you can have a practice.<br />
Step 1<br />
Step 2<br />
Open the start file we’ve provided. Add an Invert adjustment<br />
layer and change the Blend mode to Color. Next, add a Channel<br />
Mixer adjustment layer. Under the Output Channel, select Red<br />
and swap the Blue and Red channels – in other words, change<br />
Red to 0 and Blue to 100. Then change the Output channel to<br />
Blue and alter Blue to 0 and Red to 100. You’ve now got a<br />
surreal-looking landscape, but there’s plenty more to do…<br />
Next, add a Hue/Saturation adjustment layer. Under the dropdown<br />
menu, change Master to Reds. In our image, we adjusted<br />
Saturation to -23 and Lightness to -84. However, this type of<br />
creative decision is up to you, as are the rest of the colour<br />
adjustments. In our image, we altered the Yellows (-29<br />
Saturation, -47 Lightness); Greens (-29 Saturation, -58<br />
Lightness); and Magenta (-100 for both settings).<br />
Step 3<br />
Finally, add a Color Balance<br />
adjustment layer and change<br />
the Tone setting to Shadows.<br />
Adjust the Reds (+12) and<br />
Blues (+7), then under Tone,<br />
select Highlights and change<br />
the Yellows to -12 (a). Finally,<br />
make the foreground lighter<br />
using Curves and mask the<br />
top of the layer mask to keep<br />
the sky dark (b).<br />
STEP 3a<br />
STEP 3b<br />
30 <strong>Digital</strong> <strong>Camera</strong> JULY <strong>2017</strong> www.digitalcameraworld.com


