

Digital_Camera_World_Issue_192_July_2017

You also want an ePaper? Increase the reach of your titles
YUMPU automatically turns print PDFs into web optimized ePapers that Google loves.
Photo<br />
ProjeCts<br />
ProjeCt 5<br />
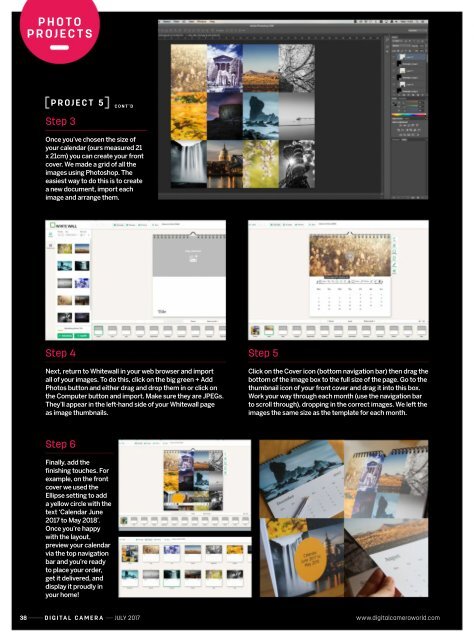
Step 3<br />
CoNt’D<br />
Once you’ve chosen the size of<br />
your calendar (ours measured 21<br />
x 21cm) you can create your front<br />
cover. We made a grid of all the<br />
images using Photoshop. The<br />
easiest way to do this is to create<br />
a new document, import each<br />
image and arrange them.<br />
Step 4<br />
Next, return to Whitewall in your web browser and import<br />
all of your images. To do this, click on the big green + Add<br />
Photos button and either drag and drop them in or click on<br />
the Computer button and import. Make sure they are JPEGs.<br />
They’ll appear in the left-hand side of your Whitewall page<br />
as image thumbnails.<br />
Step 5<br />
Click on the Cover icon (bottom navigation bar) then drag the<br />
bottom of the image box to the full size of the page. Go to the<br />
thumbnail icon of your front cover and drag it into this box.<br />
Work your way through each month (use the navigation bar<br />
to scroll through), dropping in the correct images. We left the<br />
images the same size as the template for each month.<br />
Step 6<br />
Finally, add the<br />
finishing touches. For<br />
example, on the front<br />
cover we used the<br />
Ellipse setting to add<br />
a yellow circle with the<br />
text ‘Calendar June<br />
<strong>2017</strong> to May 2018’.<br />
Once you’re happy<br />
with the layout,<br />
preview your calendar<br />
via the top navigation<br />
bar and you’re ready<br />
to place your order,<br />
get it delivered, and<br />
display it proudly in<br />
your home!<br />
38 <strong>Digital</strong> <strong>Camera</strong> JULY <strong>2017</strong> www.digitalcameraworld.com


