ā Evacuated Solar Energy Collector Technical Reference
ā Evacuated Solar Energy Collector Technical Reference
ā Evacuated Solar Energy Collector Technical Reference

Create successful ePaper yourself
Turn your PDF publications into a flip-book with our unique Google optimized e-Paper software.
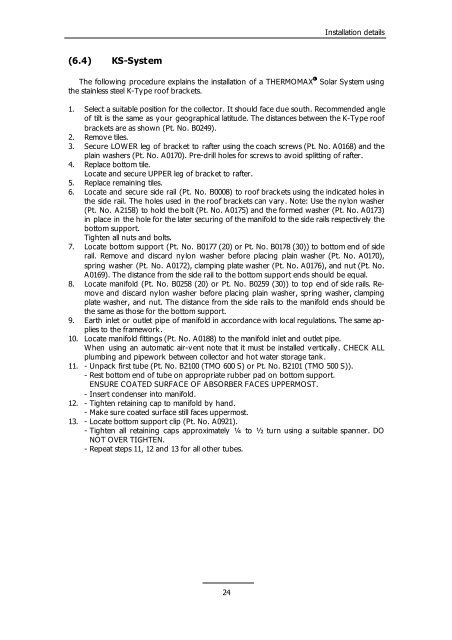
(6.4) KS-System<br />
Installation details<br />
�<br />
The following procedure explains the installation of a THERMOMAX <strong>Solar</strong> System using<br />
the stainless steel K-Ty pe roof brack ets.<br />
1. Select a suitable position for the collector. It should face due south. Recommended angle<br />
of tilt is the same as your geographical latitude. The distances between the K-Type roof<br />
brackets are as shown (Pt. No. B0249).<br />
2. Remove tiles.<br />
3. Secure LOWER leg of bracket to rafter using the coach screws (Pt. No. A0168) and the<br />
plain washers (Pt. No. A0170). Pre-drill holes for screws to avoid splitting of rafter.<br />
4. Replace bottom tile.<br />
Locate and secure UPPER leg of bracket to rafter.<br />
5. Replace remaining tiles.<br />
6. Locate and secure side rail (Pt. No. B0008) to roof brack ets using the indicated holes in<br />
the side rail. The holes used in the roof brackets can vary. Note: Use the nylon washer<br />
(Pt. No. A2158) to hold the bolt (Pt. No. A0175) and the formed washer (Pt. No. A0173)<br />
in place in the hole for the later securing of the manifold to the side rails respectively the<br />
bottom support.<br />
Tighten all nuts and bolts.<br />
7. Locate bottom support (Pt. No. B0177 (20) or Pt. No. B0178 (30)) to bottom end of side<br />
rail. Remove and discard ny lon washer before placing plain washer (Pt. No. A0170),<br />
spring washer (Pt. No. A0172), clamping plate washer (Pt. No. A0176), and nut (Pt. No.<br />
A0169). The distance from the side rail to the bottom support ends should be equal.<br />
8. Locate manifold (Pt. No. B0258 (20) or Pt. No. B0259 (30)) to top end of side rails. Remove<br />
and discard nylon washer before placing plain washer, spring washer, clamping<br />
plate washer, and nut. The distance from the side rails to the manifold ends should be<br />
the same as those for the bottom support.<br />
9. Earth inlet or outlet pipe of manifold in accordance with local regulations. The same applies<br />
to the framework.<br />
10. Locate manifold fittings (Pt. No. A0188) to the manifold inlet and outlet pipe.<br />
When using an automatic air-vent note that it must be installed vertically. CHECK ALL<br />
plumbing and pipework between collector and hot water storage tank.<br />
11. - Unpack first tube (Pt. No. B2100 (TMO 600 S) or Pt. No. B2101 (TMO 500 S)).<br />
- Rest bottom end of tube on appropriate rubber pad on bottom support.<br />
ENSURE COATED SURFACE OF ABSORBER FACES UPPERMOST.<br />
- Insert condenser into manifold.<br />
12. - Tighten retaining cap to manifold by hand.<br />
- Make sure coated surface still faces uppermost.<br />
13. - Locate bottom support clip (Pt. No. A0921).<br />
- Tighten all retaining caps approximately ¼ to ½ turn using a suitable spanner. DO<br />
NOT OVER TIGHTEN.<br />
- Repeat steps 11, 12 and 13 for all other tubes.<br />
24