You also want an ePaper? Increase the reach of your titles
YUMPU automatically turns print PDFs into web optimized ePapers that Google loves.
2.Disassembly<br />
Disassembly<br />
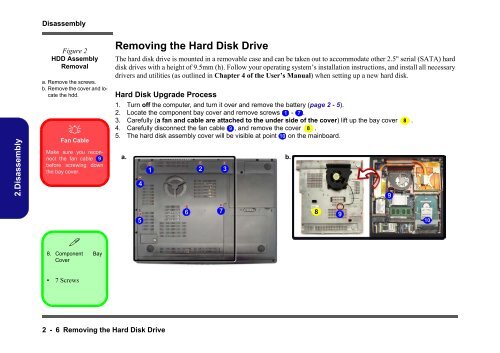
Figure 2<br />
HDD Assembly<br />
Removal<br />
a. Remove the screws.<br />
b. Remove the cover and locate<br />
the hdd.<br />
�<br />
Fan Cable<br />
Make sure you reconnect<br />
the fan cable 9<br />
before screwing down<br />
the bay cover.<br />
�<br />
8. Component Bay<br />
Cover<br />
• 7 Screws<br />
2 - 6 Removing the Hard Disk Drive<br />
Removing the Hard Disk Drive<br />
The hard disk drive is mounted in a removable case and can be taken out to accommodate other 2.5" serial (SATA) hard<br />
disk drives with a height of 9.5mm (h). Follow your operating system’s installation instructions, and install all necessary<br />
drivers and utilities (as outlined in Chapter 4 of the User’s Manual) when setting up a new hard disk.<br />
Hard Disk Upgrade Process<br />
1. Turn off the computer, and turn it over and remove the battery (page 2 - 5).<br />
2. Locate the component bay cover and remove screws 1 - 7 .<br />
3. Carefully (a fan and cable are attached to the under s<strong>id</strong>e of the cover) lift up the bay cover 8 .<br />
4. Carefully disconnect the fan cable 9 , and remove the cover 8 .<br />
5. The hard disk assembly cover will be visible at point 10 on the mainboard.<br />
a. b.<br />
4<br />
5<br />
1<br />
6<br />
2<br />
7<br />
3<br />
8<br />
9<br />
9<br />
10


