


You also want an ePaper? Increase the reach of your titles
YUMPU automatically turns print PDFs into web optimized ePapers that Google loves.
2.Disassembly<br />
Disassembly<br />
Figure 14<br />
Keyboard Removal<br />
a. Press the four latches to<br />
release the keyboard.<br />
b. Lift the keyboard up and<br />
disconnect the cable<br />
from the locking collar.<br />
c. Remove the keyboard.<br />
�<br />
Re-Inserting the<br />
Keyboard<br />
When re-inserting the<br />
keyboard firstly align the<br />
five keyboard tabs at the<br />
bottom (Figure 14d) at<br />
the bottom of the keyboard<br />
with the slots in the<br />
case.<br />
�<br />
7. Keyboard<br />
2 - 18 Removing the Keyboard<br />
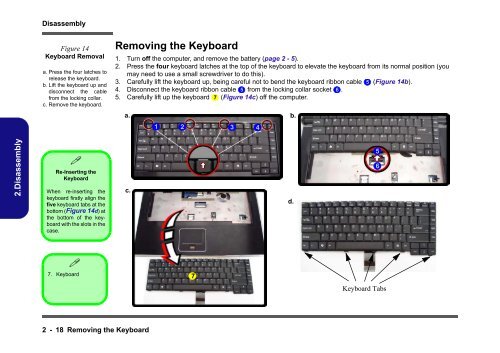
Removing the Keyboard<br />
1. Turn off the computer, and remove the battery (page 2 - 5).<br />
2. Press the four keyboard latches at the top of the keyboard to elevate the keyboard from its normal position (you<br />
may need to use a small screwdriver to do this).<br />
3. Carefully lift the keyboard up, being careful not to bend the keyboard ribbon cable 5 (Figure 14b).<br />
4. Disconnect the keyboard ribbon cable 5 from the locking collar socket 6 .<br />
5. Carefully lift up the keyboard 7 (Figure 14c) off the computer.<br />
a. b.<br />
c.<br />
1 2 3 4<br />
7<br />
d.<br />
5<br />
6<br />
Keyboard Tabs


