


You also want an ePaper? Increase the reach of your titles
YUMPU automatically turns print PDFs into web optimized ePapers that Google loves.
2.Disassembly<br />
Disassembly<br />
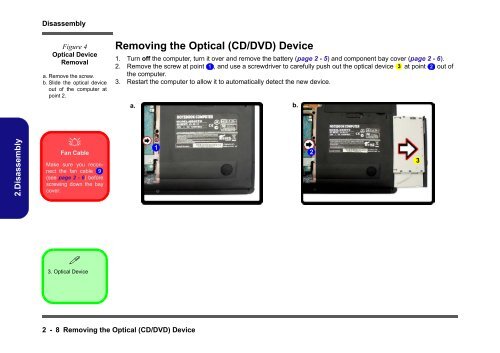
Figure 4<br />
Optical Device<br />
Removal<br />
a. Remove the screw.<br />
b. Sl<strong>id</strong>e the optical device<br />
out of the computer at<br />
point 2.<br />
�<br />
Fan Cable<br />
Make sure you reconnect<br />
the fan cable 9<br />
(see page 2 - 6) before<br />
screwing down the bay<br />
cover.<br />
�<br />
3. Optical Device<br />
Removing the Optical (CD/DVD) Device<br />
1. Turn off the computer, turn it over and remove the battery (page 2 - 5) and component bay cover (page 2 - 6).<br />
2. Remove the screw at point 1 , and use a screwdriver to carefully push out the optical device 3 at point 2 out of<br />
the computer.<br />
3. Restart the computer to allow it to <strong>au</strong>tomatically detect the new device.<br />
2 - 8 Removing the Optical (CD/DVD) Device<br />
a. b.<br />
1<br />
2<br />
3


