Create successful ePaper yourself
Turn your PDF publications into a flip-book with our unique Google optimized e-Paper software.
2.Disassembly<br />
Disassembly<br />
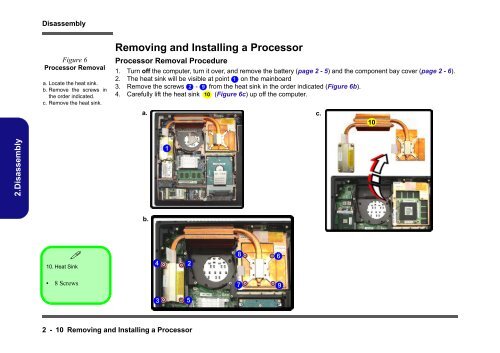
Figure 6<br />
Processor Removal<br />
a. Locate the heat sink.<br />
b. Remove the screws in<br />
the order indicated.<br />
c. Remove the heat sink.<br />
�<br />
10. Heat Sink<br />
• 8 Screws<br />
Removing and Installing a Processor<br />
Processor Removal Procedure<br />
1. Turn off the computer, turn it over, and remove the battery (page 2 - 5) and the component bay cover (page 2 - 6).<br />
2. The heat sink will be visible at point 1 on the mainboard<br />
3. Remove the screws 2 - 9 from the heat sink in the order indicated (Figure 6b).<br />
4. Carefully lift the heat sink 10 (Figure 6c) up off the computer.<br />
2 - 10 Removing and Installing a Processor<br />
a. c.<br />
b.<br />
4<br />
3<br />
1<br />
2<br />
5<br />
8 6<br />
7 9<br />
10


