NOVEMBER/DECEMBER 1983, No. 43, $3.50 Making ... - Wood Tools
NOVEMBER/DECEMBER 1983, No. 43, $3.50 Making ... - Wood Tools
NOVEMBER/DECEMBER 1983, No. 43, $3.50 Making ... - Wood Tools

You also want an ePaper? Increase the reach of your titles
YUMPU automatically turns print PDFs into web optimized ePapers that Google loves.
(continued)<br />
Methods of Work<br />
Y.<br />
out of a straight, flat lx4. <strong>No</strong>w rip another board half the<br />
diameter of your router base (measure from the center of the<br />
bit to the edge of the base) and secure it to the fence with flat<br />
hinges. As shown in the drawing, offset the hinges so that<br />
they won't protrude when the extension board is swung up<br />
out of the way. -James F. Dupler, Jamestown, N.<br />
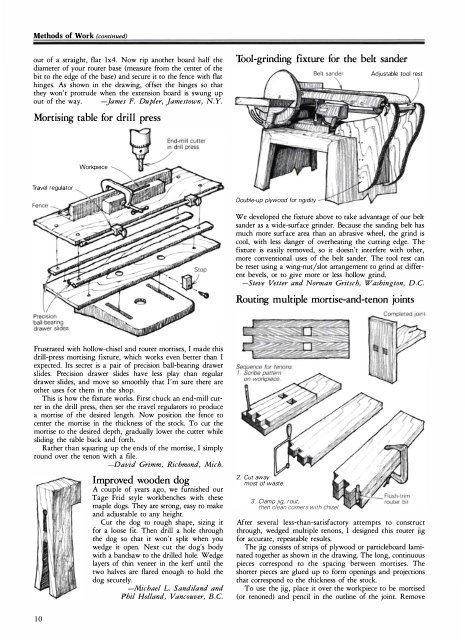
Mortising table for drill press<br />
Travel regulator<br />
Workpiece<br />
Frustrated with hollow-chisel and router mortises, I made this<br />
drill-press mortising fixture, which works even better than I<br />
expected. Its secret is a pair of precision ball-bearing drawer<br />
slides. Precision drawer slides have less play than regular<br />
drawer slides, and move so smoothly that I'm sure there are<br />
other uses for them in the shop.<br />
This is how the fixture works. First chuck an end-mill cutter<br />
in the drill press, then set the travel regulators to produce<br />
a mortise of the desired length. <strong>No</strong>w position the fence to<br />
center the mortise in the thickness of the stock. To cut the<br />
mortise to the desired depth, gradually lower the cutter while<br />
sliding the table back and forth.<br />
Rather than squaring up the ends of the mortise, I simply<br />
round over the tenon with a file.<br />
-David Grimm, Richmond, Mich.<br />
10<br />
Improved wooden dog<br />
A couple of years ago, we furnished our<br />
Tage Frid style workbenches with these<br />
maple dogs. They are strong, easy to make<br />
and adjustable to any height.<br />
Cut the dog to rough shape, sizing it<br />
for a loose fit. Then drill a hole through<br />
the dog so that it won't split when you<br />
wedge it open. Next cut the dog's body<br />
with a bandsaw to the drilled hole. Wedge<br />
layers of thin veneer in the kerf until the<br />
cwo halves are flared enough to hold the<br />
dog securely.<br />
-Michael L. Sandi land and<br />
Phil Holland, Vancouver, B.C.<br />
Tool-grinding fixture for the belt sander<br />
Double-up plywood for rigidity<br />
Adjustable tool rest<br />
We developed the fixture above to take advantage of our belt<br />
sander as a wide-surface grinder. Because the sanding belt has<br />
much more surface area than an abrasive wheel, the grind is<br />
cool, with less danger of overheating the cutting edge. The<br />
fixture is easily removed, so it doesn't interfere with other,<br />
more conventional uses of the belt sander. The tool rest can<br />
be reset using a wing-nut/slot arrangement to grind at different<br />
bevels, or to give more or less hollow grind.<br />
-Steve Vetter and <strong>No</strong>rman Gritsch, Washington, D.C.<br />
Routing multiple mortise-and-tenon joints<br />
2. Cut<br />
3. Clamp<br />
away<br />
most of waste.<br />
jig, rout.<br />
then clean corners with chisel.<br />
After several less-than-satisfactory attempts to construct<br />
through, wedged multiple tenons, I designed this router jig<br />
for accurate, repeatable results.<br />
The jig consists of strips of plywood or particleboard laminated<br />
together as shown in the drawing. The long, continuous<br />
pieces correspond to the spacing between mortises. The<br />
shorter pieces are glued up to form openings and projections<br />
that correspond to the thickness of the stock.<br />
To use the jig, place it over the workpiece to be mortised<br />
(or tenoned) and pencil in the outline of the joint. Remove