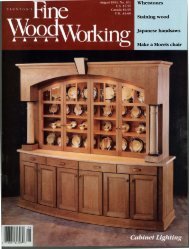
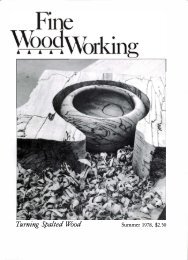
NOVEMBER/DECEMBER 1983, No. 43, $3.50 Making ... - Wood Tools
NOVEMBER/DECEMBER 1983, No. 43, $3.50 Making ... - Wood Tools
NOVEMBER/DECEMBER 1983, No. 43, $3.50 Making ... - Wood Tools

You also want an ePaper? Increase the reach of your titles
YUMPU automatically turns print PDFs into web optimized ePapers that Google loves.
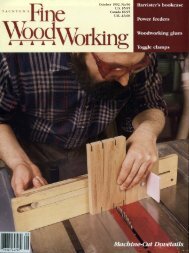
After glue-up, the fiberboard and edge-banding assembly Jhown above will be veneered<br />
tben crOJJcut to yield a cabinet door and drawer front with continuouJ grain. Figure 4,<br />
below, JhoWJ a Jimilar Jetup for a bank of drawerJ.<br />
Fig. 4: Drawer face cores<br />
Fig. 5: Drawers and guides<br />
Carcase side<br />
Moun t drawer guides<br />
in grooves milled<br />
into carcase sides.<br />
58<br />
To ensure grain continuity<br />
in a bank of dra wers,<br />
glue up the fiberboard<br />
core and edge-banding,<br />
then veneer and<br />
crosscut.<br />
Bore holes before veneering,<br />
to mark for cutting later<br />
Fiberboard core<br />
to<br />
Side<br />
Glue grooved<br />
center guide<br />
drawer bottom.<br />
Drawer<br />
bottom<br />
"-_-\--- -\;- -- -<br />
To adjust drawers,<br />
pivot center guide<br />
rail on screw, gluing<br />
it when dra wer<br />
fronts align with<br />
front of case.<br />
me. We usually pick veneers from the<br />
same flitch, and it's fun to flip through<br />
the stack, envisioning how the raw log<br />
was sliced into so many thin sheets. We<br />
organize the veneers to be bookmatched<br />
or slip-matched in sequence for each<br />
door and drawer face. To assure grain<br />
continuity between a drawer face situated<br />
above a door or in a bank of drawer<br />
faces, I glue up a sandwich core (figure<br />
4 and photo at left) which is then<br />
CUt into components after it's veneered.<br />
If I've gOt only a few doors to make,<br />
I veneer them myself on a shop made<br />
press. Otherwise, I job out the work,<br />
sending the matched, taped veneers and<br />
cores to a local architectural millwork<br />
house, preferably one equipped with hot<br />
presses. If you don't want to bother<br />
with veneered or frame-and-panel doors,<br />
fiber-core hardwood plywood edged<br />
with solid wood is a stable alternative.<br />
To hang the doors, refer to the box on<br />
the facing page.<br />
I like the whisper of a well-fitted<br />
wooden drawer sliding on a wooden<br />
track, so I use the drawer scheme shown<br />
in figure 5. The drawers slide on bearing<br />
rails grooved into the sides of the carcase.<br />
A grooved member glued to the<br />
drawer bottom slides on a center guide<br />
rail, making for smooth, accurate travel.<br />
But practically any method for hanging<br />
drawers is okay for kitchen cabinets, including<br />
metal ball-bearing slides, which<br />
are quicker to install than wooden<br />
tracks. Most metal slides require at least<br />
1:; in. of clearance between the inside of<br />
the carcase and each side of the drawer,<br />
so be sure to allow for it.<br />
Honduras mahogany router-dovetailed<br />
together makes strong, attractive drawers,<br />
but poplar, maple and Baltic birch<br />
plywood are excellent, less expensive alternatives.<br />
In fact, I recommend making<br />
drawers deeper than 10 in. Out of plywood-they'll<br />
be less likely to warp.<br />
Once I've hung and fit the drawers to<br />
my satisfaction, I install the drawer<br />
fronts with screws driven in from the inside<br />
of the drawer. Make sure the edges<br />
of the drawer fronts align with each other<br />
and with the doors.<br />
With all the doors and drawers in<br />
place, and before I apply the finish, I<br />
make any final adjustments that require<br />
planing or cutting. I coat the carcases,<br />
doors and drawers with nitrocellulose<br />
vinyl sanding sealer, followed by a fine<br />
sanding two to three hours later. A coat<br />
or two of Flecto Varathane completes<br />
the finish. 0