NOVEMBER/DECEMBER 1983, No. 43, $3.50 Making ... - Wood Tools
NOVEMBER/DECEMBER 1983, No. 43, $3.50 Making ... - Wood Tools
NOVEMBER/DECEMBER 1983, No. 43, $3.50 Making ... - Wood Tools

You also want an ePaper? Increase the reach of your titles
YUMPU automatically turns print PDFs into web optimized ePapers that Google loves.
not only cheaper than its American<br />
counterpart, it's also of more uniform<br />
thickness, thus making for more precise<br />
joinery. Cabinet-grade plywoods may be<br />
hard to find, but I recommend this material,<br />
even if you have to special-order<br />
it through a commercial cabinet shop.<br />
Interply voids in fir structural plywood<br />
make it troublesome to join, and its<br />
wild grain is unattractive, even if painted.<br />
Cabinet-grade plywoods are sold in<br />
dozens of species and several grade<br />
ranges. For kitchens, an A- l or A-2<br />
grade with a lumber, veneer or fiberboard<br />
core is suitable.<br />
Fig. 3: Cabinet dimensions<br />
Nail rail<br />
Height varies to suit<br />
ceiling or soffit.<br />
Support adjustable<br />
shelving with<br />
pins or dowels.<br />
5 �<br />
8acksplash is 4 in. to in.<br />
high, or to bottom of<br />
hanging cabinets.<br />
.... .. "'""---''---''"'-=-=<br />
�--------25--------�16-18<br />
J "1ilI ____ """'" :iiII :(-=· V2 1-1<br />
Shelving<br />
V2-in. hardwood ply<br />
. I 36<br />
..<br />
in ,<br />
or to<br />
suit<br />
user<br />
Carcase joinery-Begin construction by<br />
cutting the plywood, labeling and stacking<br />
each piece as it comes off the saw.<br />
Next, glue on %-in. thick by 17i6-in.<br />
wide edge-banding, which will later be<br />
ripped down to about � in. wide when<br />
the plywood parts are trimmed to final<br />
size. Wall cabinet sides get bands on<br />
their front and bottom edges. So end<br />
grain won't show at the front of the<br />
cabinet, do the bottom edge first, trim a<br />
bit off the width of the panel to flush<br />
up the joint, and then band the front<br />
edge. Once the plywood parts have been<br />
banded, trimmed to size (including the<br />
top frame for base cabinets) and carefully<br />
checked for square, you're ready to<br />
cut joints.<br />
Plywood lends itself to production<br />
machine joinery. I cut most of the joints<br />
on my shaper, but the only essential tools<br />
are a tablesaw, a router and the usual<br />
hand tools. For lumber-core and veneercore<br />
plywood, the offset tongue joint<br />
shown in figure 2, detail B, is strong<br />
and quick. Plate joints (FWW #34,<br />
pp. 95-97) or dowels are better for particleboard<br />
and fiberboard. Knockdown<br />
fasteners are suitable for either material,<br />
if you prefer that method.<br />
Whether you machine the offset<br />
tongue on a tablesaw fitted with a dado<br />
blade or on a router table, plywood that<br />
varies in thickness will cause some joints<br />
to be loose. One remedy is to machine<br />
the tongue slightly oversize and then<br />
hand-plane it to a good fit. A second, as<br />
shown in detail C of figure 2, is to feed<br />
the plywood vertically berween the fence<br />
and the dado head, with the tongue<br />
against the fence. Most X-in, plywood<br />
seems particularly scanry these days, being<br />
only 0.220 in. thick. If you don't<br />
have a 0.220-in. cutter but still want<br />
the backs of your cabinets to fit snugly,<br />
try CUtting the groove in rwo passes with<br />
a Va-in. wide blade in the tablesaw.<br />
Move the fence slightly to widen the<br />
groove for the second pass.<br />
With machining complete, you can<br />
sand the carcase parts before assembly.<br />
Glue-up is straightforward, but check<br />
carefully that everything is square, to<br />
avoid trouble when fitting the doors and<br />
drawers later.<br />
After assembly, clean up the carcases<br />
with a hand plane and/or a finish sander<br />
and ease the edges with sandpaper.<br />
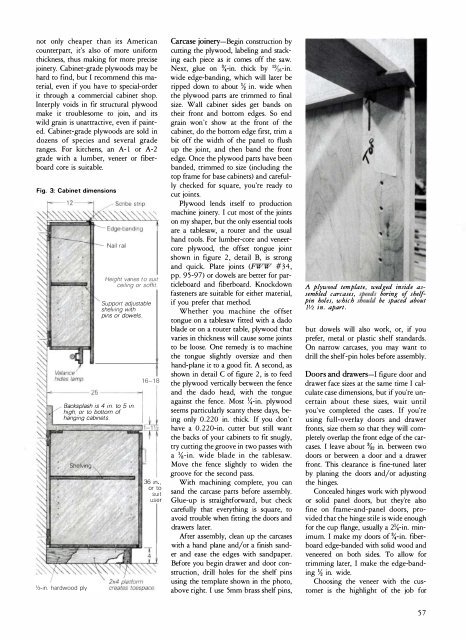
Before you begin drawer and door construction,<br />
drill holes for the shelf pins<br />
using the template shown in the photo,<br />
above right. I use 5mm brass shelf pins,<br />
A plywood template, wedged inside assembled<br />
carcases, speeds boring of shelfpin<br />
holes, which should be spaced about<br />
11/2 in. apart.<br />
but dowels will also work, or, if you<br />
prefer, metal or plastic shelf standards.<br />
On narrow carcases, you may want to<br />
drill the shelf-pin holes before assembly.<br />
Doors and drawers-I figure door and<br />
drawer face sizes at the same time I calculate<br />
case dimensions, but if you're uncertain<br />
about these sizes, wait until<br />
you've completed the cases. If you're<br />
using full-overlay doors and drawer<br />
fronts, size them so that they will completely<br />
overlap the front edge of the carcases.<br />
I leave about %2 in. berween rwo<br />
doors or berween a door and a drawer<br />
front. This clearance is fine-runed later<br />
by planing the doors and/or adjusting<br />
the hinges.<br />
Concealed hinges work with plywood<br />
or solid panel doors, but they're also<br />
fine on frame-and-panel doors, provided<br />
that the hinge stile is wide enough<br />
for the cup flange, usually a 2X-in. minimum.<br />
I make my doors of %-in. fiberboard<br />
edge-banded with solid wood and<br />
veneered on both sides. To allow for<br />
trimming later, I make the edge-banding<br />
� in. wide.<br />
Choosing the veneer with the customer<br />
is the highlight of the job for<br />
57