NOVEMBER/DECEMBER 1983, No. 43, $3.50 Making ... - Wood Tools
NOVEMBER/DECEMBER 1983, No. 43, $3.50 Making ... - Wood Tools
NOVEMBER/DECEMBER 1983, No. 43, $3.50 Making ... - Wood Tools

You also want an ePaper? Increase the reach of your titles
YUMPU automatically turns print PDFs into web optimized ePapers that Google loves.
Q & (continued)<br />
A<br />
very old pieces that come into his shop.<br />
For best results, you must have a snug fit berween the<br />
groove and the inlay, and a good glue bond. A syringe with a<br />
<strong>No</strong>. 19 needle puts the glue neatly in the groove.<br />
Some people recommend using celluloid for string inlay<br />
(available from Constantine's, 2050 Eastchester Rd., Bronx,<br />
N.Y. lO461) because it bends easily around short-radius<br />
curves and isn't affected by stain, but I have never tried it.<br />
Furniture glue will not hold it, and varnish remover dissolves<br />
it into a stringy, tubbery mess.<br />
Japanese chisels-I recently purchased a set of Japanese<br />
chisels. When used with a carvers' mallet, the chisels tend<br />
to chip or become dull fa r too quickly. This is the first set<br />
of expensive chisels I've ever bought, and I wonder if I'm<br />
expecting too much. -Richard D. Stone, Middletown, Ohio<br />
TOSHIO OOATE REPLIES: When new, a well-tempered Japanese<br />
blade is slightly harsh and on the brittle side. Most Japanese<br />
craftsmen prefer a blade that is a little harsh when new because<br />
this shows that it was properly tempered. The very fine<br />
edge becomes extremely hard when the blade is temperedharder<br />
than is easy to work with. This problem occurs more<br />
often with chisels than plane blades because a chisel edge<br />
must withstand the shock from a hammer blow. Thus, no<br />
craftsman will use a new blade, even the most expensive, as a<br />
finishing blade. A new blade, like a wild stallion, must first<br />
go through a breaking-in period called "taming the blade."<br />
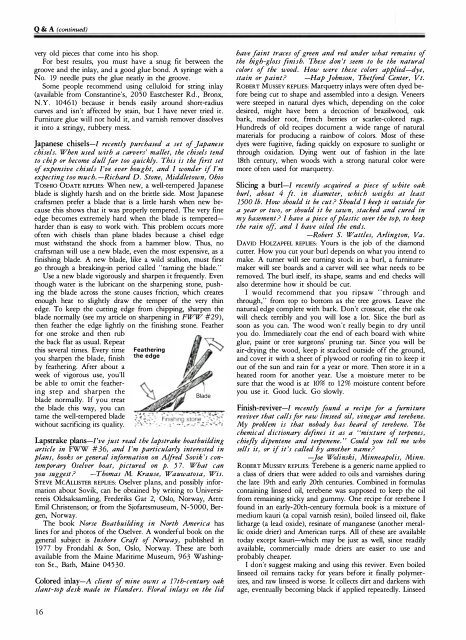
Use a new blade vigorously and sharpen it frequently. Even<br />
though water is the lubricant on the sharpening stOne, pushing<br />
the blade across the stOne causes friction, which creates<br />
enough heat to slightly draw the temper of the very thin<br />
edge. To keep the cutting edge from chipping, sharpen the<br />
blade normally (see my article on sharpening in FWW #29),<br />
then feather the edge lightly on the finishing stOne. Feather<br />
for one stroke and then rub<br />
the back flat as usual. Repeat<br />
this several times. Every time<br />
It�<br />
Feathering<br />
the edge<br />
you sharpen the blade, finish<br />
by feathering. After about a<br />
�.<br />
week of vigorous use, you'll<br />
be able to omit the feathering<br />
step and sharpen the 8fpf<br />
r .<br />
blade normally.<br />
FWW<br />
If you treat<br />
the blade this way, you can<br />
tame the well-tempered blade<br />
without sacrificing its qualiry.<br />
Lapstrake plans-I've just read the lapstrake boatbuilding<br />
article in #36, and I'm particularly interested in<br />
plans, books or general information on Alfred Sovik 's contemporary<br />
Oselver boat, pictured on p. 57. What can<br />
you suggest? -Thomas M. Krause, Wauwatosa, Wis.<br />
STEVE McALLISTER REPLIES: Oselver plans, and possibly information<br />
about Sovik, can be obtained by writing to Universiteteis<br />
Oldsaksamling,<br />
&<br />
Frederiks Gat 2, Oslo, <strong>No</strong>rway, Attn:<br />
Emil Christenson; or from the Sjofartsmuseum, N-5000, Bergen,<br />
<strong>No</strong>rway.<br />
The book <strong>No</strong>rse Boatbuilding in <strong>No</strong>rth America has<br />
lines for and photos of the Oselver. A wonderful book on the<br />
general subject is Inshore Craft of <strong>No</strong>rway, published in<br />
1977 by Frondahl Son, Oslo, <strong>No</strong>rway. These are both<br />
available from the Maine Maritime Museum, 963 WashingtOn<br />
St., Bath, Maine 04530.<br />
'(\ .w: ' Blade<br />
Colored inlay-A client of mine owns a 17th-century oak<br />
slant-top desk made in Flanders. Floral inlays on the lid<br />
16<br />
have fa int traces of green and red under what remains of<br />
the high-gloss finish. These don 't seem to be the natural<br />
colors of the wood. How were these colors applied-dye,<br />
stain or paint? -Hap Johnson, Thetford Center, Vt.<br />
ROBERT MUSSEY REPLIES: Marquetry inlays were often dyed before<br />
being cut to shape and assembled into a design. Veneers<br />
were steeped in natural dyes which, depending on the color<br />
desired, might have been a decoction of brazilwood, oak<br />
bark, madder root, french berries or scarlet-colored rags.<br />
Hundreds of old recipes document a wide range of natural<br />
materials for producing a rainbow of colors. Most of these<br />
dyes were fugitive, fading quickly on exposure to sunlight or<br />
through oxidation. Dying went out of fashion in the late<br />
18th century, when woods with a strong natural color were<br />
more often used for marquetry.<br />
Slicing a burl-I recently acquired a piece of white oak<br />
burl, about 4 ft . in diameter, which weighs at least<br />
1500 lb. How should it be cut? Should I keep it outside for<br />
a year or two, or should it be sawn, stacked and cured in<br />
my basement? I have a piece of plastic over the top, to keep<br />
the rain off, and I have oiled the ends.<br />
-Robert S. Wattles, Arlington, Va .<br />
DAVID HOLZAPFEL REPLIES: Yours is the job of the diamond<br />
cutter. How you cut your burl depends on what you intend to<br />
make. A turner will see turning stOck in a burl, a furnituremaker<br />
will see boards and a carver will see what needs to be<br />
removed. The burl itself, its shape, seams and end checks will<br />
also determine how it should be cut.<br />
I would recommend that you ripsaw "through and<br />
through," from tOp to bottom as the tree grows. Leave the<br />
natural edge complete with bark. Don't crosscut, else the oak<br />
will check terribly and you will lose a lot. Slice the burl as<br />
soon as you can. The wood won't really begin to dry until<br />
you do. Immediately coat the end of each board with white<br />
glue, paint or tree surgeons' pruning tar. Since you will be<br />
air-drying the wood, keep it stacked outside off the ground,<br />
and cover it with a sheet of plywood or roofing tin to keep it<br />
out of the sun and rain for a year or more. Then store it in a<br />
heated room for another year. Use a moisture meter to be<br />
sure that the wood is at lO% to 12% moisture content before<br />
you use it. Good luck. Go slowly.<br />
Finish-reviver-I recently found a recipe for a fu rniture<br />
reviver that calls for raw linseed oil, vinegar and terebene.<br />
My problem is that nobody has heard of terebene. The<br />
chemical dictionary defines it as a "mixture of terpenes,<br />
chiefly dipentene and terpenene. " Could you tell me who<br />
sells it, or if it's called by another name?<br />
-Joe Wolinski, Minneapolis, Minn.<br />
ROBERT MUSSEY REPLIES: Terebene is a generic name applied to<br />
a class of driers that were added to oils and varnishes during<br />
the late 19th and early 20th centuries. Combined in formulas<br />
containing linseed oil, terebene was supposed to keep the oil<br />
from remaining sticky and gummy. One recipe for terebene I<br />
found in an early-20th-century formula book is a mixture of<br />
medium kauri (a copal varnish resin), boiled linseed oil, flake<br />
litharge (a lead oxide), resinate of manganese (another metallic<br />
oxide drier) and American turps. All of these are available<br />
tOday except kauri-which may be just as well, since readily<br />
available, commercially made driers are easier to use and<br />
probably cheaper.<br />
I don't suggest making and using this reviver. Even boiled<br />
linseed oil remains tacky for years before it finally polymerizes,<br />
and raw linseed is worse. It collects dirt and darkens with<br />
age, eventually becoming black if applied repeatedly. Linseed