Template BA B168xH238 - Hörmann
Template BA B168xH238 - Hörmann
Template BA B168xH238 - Hörmann

You also want an ePaper? Increase the reach of your titles
YUMPU automatically turns print PDFs into web optimized ePapers that Google loves.
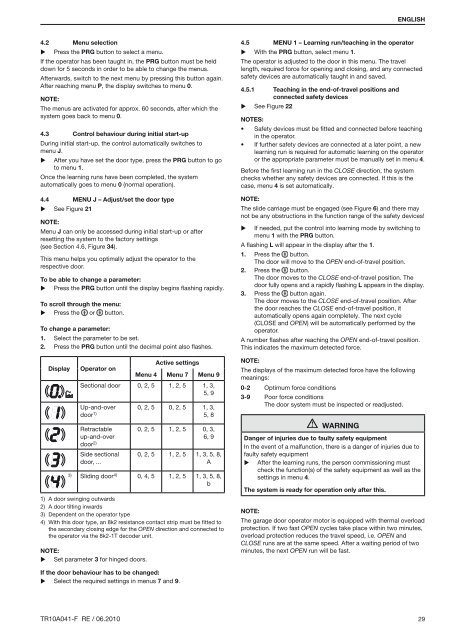
ENGLISH4.2▶Menu selectionPress the PRG button to select a menu.If the operator has been taught in, the PRG button must be helddown for 5 seconds in order to be able to change the menus.Afterwards, switch to the next menu by pressing this button again.After reaching menu P, the display switches to menu 0.Note:The menus are activated for approx. 60 seconds, after which thesystem goes back to menu 0.4.3 Control behaviour during initial start-upDuring initial start-up, the control automatically switches tomenu J.▶ After you have set the door type, press the PRG button to goto menu 1.Once the learning runs have been completed, the systemautomatically goes to menu 0 (normal operation).4.4 MENU J – Adjust/set the door type▶ See Figure 21Note:Menu J can only be accessed during initial start-up or afterresetting the system to the factory settings(see Section 4.6, Figure 34).This menu helps you optimally adjust the operator to therespective door.To be able to change a parameter:▶ Press the PRG button until the display begins flashing rapidly.To scroll through the menu:▶ Press the or button.To change a parameter:1. Select the parameter to be set.2. Press the PRG button until the decimal point also flashes.DisplayOperator onActive settingsMenu 4 Menu 7 Menu 9Sectional door 0, 2, 5 1, 2, 5 1, 3,5, 9Up-and-over 0, 2, 5 0, 2, 5 1, 3,door 1) 5, 8Retractable 0, 2, 5 1, 2, 5 0, 3,door 2)up-and-over6, 9Side sectionaldoor, ...0, 2, 5 1, 2, 5 1, 3, 5, 8,A3) Sliding door 4) 0, 4, 5 1, 2, 5 1, 3, 5, 8,b1) A door swinging outwards2) A door tilting inwards3) Dependent on the operator type4) With this door type, an 8k2 resistance contact strip must be fitted tothe secondary closing edge for the OPEN direction and connected tothe operator via the 8k2-1T decoder unit.Note:▶ Set parameter 3 for hinged doors.4.5 MENU 1 – Learning run/teaching in the operator▶ With the PRG button, select menu 1.The operator is adjusted to the door in this menu. The travellength, required force for opening and closing, and any connectedsafety devices are automatically taught in and saved.4.5.1 Teaching in the end-of-travel positions andconnected safety devices▶ See Figure 22Notes:• Safety devices must be fitted and connected before teachingin the operator.• If further safety devices are connected at a later point, a newlearning run is required for automatic learning on the operatoror the appropriate parameter must be manually set in menu 4.Before the first learning run in the CLOSE direction, the systemchecks whether any safety devices are connected. If this is thecase, menu 4 is set automatically.Note:The slide carriage must be engaged (see Figure 6) and there maynot be any obstructions in the function range of the safety devices!▶ If needed, put the control into learning mode by switching tomenu 1 with the PRG button.A flashing L will appear in the display after the 1.1. Press the button.The door will move to the OPEN end-of-travel position.2. Press the button.The door moves to the CLOSE end-of-travel position. Thedoor fully opens and a rapidly flashing L appears in the display.3. Press the button again.The door moves to the CLOSE end-of-travel position. Afterthe door reaches the CLOSE end-of-travel position, itautomatically opens again completely. The next cycle(CLOSE and OPEN) will be automatically performed by theoperator.A number flashes after reaching the OPEN end-of-travel position.This indicates the maximum detected force.Note:The displays of the maximum detected force have the followingmeanings:0-2 Optimum force conditions3-9 Poor force conditionsThe door system must be inspected or readjusted.WARNINGDanger of injuries due to faulty safety equipmentIn the event of a malfunction, there is a danger of injuries due tofaulty safety equipment▶ After the learning runs, the person commissioning mustcheck the function(s) of the safety equipment as well as thesettings in menu 4.The system is ready for operation only after this.Note:The garage door operator motor is equipped with thermal overloadprotection. If two fast OPEN cycles take place within two minutes,overload protection reduces the travel speed, i.e. OPEN andCLOSE runs are at the same speed. After a waiting period of twominutes, the next OPEN run will be fast.If the door behaviour has to be changed:▶ Select the required settings in menus 7 and 9.TR10A041-F RE / 06.2010 29