253/3 - Wertherint.de
253/3 - Wertherint.de
253/3 - Wertherint.de

Create successful ePaper yourself
Turn your PDF publications into a flip-book with our unique Google optimized e-Paper software.
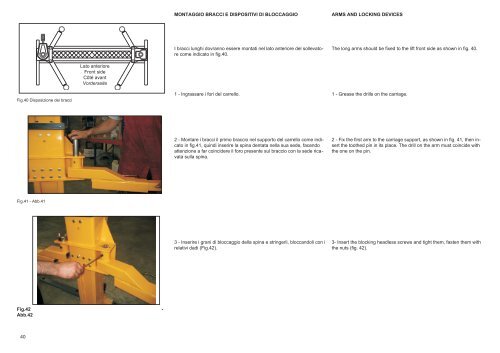
Fig.40 Disposizione <strong>de</strong>i bracci<br />
Fig.41 - Abb.41<br />
Fig.42 -<br />
Abb.42<br />
40<br />
Lato anteriore<br />
Front si<strong>de</strong><br />
Côté avant<br />
Vor<strong>de</strong>rseite<br />
MONTAGGIO BRACCI E DISPOSITIVI DI BLOCCAGGIO<br />
I bracci lunghi dovranno essere montati nel lato anteriore <strong>de</strong>l sollevatore<br />
come indicato in fig.40.<br />
1 - Ingrassare i fori <strong>de</strong>l carrello.<br />
2 - Montare i bracci il primo braccio nel supporto <strong>de</strong>l carrello come indicato<br />
in fig.41, quindi inserire la spina <strong>de</strong>ntata nella sua se<strong>de</strong>, facendo<br />
attenzione a far coinci<strong>de</strong>re il foro presente sul braccio con la se<strong>de</strong> ricavata<br />
sulla spina.<br />
3 - Inserire i grani di bloccaggio <strong>de</strong>lla spina e stringerli, bloccandoli con i<br />
relativi dadi (Fig.42).<br />
ARMS AND LOCKING DEVICES<br />
The long arms should be fixed to the lift front si<strong>de</strong> as shown in fig. 40.<br />
1 - Grease the drills on the carriage.<br />
2 - Fix the first arm to the carriage support, as shown in fig. 41, then insert<br />
the toothed pin in its place. The drill on the arm must coinci<strong>de</strong> with<br />
the one on the pin.<br />
3- Insert the blocking headless screws and tight them, fasten them with<br />
the nuts (fig. 42).