253/3 - Wertherint.de
253/3 - Wertherint.de
253/3 - Wertherint.de

You also want an ePaper? Increase the reach of your titles
YUMPU automatically turns print PDFs into web optimized ePapers that Google loves.
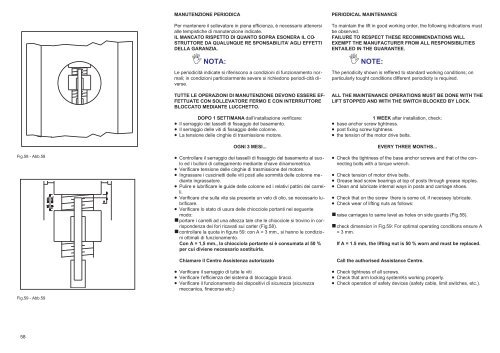
Fig.58 - Abb.58<br />
Fig.59 - Abb.59<br />
58<br />
MANUTENZIONE PERIODICA<br />
Per mantenere il sollevatore in piena efficienza, è necessario attenersi<br />
alle tempistiche di manutenzione indicate.<br />
IL MANCATO RISPETTO DI QUANTO SOPRA ESONERA IL CO-<br />
STRUTTORE DA QUALUNQUE RE SPONSABILITA’ AGLI EFFETTI<br />
DELLA GARANZIA.<br />
NOTA:<br />
Le periodicità indicate si riferiscono a condizioni di funzionamento normali;<br />
in condizioni particolarmente severe si richiedono periodi-cità diverse.<br />
TUTTE LE OPERAZIONI DI MANUTENZIONE DEVONO ESSERE EF-<br />
FETTUATE CON SOLLEVATORE FERMO E CON INTERRUTTORE<br />
BLOCCATO MEDIANTE LUCCHETTO.<br />
DOPO 1 SETTIMANA dall’installazione verificare:<br />
Il serraggio <strong>de</strong>i tasselli di fissaggio <strong>de</strong>l basamento.<br />
Il serraggio <strong>de</strong>lle viti di fissaggio <strong>de</strong>lle colonne.<br />
La tensione <strong>de</strong>lle cinghie di trasmissione motore.<br />
OGNI 3 MESI...<br />
Controllare il serraggio <strong>de</strong>i tasselli di fissaggio <strong>de</strong>l basamento al suolo<br />
ed i bulloni di collegamento mediante chiave dinamometrica.<br />
Verificare tensione <strong>de</strong>lle cinghie di trasmissione <strong>de</strong>l motore.<br />
Ingrassare i cuscinetti <strong>de</strong>lle viti posti alle sommità <strong>de</strong>lle colonne mediante<br />
ingrassatore.<br />
Pulire e lubrificare le gui<strong>de</strong> <strong>de</strong>lle colonne ed i relativi pattini <strong>de</strong>i carrelli.<br />
Verificare che sulla vite sia presente un velo di olio, se necessario lubrificare.<br />
Verificare lo stato di usura <strong>de</strong>lle chiocciole portanti nel seguente<br />
modo:<br />
portare i carrelli ad una altezza tale che le chiocciole si trovino in corrispon<strong>de</strong>nza<br />
<strong>de</strong>i fori ricavati sui carter (Fig.58).<br />
controllare la quota in figura 59: con A = 3 mm., si hanno le condizioni<br />
ottimali di funzionamento.<br />
Con A = 1,5 mm., la chiocciola portante si è consumata al 50 %<br />
per cui diviene necessario sostituirla.<br />
Chiamare il Centro Assistenza autorizzato<br />
Verificare il serraggio di tutte le viti<br />
Verificare l’efficienza <strong>de</strong>l sistema di bloccaggio bracci.<br />
Verificare il funzionamento <strong>de</strong>i dispositivi di sicurezza (sicurezza<br />
meccanica, finecorsa etc.)<br />
PERIODICAL MAINTENANCE<br />
To maintain the lift in good working or<strong>de</strong>r, the following indications must<br />
be observed.<br />
FAILURE TO RESPECT THESE RECOMMENDATIONS WILL<br />
EXEMPT THE MANUFACTURER FROM ALL RESPONSIBILITIES<br />
ENTAILED IN THE GUARANTEE.<br />
NOTE:<br />
The periodicity shown is reffered to standard working conditions; on<br />
particularly tought conditions different periodicity is required.<br />
ALL THE MAINTENANCE OPERATIONS MUST BE DONE WITH THE<br />
LIFT STOPPED AND WITH THE SWITCH BLOCKED BY LOCK.<br />
1 WEEK after installation, check:<br />
base anchor screw tightness.<br />
post fixing screw tightness.<br />
the tension of the motor drive belts.<br />
EVERY THREE MONTHS...<br />
Check the tightness of the base anchor screws and that of the connecting<br />
bolts with a torque wrench.<br />
Check tension of motor drive belts.<br />
Grease lead screw bearings at top of posts through grease nipples.<br />
Clean and lubricate internal ways in posts and carriage shoes.<br />
Check that on the screw there is some oil, if necessey lubricate.<br />
Check wear of lifting nuts as follows:<br />
raise carriages to same level as holes on si<strong>de</strong> guards (Fig.58).<br />
check dimension in Fig.59: For optimal operating conditions ensure A<br />
= 3 mm.<br />
If A = 1.5 mm, the lifting nut is 50 % worn and must be replaced.<br />
Call the authorised Assistance Centre.<br />
Check tightness of all screws.<br />
Check that arm locking systemKs working properly.<br />
Check operation of safety <strong>de</strong>vices (safety cable, limit switches, etc.).