SHERPA 275678A_1_18.pmd - Olimpia Splendid
SHERPA 275678A_1_18.pmd - Olimpia Splendid
SHERPA 275678A_1_18.pmd - Olimpia Splendid

Create successful ePaper yourself
Turn your PDF publications into a flip-book with our unique Google optimized e-Paper software.
I GB F<br />
- Tagliare i tratti di tubazione<br />
abbondando di circa 3-4 cm sulla<br />
lunghezza.<br />
- Cut the sections of pipe leaving an extra<br />
3-4 cm on the ends.<br />
DGR<br />
- Couper les morceaux de tuyau en<br />
excédant d’environ 3-4 cm sur la<br />
longueur.<br />
2<br />
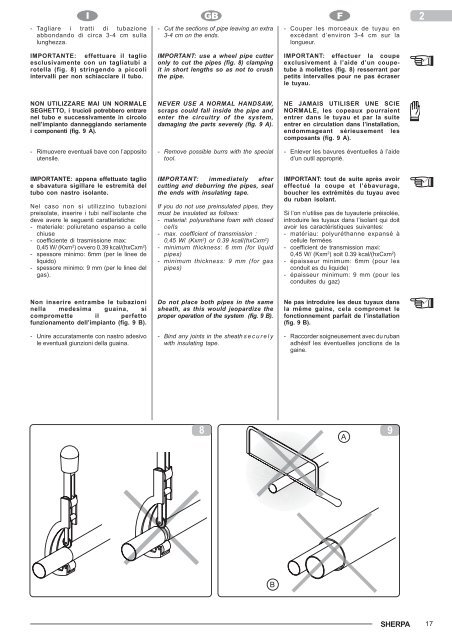
IMPORTANTE: effettuare il taglio<br />
esclusivamente con un tagliatubi a<br />
rotella (fig. 8) stringendo a piccoli<br />
intervalli per non schiacciare il tubo.<br />
IMPORTANT: use a wheel pipe cutter<br />
only to cut the pipes (fig. 8) clamping<br />
it in short lengths so as not to crush<br />
the pipe.<br />
IMPORTANT: effectuer la coupe<br />
exclusivement à l’aide d’un coupetube<br />
à mollettes (fig. 8) resserrant par<br />
petits intervalles pour ne pas écraser<br />
le tuyau.<br />
NON UTILIZZARE MAI UN NORMALE<br />
SEGHETTO, i trucioli potrebbero entrare<br />
nel tubo e successivamente in circolo<br />
nell’impianto danneggiando seriamente<br />
i componenti (fig. 9 A).<br />
- Rimuovere eventuali bave con l’apposito<br />
utensile.<br />
NEVER USE A NORMAL HANDSAW,<br />
scraps could fall inside the pipe and<br />
enter the circuitry of the system,<br />
damaging the parts severely (fig. 9 A).<br />
- Remove possible burrs with the special<br />
tool.<br />
NE JAMAIS UTILISER UNE SCIE<br />
NORMALE, les copeaux pourraient<br />
entrer dans le tuyau et par la suite<br />
entrer en circulation dans l’installation,<br />
endommageant sérieusement les<br />
composants (fig. 9 A).<br />
- Enlever les bavures éventuelles à l’aide<br />
d’un outil approprié.<br />
IMPORTANTE: appena effettuato taglio<br />
e sbavatura sigillare le estremità del<br />
tubo con nastro isolante.<br />
Nel caso non si utilizzino tubazioni<br />
preisolate, inserire i tubi nell’isolante che<br />
deve avere le seguenti caratteristiche:<br />
- materiale: poliuretano espanso a celle<br />
chiuse<br />
- coefficiente di trasmissione max:<br />
0,45 W/ (Kxm 2 ) ovvero 0.39 kcal/(hxCxm 2 )<br />
- spessore minimo: 6mm (per le linee de<br />
liquido)<br />
- spessore minimo: 9 mm (per le linee del<br />
gas).<br />
IMPORTANT: immediately after<br />
cutting and deburring the pipes, seal<br />
the ends with insulating tape.<br />
If you do not use preinsulated pipes, they<br />
must be insulated as follows:<br />
- material: polyurethane foam with closed<br />
cells<br />
- max. coefficient of transmission :<br />
0,45 W/ (Kxm 2 ) or 0.39 kcal/(hxCxm 2 )<br />
- minimum thickness: 6 mm (for liquid<br />
pipes)<br />
- minimum thickness: 9 mm (for gas<br />
pipes)<br />
IMPORTANT: tout de suite après avoir<br />
effectué la coupe et l’ébavurage,<br />
boucher les extrémités du tuyau avec<br />
du ruban isolant.<br />
Si l’on n’utilise pas de tuyauterie préisolée,<br />
introduire les tuyaux dans l’isolant qui doit<br />
avoir les caractéristiques suivantes:<br />
- matériau: polyuréthanne expansé à<br />
cellule fermées<br />
- coefficient de transmission maxi:<br />
0,45 W/ (Kxm 2 ) soit 0.39 kcal/(hxCxm 2 )<br />
- épaisseur minimum: 6mm (pour les<br />
conduit es du liquide)<br />
- épaisseur minimum: 9 mm (pour les<br />
conduites du gaz)<br />
Non inserire entrambe le tubazioni<br />
nella medesima guaina, si<br />
compromette il perfetto<br />
funzionamento dell’impianto (fig. 9 B).<br />
- Unire accuratamente con nastro adesivo<br />
le eventuali giunzioni della guaina.<br />
Do not place both pipes in the same<br />
sheath, as this would jeopardize the<br />
proper operation of the system (fig. 9 B).<br />
- Bind any joints in the sheath securely<br />
with insulating tape.<br />
Ne pas introduire les deux tuyaux dans<br />
la même gaine, cela compromet le<br />
fonctionnement parfait de l’installation<br />
(fig. 9 B).<br />
- Raccorder soigneusement avec du ruban<br />
adhésif les éventuelles jonctions de la<br />
gaine.<br />
8<br />
A<br />
9<br />
B<br />
<strong>SHERPA</strong><br />
17