- Page 1 and 2:
ALP 4.0 - MOTARD M4 Grazie per la f
- Page 3 and 4:
Avvertenze sull’uso del veicolo .
- Page 5 and 6:
AVVERTENZE SULL’USO DEL VEICOLO
- Page 7 and 8:
INDICE ARGOMENTI CAP. 1 INFORMAZION
- Page 9 and 10:
CARICO •Carico massimo (conducent
- Page 11 and 12:
CONOSCENZA DEL VEICOLO ALP 4.0 20 1
- Page 13 and 14:
CRUSCOTTO E COMANDI 3 6 7 14 15 16
- Page 15 and 16:
Successione pagine su LCD Tutte le
- Page 17 and 18:
Pagina 6 - LAP - Cronometro minuti:
- Page 19 and 20:
Cancellazione parametri TRP, SPEED
- Page 21 and 22:
1 ICONA BATTERIA Vb MINORE DI 10,5V
- Page 23 and 24:
CAPACITÀ serbatoio carburante ....
- Page 25 and 26:
Grasso per tiranterie .............
- Page 27 and 28:
LEGENDA SCHEMA ELETTRICO 1) LAMPEGG
- Page 29:
NOTE RELATIVE ALLA BATTERIA G Inser
- Page 32 and 33:
2 UTILIZZO DEL VEICOLO I CONTROLLI
- Page 34 and 35:
2 UTILIZZO DEL VEICOLO I A AVVIAMEN
- Page 36 and 37:
2 UTILIZZO DEL VEICOLO I A RIFORNIM
- Page 38 and 39:
3 CONTROLLI E MANUTENZIONE I Fig. A
- Page 40 and 41:
3 CONTROLLI E MANUTENZIONE I SOSTIT
- Page 42 and 43:
3 CONTROLLI E MANUTENZIONE I •Per
- Page 44 and 45:
3 CONTROLLI E MANUTENZIONE I D B C
- Page 46 and 47:
3 CONTROLLI E MANUTENZIONE I ALP MO
- Page 48 and 49:
3 CONTROLLI E MANUTENZIONE I OLIO F
- Page 50 and 51:
3 CONTROLLI E MANUTENZIONE I 50 CAN
- Page 52 and 53:
3 CONTROLLI E MANUTENZIONE I CARBUR
- Page 54 and 55:
3 CONTROLLI E MANUTENZIONE I Smonta
- Page 56 and 57:
3 CONTROLLI E MANUTENZIONE I Smonta
- Page 58 and 59:
3 CONTROLLI E MANUTENZIONE I SOSTIT
- Page 60 and 61:
3 CONTROLLI E MANUTENZIONE I PULIZI
- Page 62 and 63:
3 CONTROLLI E MANUTENZIONE I LUNGA
- Page 64 and 65:
4 REGOLAZIONI I 64 REGOLAZIONE FREN
- Page 66 and 67:
4 REGOLAZIONI I CONTROLLO E REGOLAZ
- Page 68 and 69:
4 REGOLAZIONI I FASCIO LUMINOSO •
- Page 70 and 71:
5 SOSTITUZIONI I A C B SOSTITUZIONE
- Page 72 and 73:
5 SOSTITUZIONI I SOSTITUZIONE PASTI
- Page 74 and 75:
5 SOSTITUZIONI I A C B SOSTITUZIONE
- Page 77 and 78:
INDICE ARGOMENTI CAP. 6 COSA FARE I
- Page 79 and 80:
Avviamento ........................
- Page 81 and 82:
ALP 4.0 - MOTARD M4 Thanks for you
- Page 83 and 84: Operating instructions ............
- Page 85 and 86: OPERATING INSTRUCTIONS •The vehic
- Page 87 and 88: CONTENTS CHAPTER 1 GENERAL INFORMAT
- Page 89 and 90: LOAD •Maximum load (rider + passe
- Page 91 and 92: FAMILIARIZING WITH THE VEHICLE ALP
- Page 93 and 94: INSTRUMENT PANEL AND CONTROLS 3 6 7
- Page 95 and 96: Order of pages on LCD display The d
- Page 97 and 98: Page 6 - LAP - Stopwatch minutes:se
- Page 99 and 100: Resetting the TRP, SPEED max and LA
- Page 101 and 102: 1 BATTERY ICON - Vb LESS THAN 10.5
- Page 103 and 104: CAPACITIES fuel tank ..............
- Page 105 and 106: Tie rod grease ....................
- Page 107 and 108: WIRING DIAGRAM 1) RIGHT-HAND FRONT
- Page 109: NOTES ON THE BATTERY G Insert the n
- Page 112 and 113: 2 OPERATION GB CHECKS AND MAINTENAN
- Page 114 and 115: 2 OPERATION GB A STARTING THE ENGIN
- Page 116 and 117: 2 OPERATION GB A REFUELLING •Swit
- Page 118 and 119: 3 CHECKS AND MAINTENANCE GB Fig. A
- Page 120 and 121: 3 CHECKS AND MAINTENANCE GB MOTOR O
- Page 122 and 123: 3 CHECKS AND MAINTENANCE GB •For
- Page 124 and 125: 3 CHECKS AND MAINTENANCE GB D B C F
- Page 126 and 127: 3 CHECKS AND MAINTENANCE GB ALP MOT
- Page 128 and 129: 3 CHECKS AND MAINTENANCE GB FORK OI
- Page 130 and 131: 3 CHECKS AND MAINTENANCE GB 130 SPA
- Page 132 and 133: 3 CHECKS AND MAINTENANCE GB CARBURE
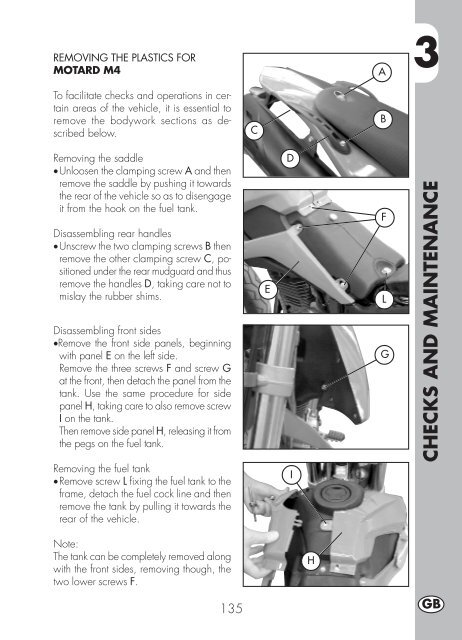
- Page 136 and 137: 3 CHECKS AND MAINTENANCE GB Disasse
- Page 138 and 139: 3 CHECKS AND MAINTENANCE GB FINAL T
- Page 140 and 141: 3 CHECKS AND MAINTENANCE GB CLEANIN
- Page 142 and 143: 3 CHECKS AND MAINTENANCE GB PROLONG
- Page 144 and 145: 4 ADJUSTMENTS GB 144 ADJUSTING THE
- Page 146 and 147: 4 ADJUSTMENTS GB CHECKING AND ADJUS
- Page 148 and 149: 4 ADJUSTMENTS GB ADJUSTING THE HEAD
- Page 150 and 151: 5 REPLACEMENTS GB A C B 150 REPLACI
- Page 152 and 153: 5 REPLACEMENTS GB REPLACING THE REA
- Page 154 and 155: 5 REPLACEMENTS GB A C B REPLACING T
- Page 157 and 158: CONTENTS CHARTER 6 TROUBLESHOOTING
- Page 159 and 160: Air filter ........................
- Page 161 and 162: ALP 4.0 - MOTARD M4 Merci de votre
- Page 163 and 164: Conseils d’utilisation ..........
- Page 165 and 166: CONSEILS POUR L’UTILISATION DU V
- Page 167 and 168: TABLE DES MATIÈRES CHAP. 1 GÉNÉR
- Page 169 and 170: CHARGE •Charge maximum (conducteu
- Page 171 and 172: CONNAISSANCE DU VÉHICULE ALP 4.0 2
- Page 173 and 174: TABLEAU DE BORD ET COMMANDES 1- LCD
- Page 175 and 176: Succession pages sur écran LCD Tou
- Page 177 and 178: Page 6 - LAP - Chronomètre minutes
- Page 179 and 180: Annulation des paramètres TRP, SPE
- Page 181 and 182: 1 ICONE BATTERIE Vb INFERIEURE A 10
- Page 183 and 184: CONTENANCES Réservoir à carburant
- Page 185 and 186:
Graisse pour timonerie ............
- Page 187 and 188:
SCHÉMA ÉLECTRIQUE 1) CLIGNOTANT A
- Page 189:
NOTES CONCERNANT LA BATTERIE G Mett
- Page 192 and 193:
2 UTILISATION DU VÉHICULE F CONTR
- Page 194 and 195:
2 UTILISATION DU VÉHICULE F A DÉM
- Page 196 and 197:
2 UTILISATION DU VÉHICULE F A APPR
- Page 198 and 199:
3 CONTRÔLES ET ENTRETIEN F Fig. A
- Page 200 and 201:
3 CONTRÔLES ET ENTRETIEN F VIDANGE
- Page 202 and 203:
3 CONTRÔLES ET ENTRETIEN F •Pour
- Page 204 and 205:
3 CONTRÔLES ET ENTRETIEN F D B C T
- Page 206 and 207:
3 CONTRÔLES ET ENTRETIEN F ALP MOT
- Page 208 and 209:
3 CONTRÔLES ET ENTRETIEN F HUILE D
- Page 210 and 211:
3 CONTRÔLES ET ENTRETIEN F 210 BOU
- Page 212 and 213:
3 CONTRÔLES ET ENTRETIEN F CARBURA
- Page 214 and 215:
3 CONTRÔLES ET ENTRETIEN F Démont
- Page 216 and 217:
3 CONTRÔLES ET ENTRETIEN F Démont
- Page 218 and 219:
3 CONTRÔLES ET ENTRETIEN F SUBSTIT
- Page 220 and 221:
3 CONTRÔLES ET ENTRETIEN F NETTOYA
- Page 222 and 223:
3 CONTRÔLES ET ENTRETIEN F LONGUE
- Page 224 and 225:
4 RÉGLAGES F 224 RÉGLAGE DES FREI
- Page 226 and 227:
4 RÉGLAGES F CONTRÔLE ET RÉGLAGE
- Page 228 and 229:
4 RÉGLAGES F FAISCEAU LUMINEUX •
- Page 230 and 231:
5 REMPLACEMENTS F A C B REMPLACEMEN
- Page 232 and 233:
5 REMPLACEMENTS F REMPLACEMENT DES
- Page 234 and 235:
5 REMPLACEMENTS F A C B REMPLACEMEN
- Page 237 and 238:
TABLE DES MATIÈRES CHAP. 6 QUE FAI
- Page 239 and 240:
Approvisionnement en carburant ....
- Page 241 and 242:
ALP 4.0 - MOTARD M4 Vielen Dank fü
- Page 243 and 244:
Hinweise zum Gebrauch des Fahrzeugs
- Page 245 and 246:
HINWEISE ZUM GEBRAUCH DES FAHRZEUGS
- Page 247 and 248:
INHALTSVERZEICHNIS KAPITEL 1 ALLGEM
- Page 249 and 250:
ZULADUNG •Maximale Zuladung (Fahr
- Page 251 and 252:
WICHTIGSTE FAHRZEUGTEILE ALP 4.0 20
- Page 253 and 254:
ARMATURENBRETT UND BEDIENUNGSELEMEN
- Page 255 and 256:
Seitenabfolge am LCD Alle Seiten si
- Page 257 and 258:
Seite 6 - LAP - Chronometer Minuten
- Page 259 and 260:
Löschen der Parameter TRP, SPEED m
- Page 261 and 262:
1 IKONE BATTERIE Vb KLEINER ALS 10,
- Page 263 and 264:
FASSUNGSVERMÖGEN Benzintank ......
- Page 265 and 266:
Fett für Züge ...................
- Page 267 and 268:
ZEICHENERKLÄRUNG ELEKTRISCHER SCHA
- Page 269:
HINWEISE ZUR BATTERIE G Die Batteri
- Page 272 and 273:
2 BEDIENUNGSVORSCHRIFTEN D KONTROLL
- Page 274 and 275:
2 BEDIENUNGSVORSCHRIFTEN D A STARTE
- Page 276 and 277:
2 BEDIENUNGSVORSCHRIFTEN D A TANKEN
- Page 278 and 279:
3 WARTUNG UND KONTROLLEN D Fig. A L
- Page 280 and 281:
3 WARTUNG UND KONTROLLEN D WECHSEL
- Page 282 and 283:
3 WARTUNG UND KONTROLLEN D •Für
- Page 284 and 285:
3 WARTUNG UND KONTROLLEN D D B C LE
- Page 286 and 287:
3 WARTUNG UND KONTROLLEN D ALP MOTA
- Page 288 and 289:
3 WARTUNG UND KONTROLLEN D GABELÖL
- Page 290 and 291:
3 WARTUNG UND KONTROLLEN D 290 ZÜN
- Page 292 and 293:
3 WARTUNG UND KONTROLLEN D VERGASER
- Page 294 and 295:
3 WARTUNG UND KONTROLLEN D Ausbau d
- Page 296 and 297:
3 WARTUNG UND KONTROLLEN D Ausbau d
- Page 298 and 299:
3 WARTUNG UND KONTROLLEN D WECHSELN
- Page 300 and 301:
3 WARTUNG UND KONTROLLEN D FAHRZEUG
- Page 302 and 303:
3 WARTUNG UND KONTROLLEN D LÄNGERE
- Page 304 and 305:
4 EINSTELLUNGEN D 304 EINSTELLUNG D
- Page 306 and 307:
4 EINSTELLUNGEN D KONTROLLE UND EIN
- Page 308 and 309:
4 EINSTELLUNGEN D EINSTELLUNG DES S
- Page 310 and 311:
5 AUSTAUSCHEN/ AUSWECHSELN VON TEIL
- Page 312 and 313:
5 AUSTAUSCHEN/ AUSWECHSELN VON TEIL
- Page 314 and 315:
5 AUSTAUSCHEN/ AUSWECHSELN VON TEIL
- Page 317 and 318:
INHALTSVERZEICHNIS KAPITEL 6 WAS IS
- Page 319 and 320:
Armaturenbrett und Bedienungselemen
- Page 321 and 322:
ALP 4.0 - MOTARD M4 Gracias por la
- Page 323 and 324:
Advertencias sobre el uso .........
- Page 325 and 326:
ADVERTENCIAS SOBRE EL USO DEL VEHIC
- Page 327 and 328:
INDICE DE LOS ARGUMENTOS CAP. 1 INF
- Page 329 and 330:
CARGA •Carga max. (conductor + pa
- Page 331 and 332:
CONOCIMIENTO DEL VEHICULO ALP 4.0 2
- Page 333 and 334:
TABLERO Y MANDOS 3 6 7 14 15 16 10
- Page 335 and 336:
Sucesión páginas en el LCD Es pos
- Page 337 and 338:
Página 6 - LAP - Cronómetro minut
- Page 339 and 340:
Anulación parámetros TRP, SPEED m
- Page 341 and 342:
1 ICONO BATERÍA Vb INFERIOR A 10,5
- Page 343 and 344:
CAPACIDAD DE LLENADO Tanque gasolin
- Page 345 and 346:
Grasa para varillaje ..............
- Page 347 and 348:
ESQUEMA ELECTRICO 1) INDICADOR DE D
- Page 349:
NOTA RELATIVA A LA BATERIA G Introd
- Page 352 and 353:
2 USO DEL VEHICULO E CONTROLES Y MA
- Page 354 and 355:
2 USO DEL VEHICULO E A ARRANQUE DEL
- Page 356 and 357:
2 USO DEL VEHICULO E A ABASTECIMIEN
- Page 358 and 359:
3 CONTROLES Y MANTENIMIENTO E Fig.
- Page 360 and 361:
3 CONTROLES Y MANTENIMIENTO E SUSTI
- Page 362 and 363:
3 CONTROLES Y MANTENIMIENTO E •Pa
- Page 364 and 365:
3 CONTROLES Y MANTENIMIENTO E D B C
- Page 366 and 367:
3 CONTROLES Y MANTENIMIENTO E ALP M
- Page 368 and 369:
3 CONTROLES Y MANTENIMIENTO E ACEIT
- Page 370 and 371:
3 CONTROLES Y MANTENIMIENTO E 370 B
- Page 372 and 373:
3 CONTROLES Y MANTENIMIENTO E CARBU
- Page 374 and 375:
3 CONTROLES Y MANTENIMIENTO E Desmo
- Page 376 and 377:
3 CONTROLES Y MANTENIMIENTO E Desmo
- Page 378 and 379:
3 CONTROLES Y MANTENIMIENTO E SUSTI
- Page 380 and 381:
3 CONTROLES Y MANTENIMIENTO E LIMPI
- Page 382 and 383:
3 CONTROLES Y MANTENIMIENTO E LARGA
- Page 384 and 385:
4 REGULACIONES E 384 REGULACION FRE
- Page 386 and 387:
4 REGULACIONES E COMPROBACION Y REG
- Page 388 and 389:
4 REGULACIONES E HAZ LUMINOSO •La
- Page 390 and 391:
5 SUSTITUCIONES E A C B SUSTITUCION
- Page 392 and 393:
5 SUSTITUCIONES E SUSTITUCION PASTI
- Page 394 and 395:
5 SUSTITUCIONES E A C B SUSTITUCION
- Page 397 and 398:
INDICE DE LOS ARGUMENTOS CAP. 6 QUE
- Page 399 and 400:
Abastecimiento gasolina............


![R12 '08 [it-en] - Betamotor](https://img.yumpu.com/46211606/1/190x134/r12-08-it-en-betamotor.jpg?quality=85)
![Minitrial '08 [it-en] - Betamotor](https://img.yumpu.com/43117194/1/190x134/minitrial-08-it-en-betamotor.jpg?quality=85)
![Bedienungsanleitung '13 [de] - Betamotor](https://img.yumpu.com/43108443/1/185x260/bedienungsanleitung-13-de-betamotor.jpg?quality=85)
![Veicolo Motore '08 [it] - Betamotor](https://img.yumpu.com/42393035/1/190x134/veicolo-motore-08-it-betamotor.jpg?quality=85)