technical & service manual dc inverter multi-system air conditioner
technical & service manual dc inverter multi-system air conditioner
technical & service manual dc inverter multi-system air conditioner

Create successful ePaper yourself
Turn your PDF publications into a flip-book with our unique Google optimized e-Paper software.
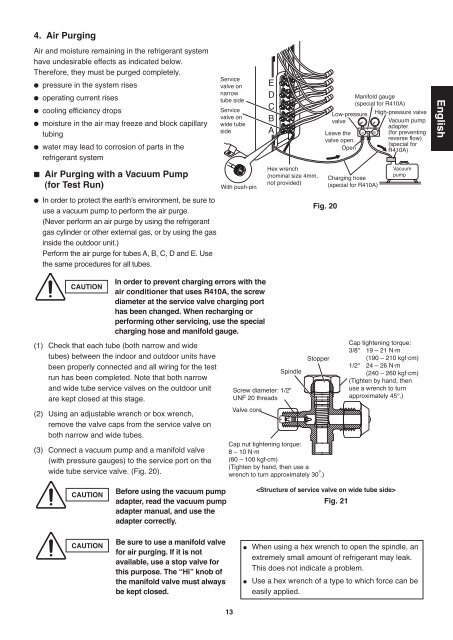
4. Air Purging<br />
Air and moisture remaining in the refrigerant <strong>system</strong><br />
have undesirable effects as indicated below.<br />
Therefore, they must be purged completely.<br />
� pressure in the <strong>system</strong> rises<br />
� operating current rises<br />
� cooling efficiency drops<br />
� moisture in the <strong>air</strong> may freeze and block capillary<br />
tubing<br />
� water may lead to corrosion of parts in the<br />
refrigerant <strong>system</strong><br />
� Air Purging with a Vacuum Pump<br />
(for Test Run)<br />
� In order to protect the earth’s environment, be sure to<br />
use a vacuum pump to perform the <strong>air</strong> purge.<br />
(Never perform an <strong>air</strong> purge by using the refrigerant<br />
gas cylinder or other external gas, or by using the gas<br />
inside the outdoor unit.)<br />
Perform the <strong>air</strong> purge for tubes A, B, C, D and E. Use<br />
the same procedures for all tubes.<br />
CAUTION<br />
(1) Check that each tube (both narrow and wide<br />
tubes) between the indoor and outdoor units have<br />
been properly connected and all wiring for the test<br />
run has been completed. Note that both narrow<br />
and wide tube <strong>service</strong> valves on the outdoor unit<br />
are kept closed at this stage.<br />
(2) Using an adjustable wrench or box wrench,<br />
remove the valve caps from the <strong>service</strong> valve on<br />
both narrow and wide tubes.<br />
(3) Connect a vacuum pump and a manifold valve<br />
(with pressure gauges) to the <strong>service</strong> port on the<br />
wide tube <strong>service</strong> valve. (Fig. 20).<br />
CAUTION<br />
CAUTION<br />
In order to prevent charging errors with the<br />
<strong>air</strong> <strong>conditioner</strong> that uses R410A, the screw<br />
diameter at the <strong>service</strong> valve charging port<br />
has been changed. When recharging or<br />
performing other servicing, use the special<br />
charging hose and manifold gauge.<br />
Before using the vacuum pump<br />
adapter, read the vacuum pump<br />
adapter <strong>manual</strong>, and use the<br />
adapter correctly.<br />
Be sure to use a manifold valve<br />
for <strong>air</strong> purging. If it is not<br />
available, use a stop valve for<br />
this purpose. The “Hi” knob of<br />
the manifold valve must always<br />
be kept closed.<br />
Service<br />
valve on<br />
narrow<br />
tube side<br />
Service<br />
valve on<br />
wide tube<br />
side<br />
With push-pin<br />
13<br />
E<br />
D<br />
C<br />
B<br />
A<br />
Hex wrench<br />
(nominal size 4mm,<br />
not provided)<br />
Spindle<br />
Screw diameter: 1/2"<br />
UNF 20 threads<br />
Valve core<br />
Fig. 20<br />
Stopper<br />
Cap nut tightening torque:<br />
8 – 10 N·m<br />
(80 – 100 kgf·cm)<br />
(Tighten by hand, then use a<br />
wrench to turn approximately 30 .)<br />
Low-pressure<br />
valve<br />
Leave the<br />
valve open.<br />
Open<br />
Charging hose<br />
(special for R410A)<br />
Fig. 21<br />
Manifold gauge<br />
(special for R410A)<br />
High-pressure valve<br />
Vacuum pump<br />
adapter<br />
Hi (for preventing<br />
reverse flow)<br />
(special for<br />
R410A)<br />
Vacuum<br />
pump<br />
� When using a hex wrench to open the spindle, an<br />
extremely small amount of refrigerant may leak.<br />
This does not indicate a problem.<br />
� Use a hex wrench of a type to which force can be<br />
easily applied.<br />
Lo<br />
Cap tightening torque:<br />
3/8" 19 – 21 N·m<br />
(190 – 210 kgf·cm)<br />
1/2" 24 – 26 N·m<br />
(240 – 260 kgf·cm)<br />
(Tighten by hand, then<br />
use a wrench to turn<br />
approximately 45°.)<br />
<br />
English