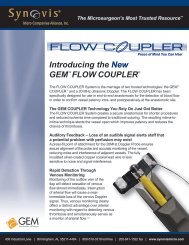
GEM Microvascular Anastomotic COUPLER Device and System
GEM Microvascular Anastomotic COUPLER Device and System
GEM Microvascular Anastomotic COUPLER Device and System

Create successful ePaper yourself
Turn your PDF publications into a flip-book with our unique Google optimized e-Paper software.
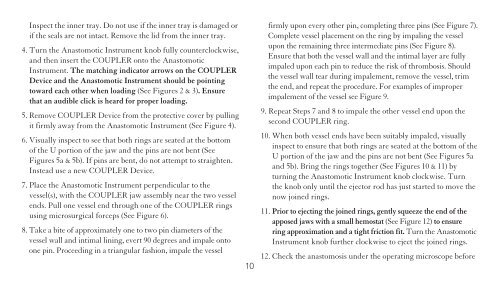
Inspect the inner tray. Do not use if the inner tray is damaged or<br />
if the seals are not intact. Remove the lid from the inner tray.<br />
4. Turn the <strong>Anastomotic</strong> Instrument knob fully counterclockwise,<br />
<strong>and</strong> then insert the <strong>COUPLER</strong> onto the <strong>Anastomotic</strong><br />
Instrument. The matching indicator arrows on the <strong>COUPLER</strong><br />
<strong>Device</strong> <strong>and</strong> the <strong>Anastomotic</strong> Instrument should be pointing<br />
toward each other when loading (See Figures 2 & 3). Ensure<br />
that an audible click is heard for proper loading.<br />
5. Remove <strong>COUPLER</strong> <strong>Device</strong> from the protective cover by pulling<br />
it firmly away from the <strong>Anastomotic</strong> Instrument (See Figure 4).<br />
6. Visually inspect to see that both rings are seated at the bottom<br />
of the U portion of the jaw <strong>and</strong> the pins are not bent (See<br />
Figures 5a & 5b). If pins are bent, do not attempt to straighten.<br />
Instead use a new <strong>COUPLER</strong> <strong>Device</strong>.<br />
7. Place the <strong>Anastomotic</strong> Instrument perpendicular to the<br />
vessel(s), with the <strong>COUPLER</strong> jaw assembly near the two vessel<br />
ends. Pull one vessel end through one of the <strong>COUPLER</strong> rings<br />
using microsurgical forceps (See Figure 6).<br />
8. Take a bite of approximately one to two pin diameters of the<br />
vessel wall <strong>and</strong> intimal lining, evert 90 degrees <strong>and</strong> impale onto<br />
one pin. Proceeding in a triangular fashion, impale the vessel<br />
firmly upon every other pin, completing three pins (See Figure 7).<br />
Complete vessel placement on the ring by impaling the vessel<br />
upon the remaining three intermediate pins (See Figure 8).<br />
Ensure that both the vessel wall <strong>and</strong> the intimal layer are fully<br />
impaled upon each pin to reduce the risk of thrombosis. Should<br />
the vessel wall tear during impalement, remove the vessel, trim<br />
the end, <strong>and</strong> repeat the procedure. For examples of improper<br />
impalement of the vessel see Figure 9.<br />
9. Repeat Steps 7 <strong>and</strong> 8 to impale the other vessel end upon the<br />
second <strong>COUPLER</strong> ring.<br />
10. When both vessel ends have been suitably impaled, visually<br />
inspect to ensure that both rings are seated at the bottom of the<br />
U portion of the jaw <strong>and</strong> the pins are not bent (See Figures 5a<br />
<strong>and</strong> 5b). Bring the rings together (See Figures 10 & 11) by<br />
turning the <strong>Anastomotic</strong> Instrument knob clockwise. Turn<br />
the knob only until the ejector rod has just started to move the<br />
now joined rings.<br />
11. Prior to ejecting the joined rings, gently squeeze the end of the<br />
apposed jaws with a small hemostat (See Figure 12) to ensure<br />
ring approximation <strong>and</strong> a tight friction fit. Turn the <strong>Anastomotic</strong><br />
Instrument knob further clockwise to eject the joined rings.<br />
12. Check the anastomosis under the operating microscope before<br />
10