

Final Fairing & Finishing - WEST SYSTEM Epoxy
Final Fairing & Finishing - WEST SYSTEM Epoxy
Final Fairing & Finishing - WEST SYSTEM Epoxy

Create successful ePaper yourself
Turn your PDF publications into a flip-book with our unique Google optimized e-Paper software.
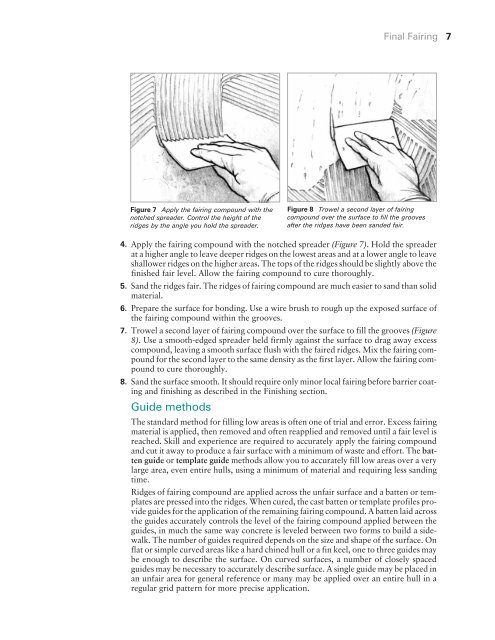
Figure 7 Apply the fairing compound with the<br />
notched spreader. Control the height of the<br />
ridges by the angle you hold the spreader.<br />
4. Apply the fairing compound with the notched spreader (Figure 7). Hold the spreader<br />
at a higher angle to leave deeper ridges on the lowest areas and at a lower angle to leave<br />
shallower ridges on the higher areas. The tops of the ridges should be slightly above the<br />
finished fair level. Allow the fairing compound to cure thoroughly.<br />
5. Sand the ridges fair. The ridges of fairing compound are much easier to sand than solid<br />
material.<br />
6. Prepare the surface for bonding. Use a wire brush to rough up the exposed surface of<br />
the fairing compound within the grooves.<br />
7. Trowel a second layer of fairing compound over the surface to fill the grooves (Figure<br />
8). Use a smooth-edged spreader held firmly against the surface to drag away excess<br />
compound, leaving a smooth surface flush with the faired ridges. Mix the fairing compound<br />
for the second layer to the same density as the first layer. Allow the fairing compound<br />
to cure thoroughly.<br />
8. Sand the surface smooth. It should require only minor local fairing before barrier coating<br />
and finishing as described in the <strong>Finishing</strong> section.<br />
Guide methods<br />
<strong>Final</strong> <strong>Fairing</strong> 7<br />
Figure 8 Trowel a second layer of fairing<br />
compound over the surface to fill the grooves<br />
after the ridges have been sanded fair.<br />
The standard method for filling low areas is often one of trial and error. Excess fairing<br />
material is applied, then removed and often reapplied and removed until a fair level is<br />
reached. Skill and experience are required to accurately apply the fairing compound<br />
and cut it away to produce a fair surface with a minimum of waste and effort. The batten<br />
guide or template guide methods allow you to accurately fill low areas over a very<br />
large area, even entire hulls, using a minimum of material and requiring less sanding<br />
time.<br />
Ridges of fairing compound are applied across the unfair surface and a batten or templates<br />
are pressed into the ridges. When cured, the cast batten or template profiles provide<br />
guides for the application of the remaining fairing compound. A batten laid across<br />
the guides accurately controls the level of the fairing compound applied between the<br />
guides, in much the same way concrete is leveled between two forms to build a sidewalk.<br />
The number of guides required depends on the size and shape of the surface. On<br />
flat or simple curved areas like a hard chined hull or a fin keel, one to three guides may<br />
be enough to describe the surface. On curved surfaces, a number of closely spaced<br />
guides may be necessary to accurately describe surface. A single guide may be placed in<br />
an unfair area for general reference or many may be applied over an entire hull in a<br />
regular grid pattern for more precise application.


