

Final Fairing & Finishing - WEST SYSTEM Epoxy
Final Fairing & Finishing - WEST SYSTEM Epoxy
Final Fairing & Finishing - WEST SYSTEM Epoxy

You also want an ePaper? Increase the reach of your titles
YUMPU automatically turns print PDFs into web optimized ePapers that Google loves.
ple, and one of the frames is 5 16" too high, you would have to alter the shape of the hull<br />
to avoid sanding a hole through 1 4" planking.<br />
If you are fairing a hard surface like a fiberglass, aluminum or steel hull, or a lead keel,<br />
removing a lot of material is impractical. You are pretty much limited to filling the low<br />
areas and establishing the level near or above the highest point on the surface, (option<br />
2). Many steel and aluminum boats are built this way. A layer of fairing compound is<br />
applied over the completed hull and all of the fairing takes place in the easy-to-sand<br />
fairing compound outside of the hull’s metal surface.<br />
Removing high areas<br />
The first task in overall fairing is locating the high and low areas. Developing a good<br />
eye or feel for finding high or low areas may come naturally or with practice and trial<br />
and error. Whether you develop a good eye or not, a batten or chalk stick is an indispensable<br />
fairing tool. See Appendix A, page 23. A batten will also help you develop your<br />
eye by providing an accurate backup measurement to check against your eye and hand<br />
measurements.<br />
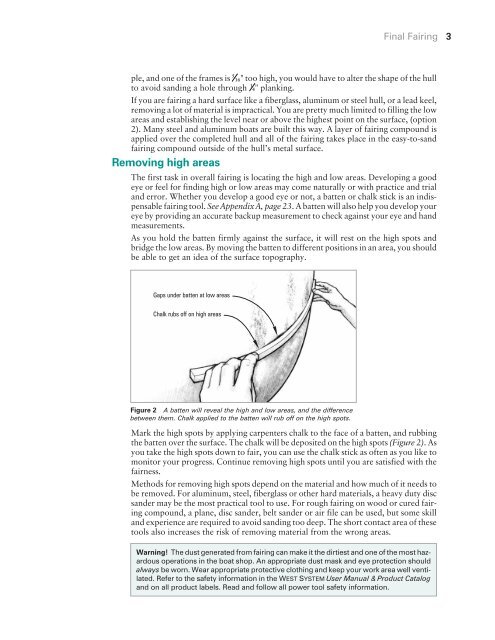
As you hold the batten firmly against the surface, it will rest on the high spots and<br />
bridge the low areas. By moving the batten to different positions in an area, you should<br />
be able to get an idea of the surface topography.<br />
Gaps under batten at low areas<br />
Chalk rubs off on high areas<br />
Figure 2 A batten will reveal the high and low areas, and the difference<br />
between them. Chalk applied to the batten will rub off on the high spots.<br />
<strong>Final</strong> <strong>Fairing</strong> 3<br />
Mark the high spots by applying carpenters chalk to the face of a batten, and rubbing<br />
the batten over the surface. The chalk will be deposited on the high spots (Figure 2).As<br />
you take the high spots down to fair, you can use the chalk stick as often as you like to<br />
monitor your progress. Continue removing high spots until you are satisfied with the<br />
fairness.<br />
Methods for removing high spots depend on the material and how much of it needs to<br />
be removed. For aluminum, steel, fiberglass or other hard materials, a heavy duty disc<br />
sander may be the most practical tool to use. For rough fairing on wood or cured fairing<br />
compound, a plane, disc sander, belt sander or air file can be used, but some skill<br />
and experience are required to avoid sanding too deep. The short contact area of these<br />
tools also increases the risk of removing material from the wrong areas.<br />
Warning! The dust generated from fairing can make it the dirtiest and one of the most hazardous<br />
operations in the boat shop. An appropriate dust mask and eye protection should<br />
always be worn. Wear appropriate protective clothing and keep your work area well ventilated.<br />
Refer to the safety information in the <strong>WEST</strong> <strong>SYSTEM</strong> User Manual & Product Catalog<br />
and on all product labels. Read and follow all power tool safety information.


