

Final Fairing & Finishing - WEST SYSTEM Epoxy
Final Fairing & Finishing - WEST SYSTEM Epoxy
Final Fairing & Finishing - WEST SYSTEM Epoxy

Create successful ePaper yourself
Turn your PDF publications into a flip-book with our unique Google optimized e-Paper software.
Making a fairing file<br />
Hacksaw blades can be modified and used for fairing.<br />
Sanding the cured epoxy with sanding boards can be slow<br />
work. A new hacksaw blade will easily cut through the<br />
low-density filler and occasional high spots in the fiberglass.<br />
Clamp the hacksaw blade between two ¼"-thick wooden<br />
strips The strips provide a handle and add stiffness to the<br />
blade, but are flexible enough to bend slightly over curved<br />
surfaces. Round the corners of the wooden strips with<br />
sandpaper, to make it comfortable to hold. Hold the blade<br />
and strips together with epoxy or G/5, Five Minute Adhesive.<br />
Keep the glue out of the saw teeth while bonding the<br />
wooden strips to the saw blade.<br />
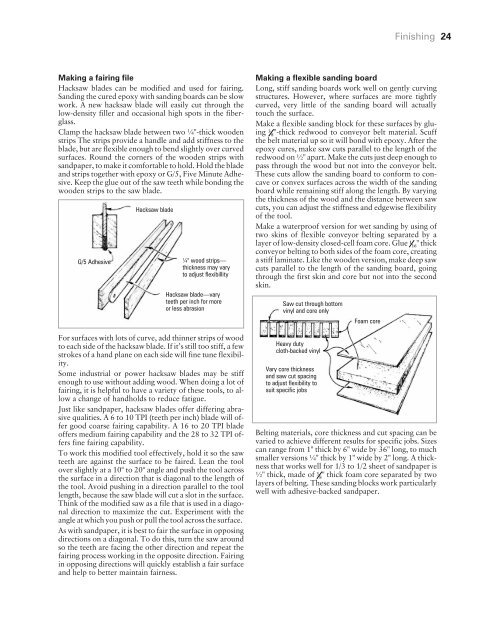
G/5 Adhesive<br />
Hacksaw blade<br />
¼" wood strips—<br />
thickness may vary<br />
to adjust flexibillity<br />
Hacksaw blade—vary<br />
teeth per inch for more<br />
or less abrasion<br />
For surfaces with lots of curve, add thinner strips of wood<br />
to each side of the hacksaw blade. If it’s still too stiff, a few<br />
strokes of a hand plane on each side will fine tune flexibility.<br />
Some industrial or power hacksaw blades may be stiff<br />
enough to use without adding wood. When doing a lot of<br />
fairing, it is helpful to have a variety of these tools, to allow<br />
a change of handholds to reduce fatigue.<br />
Just like sandpaper, hacksaw blades offer differing abrasive<br />
qualities. A 6 to 10 TPI (teeth per inch) blade will offer<br />
good coarse fairing capability. A 16 to 20 TPI blade<br />
offers medium fairing capability and the 28 to 32 TPI offers<br />
fine fairing capability.<br />
To work this modified tool effectively, hold it so the saw<br />
teeth are against the surface to be faired. Lean the tool<br />
over slightly at a 10° to 20° angle and push the tool across<br />
the surface in a direction that is diagonal to the length of<br />
the tool. Avoid pushing in a direction parallel to the tool<br />
length, because the saw blade will cut a slot in the surface.<br />
Think of the modified saw as a file that is used in a diagonal<br />
direction to maximize the cut. Experiment with the<br />
angle at which you push or pull the tool across the surface.<br />
As with sandpaper, it is best to fair the surface in opposing<br />
directions on a diagonal. To do this, turn the saw around<br />
so the teeth are facing the other direction and repeat the<br />
fairing process working in the opposite direction. <strong>Fairing</strong><br />
in opposing directions will quickly establish a fair surface<br />
and help to better maintain fairness.<br />
<strong>Finishing</strong> 24<br />
Making a flexible sanding board<br />
Long, stiff sanding boards work well on gently curving<br />
structures. However, where surfaces are more tightly<br />
curved, very little of the sanding board will actually<br />
touch the surface.<br />
Make a flexible sanding block for these surfaces by gluing<br />
3 8"-thick redwood to conveyor belt material. Scuff<br />
the belt material up so it will bond with epoxy. After the<br />
epoxy cures, make saw cuts parallel to the length of the<br />
redwood on ½" apart. Make the cuts just deep enough to<br />
pass through the wood but not into the conveyor belt.<br />
These cuts allow the sanding board to conform to concave<br />
or convex surfaces across the width of the sanding<br />
board while remaining stiff along the length. By varying<br />
the thickness of the wood and the distance between saw<br />
cuts, you can adjust the stiffness and edgewise flexibility<br />
of the tool.<br />
Make a waterproof version for wet sanding by using of<br />
two skins of flexible conveyor belting separated by a<br />
layer of low-density closed-cell foam core. Glue 1 16" thick<br />
conveyor belting to both sides of the foam core, creating<br />
a stiff laminate. Like the wooden version, make deep saw<br />
cuts parallel to the length of the sanding board, going<br />
through the first skin and core but not into the second<br />
skin.<br />
Saw cut through bottom<br />
vinyl and core only<br />
Heavy duty<br />
cloth-backed vinyl<br />
Vary core thickness<br />
and saw cut spacing<br />
to adjust flexibility to<br />
suit specific jobs<br />
Foam core<br />
Belting materials, core thickness and cut spacing can be<br />
varied to achieve different results for specific jobs. Sizes<br />
can range from 1" thick by 6" wide by 36" long, to much<br />
smaller versions ¼" thick by 1" wide by 2" long. A thickness<br />
that works well for 1/3 to 1/2 sheet of sandpaper is<br />
½" thick, made of 3 8" thick foam core separated by two<br />
layers of belting. These sanding blocks work particularly<br />
well with adhesive-backed sandpaper.


