

Final Fairing & Finishing - WEST SYSTEM Epoxy
Final Fairing & Finishing - WEST SYSTEM Epoxy
Final Fairing & Finishing - WEST SYSTEM Epoxy

You also want an ePaper? Increase the reach of your titles
YUMPU automatically turns print PDFs into web optimized ePapers that Google loves.
<strong>Final</strong> <strong>Fairing</strong> 11<br />
the material under the release fabric upward so it comes in contact with the template.<br />
When you’re satisfied, carefully remove the template, leave the release fabric in place,<br />
and allow the mixture to cure thoroughly.<br />
7. Remove the release fabric and mark the center of the template impression with a permanent<br />
felt marker to act as a sanding guide. Sand the ridges on either side of the template<br />
impression flush with the profile. Avoid sanding into the profile. You should be<br />
left with smooth bands of fairing compound at the root, midpoint and tip of the keel<br />
that will be used as profile guides to accurately apply the remaining fairing material.<br />
Use the templates to check the profiles and sand or add filler to the profile as necessary<br />
to match the template.<br />
8. Wet out the surface between the guides with epoxy. Allow the coating to gel.<br />
9. Mix enough epoxy/407 or 410 fairing compound to fill the area between two of the<br />
profile guides. Use the same filler and filler consistency used to make the guides. With a<br />
plastic spreader or custom spreader, apply the mixture to the middle area of the foil.<br />
Leave the mixture higher than the guides. See Appendix A for information on mixing<br />
and applying large quantities of fairing compound.<br />
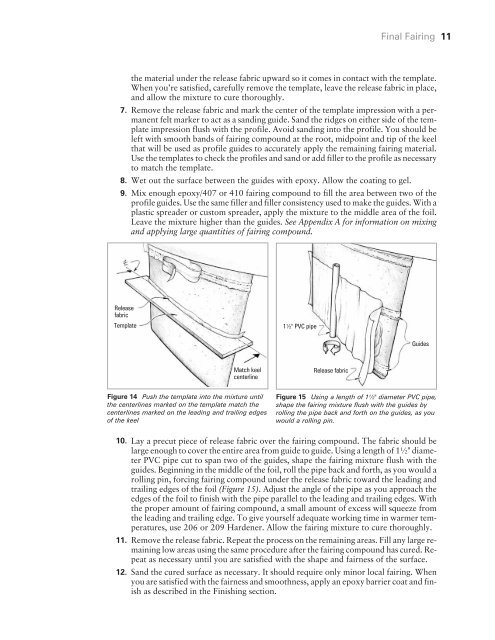
Release<br />
fabric<br />
Template<br />
Match keel<br />
centerline<br />
Figure 14 Push the template into the mixture until<br />
the centerlines marked on the template match the<br />
centerlines marked on the leading and trailing edges<br />
of the keel<br />
1½" PVC pipe<br />
Release fabric<br />
Guides<br />
Figure 15 Using a length of 1½" diameter PVC pipe,<br />
shape the fairing mixture flush with the guides by<br />
rolling the pipe back and forth on the guides, as you<br />
would a rolling pin.<br />
10. Lay a precut piece of release fabric over the fairing compound. The fabric should be<br />
large enough to cover the entire area from guide to guide. Using a length of 1½" diameter<br />
PVC pipe cut to span two of the guides, shape the fairing mixture flush with the<br />
guides. Beginning in the middle of the foil, roll the pipe back and forth, as you would a<br />
rolling pin, forcing fairing compound under the release fabric toward the leading and<br />
trailing edges of the foil (Figure 15). Adjust the angle of the pipe as you approach the<br />
edges of the foil to finish with the pipe parallel to the leading and trailing edges. With<br />
the proper amount of fairing compound, a small amount of excess will squeeze from<br />
the leading and trailing edge. To give yourself adequate working time in warmer temperatures,<br />
use 206 or 209 Hardener. Allow the fairing mixture to cure thoroughly.<br />
11. Remove the release fabric. Repeat the process on the remaining areas. Fill any large remaining<br />
low areas using the same procedure after the fairing compound has cured. Repeat<br />
as necessary until you are satisfied with the shape and fairness of the surface.<br />
12. Sand the cured surface as necessary. It should require only minor local fairing. When<br />
you are satisfied with the fairness and smoothness, apply an epoxy barrier coat and finish<br />
as described in the <strong>Finishing</strong> section.


