

Final Fairing & Finishing - WEST SYSTEM Epoxy
Final Fairing & Finishing - WEST SYSTEM Epoxy
Final Fairing & Finishing - WEST SYSTEM Epoxy

Create successful ePaper yourself
Turn your PDF publications into a flip-book with our unique Google optimized e-Paper software.
Release fabric Guide<br />
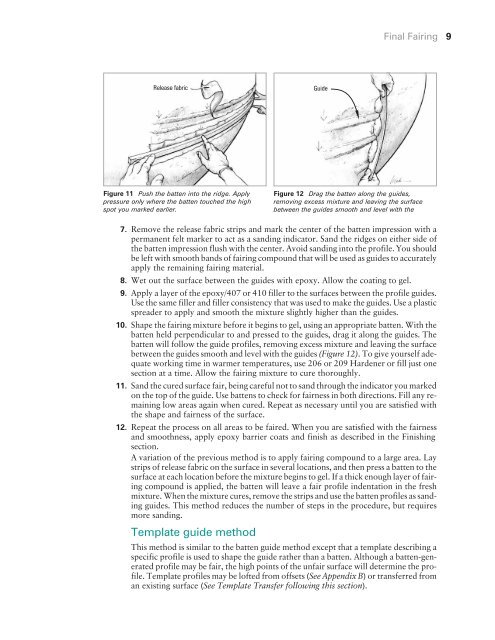
Figure 11 Push the batten into the ridge. Apply<br />
pressure only where the batten touched the high<br />
spot you marked earlier.<br />
7. Remove the release fabric strips and mark the center of the batten impression with a<br />
permanent felt marker to act as a sanding indicator. Sand the ridges on either side of<br />
the batten impression flush with the center. Avoid sanding into the profile. You should<br />
be left with smooth bands of fairing compound that will be used as guides to accurately<br />
apply the remaining fairing material.<br />
8. Wet out the surface between the guides with epoxy. Allow the coating to gel.<br />
9. Apply a layer of the epoxy/407 or 410 filler to the surfaces between the profile guides.<br />
Use the same filler and filler consistency that was used to make the guides. Use a plastic<br />
spreader to apply and smooth the mixture slightly higher than the guides.<br />
10. Shape the fairing mixture before it begins to gel, using an appropriate batten. With the<br />
batten held perpendicular to and pressed to the guides, drag it along the guides. The<br />
batten will follow the guide profiles, removing excess mixture and leaving the surface<br />
between the guides smooth and level with the guides (Figure 12). To give yourself adequate<br />
working time in warmer temperatures, use 206 or 209 Hardener or fill just one<br />
section at a time. Allow the fairing mixture to cure thoroughly.<br />
11. Sand the cured surface fair, being careful not to sand through the indicator you marked<br />
on the top of the guide. Use battens to check for fairness in both directions. Fill any remaining<br />
low areas again when cured. Repeat as necessary until you are satisfied with<br />
the shape and fairness of the surface.<br />
12. Repeat the process on all areas to be faired. When you are satisfied with the fairness<br />
and smoothness, apply epoxy barrier coats and finish as described in the <strong>Finishing</strong><br />
section.<br />
A variation of the previous method is to apply fairing compound to a large area. Lay<br />
strips of release fabric on the surface in several locations, and then press a batten to the<br />
surface at each location before the mixture begins to gel. If a thick enough layer of fairing<br />
compound is applied, the batten will leave a fair profile indentation in the fresh<br />
mixture. When the mixture cures, remove the strips and use the batten profiles as sanding<br />
guides. This method reduces the number of steps in the procedure, but requires<br />
more sanding.<br />
Template guide method<br />
<strong>Final</strong> <strong>Fairing</strong> 9<br />
Figure 12 Drag the batten along the guides,<br />
removing excess mixture and leaving the surface<br />
between the guides smooth and level with the<br />
This method is similar to the batten guide method except that a template describing a<br />
specific profile is used to shape the guide rather than a batten. Although a batten-generated<br />
profile may be fair, the high points of the unfair surface will determine the profile.<br />
Template profiles may be lofted from offsets (See Appendix B) or transferred from<br />
an existing surface (See Template Transfer following this section).


