

Final Fairing & Finishing - WEST SYSTEM Epoxy
Final Fairing & Finishing - WEST SYSTEM Epoxy
Final Fairing & Finishing - WEST SYSTEM Epoxy

You also want an ePaper? Increase the reach of your titles
YUMPU automatically turns print PDFs into web optimized ePapers that Google loves.
Batten guide method<br />
The batten guide method uses a flexible batten to cast an impression in the ridge of fairing<br />
compound. The resulting profile is determined by the stiffness of the batten and the<br />
batten’s points of contact with the unfair surface. The batten should be a suitable stiffness<br />
for the curve of the fairing area. This procedure may require at least two people to<br />
support and accurately position the batten.<br />
1. Prepare the area for bonding. Remove all paint. Wire brush the entire surface of external<br />
keels to remove any contamination and to expose fresh iron or lead. Sand the surface<br />
of internal keels or hulls to remove loose fillers and gelcoat and expose solid<br />
fiberglass laminate. Dry the surface if necessary, using a hot air gun, hair dryer or heat<br />
lamp.<br />
2. Determine and mark the locations for the guides. If you are fairing a curved surface like<br />
a hull, you may need to provide at least three parallel profile guides to describe the<br />
curve. Curves with a smaller radius and complex shapes may require more or closer<br />
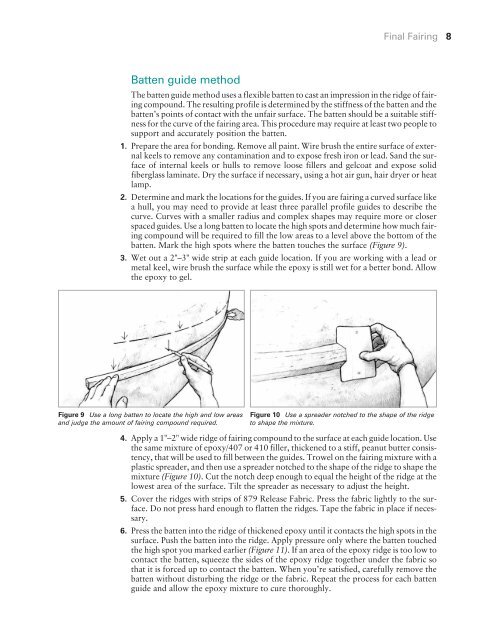
spaced guides. Use a long batten to locate the high spots and determine how much fairing<br />
compound will be required to fill the low areas to a level above the bottom of the<br />
batten. Mark the high spots where the batten touches the surface (Figure 9).<br />
3. Wet out a 2"–3" wide strip at each guide location. If you are working with a lead or<br />
metal keel, wire brush the surface while the epoxy is still wet for a better bond. Allow<br />
the epoxy to gel.<br />
Figure 9 Use a long batten to locate the high and low areas<br />
and judge the amount of fairing compound required.<br />
<strong>Final</strong> <strong>Fairing</strong> 8<br />
Figure 10 Use a spreader notched to the shape of the ridge<br />
to shape the mixture.<br />
4. Apply a 1"–2" wide ridge of fairing compound to the surface at each guide location. Use<br />
the same mixture of epoxy/407 or 410 filler, thickened to a stiff, peanut butter consistency,<br />
that will be used to fill between the guides. Trowel on the fairing mixture with a<br />
plastic spreader, and then use a spreader notched to the shape of the ridge to shape the<br />
mixture (Figure 10). Cut the notch deep enough to equal the height of the ridge at the<br />
lowest area of the surface. Tilt the spreader as necessary to adjust the height.<br />
5. Cover the ridges with strips of 879 Release Fabric. Press the fabric lightly to the surface.<br />
Do not press hard enough to flatten the ridges. Tape the fabric in place if necessary.<br />
6. Press the batten into the ridge of thickened epoxy until it contacts the high spots in the<br />
surface. Push the batten into the ridge. Apply pressure only where the batten touched<br />
the high spot you marked earlier (Figure 11). If an area of the epoxy ridge is too low to<br />
contact the batten, squeeze the sides of the epoxy ridge together under the fabric so<br />
that it is forced up to contact the batten. When you’re satisfied, carefully remove the<br />
batten without disturbing the ridge or the fabric. Repeat the process for each batten<br />
guide and allow the epoxy mixture to cure thoroughly.


