

Final Fairing & Finishing - WEST SYSTEM Epoxy
Final Fairing & Finishing - WEST SYSTEM Epoxy
Final Fairing & Finishing - WEST SYSTEM Epoxy

You also want an ePaper? Increase the reach of your titles
YUMPU automatically turns print PDFs into web optimized ePapers that Google loves.
Appendix<br />
Appendix A Tools and materials<br />
Abrasives<br />
Abrasives, specifically the different types of sandpaper,<br />
are the primary tool for removing material in fairing and<br />
finishing operations. Sandpaper is available in a variety of<br />
forms, grits and composition.<br />
The abrasive mineral particles are bonded to a cloth or<br />
paper backing, in sheets, discs and belts. 9" x 11" sheets<br />
are the most common form. They can be cut or folded to<br />
a convenient size for hand sanding or to fit pad sanders.<br />
Narrower sheets are sized for machine sanders. 2¾" x<br />
16½" or 17½" adhesive backed sizes are designed for air<br />
file sanders, but also work well on fairing boards or<br />
blocks. Discs come in a variety of diameters. 5", 6" and 8"<br />
are the most common and are available with pressure sensitive<br />
adhesive backs. Some manufacturers offer hook<br />
and loop type discs and corresponding pads. Plain backed<br />
papers can be mounted to blocks or boards with contact<br />
adhesive.<br />
Sandpaper can come in “open coat” or “closed coat”.<br />
Open coat means the mineral particles are spread out<br />
more and are less likely to "load up" or clog as easily as<br />
closed coat papers. Sandpaper is identified by the abrasive<br />
mineral on the face. Each mineral has different qualities<br />
of hardness (cutting ability) and toughness (wearing<br />
ability). The following types are most often used for<br />
fairing and finishing:<br />
Zirconia Alumina—Fairly aggressive cutting action, very<br />
long wearing (toughest), useful for rough fairing.<br />
Aluminum Oxide—Aggressive cutting action, long wearing,<br />
good all around paper for rough and finish sanding.<br />
Silicon Carbide—Very aggressive cutting action (hardest),<br />
moderately long wearing, useful for finishing and<br />
wet-sanding (with waterproof paper).<br />
Grit refers to the mineral particle size and generally determines<br />
the amount of material a paper will remove and<br />
how smooth it will leave the surface. The following grits<br />
are useful for fairing and finishing:<br />
36 to 50 grit—Rough fairing depending on the type and<br />
amount of material.<br />
50 to 80 grit—Local fairing and preparation for the epoxy<br />
barrier coat.<br />
80 to 100 grit—Preparing the epoxy barrier coat if a<br />
high-build or filling primer is to be applied.<br />
120 to 180 grit—Preparing the epoxy barrier coat for<br />
primers and high-solids coatings.<br />
220 to 400 grit—Preparing the epoxy barrier coat for<br />
most paints or varnishes and sanding between coats of<br />
paint or varnish. The thinner the coating film thickness,<br />
the finer the grit.<br />
<strong>Finishing</strong> 22<br />
<strong>Fairing</strong> fillers<br />
<strong>WEST</strong> <strong>SYSTEM</strong> 407 Low-Density and 410 Microlight<br />
fillers are blended to create fairing compounds when<br />
mixed with epoxy. 407 filler is a phenolic microballoon<br />
based mixture. It sands and carves easily when cured, and<br />
is strong enough to be used in some structural applications.<br />
407 can be mixed to a stiffer consistency than 410.<br />
410 Microlight is about three times lighter and about<br />
25% easier to sand than 407. It mixes easier and is more<br />
economical. However, 410 is not recommended under<br />
dark paint or other surfaces subject to high temperatures.<br />
407 filler is a better choice for thicker applications or applications<br />
requiring more impact or abrasion resistance.<br />
<strong>Fairing</strong> compound is generally mixed to the consistency<br />
of peanut butter. The more filler added to the epoxy—the<br />
stiffer the mixture and the easier it is to sand.<br />
Because epoxy is thinner at higher temperatures, it takes<br />
more filler to make a specific consistency at higher temperatures<br />
than it does at lower temperatures.<br />
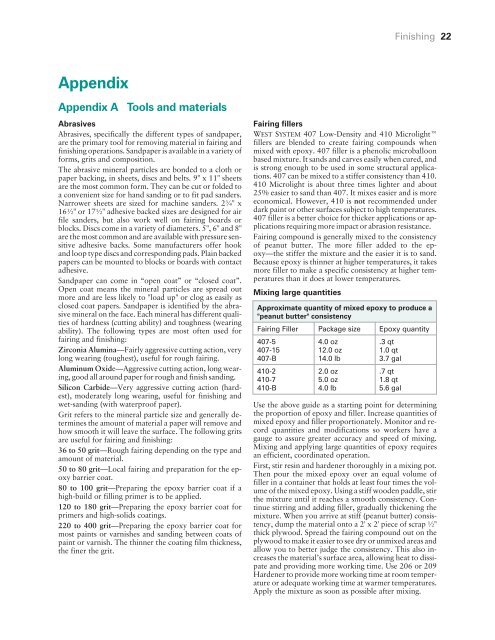
Mixing large quantities<br />
Approximate quantity of mixed epoxy to produce a<br />
"peanut butter" consistency<br />
<strong>Fairing</strong> Filler Package size <strong>Epoxy</strong> quantity<br />
407-5<br />
407-15<br />
407-B<br />
410-2<br />
410-7<br />
410-B<br />
4.0 oz<br />
12.0 oz<br />
14.0 lb<br />
2.0 oz<br />
5.0 oz<br />
4.0 lb<br />
.3 qt<br />
1.0 qt<br />
3.7 gal<br />
.7 qt<br />
1.8 qt<br />
5.6 gal<br />
Use the above guide as a starting point for determining<br />
the proportion of epoxy and filler. Increase quantities of<br />
mixed epoxy and filler proportionately. Monitor and record<br />
quantities and modifications so workers have a<br />
gauge to assure greater accuracy and speed of mixing.<br />
Mixing and applying large quantities of epoxy requires<br />
an efficient, coordinated operation.<br />
First, stir resin and hardener thoroughly in a mixing pot.<br />
Then pour the mixed epoxy over an equal volume of<br />
filler in a container that holds at least four times the volume<br />
of the mixed epoxy. Using a stiff wooden paddle, stir<br />
the mixture until it reaches a smooth consistency. Continue<br />
stirring and adding filler, gradually thickening the<br />
mixture. When you arrive at stiff (peanut butter) consistency,<br />
dump the material onto a 2' x 2' piece of scrap ½"<br />
thick plywood. Spread the fairing compound out on the<br />
plywood to make it easier to see dry or unmixed areas and<br />
allow you to better judge the consistency. This also increases<br />
the material’s surface area, allowing heat to dissipate<br />
and providing more working time. Use 206 or 209<br />
Hardener to provide more working time at room temperature<br />
or adequate working time at warmer temperatures.<br />
Apply the mixture as soon as possible after mixing.


