

Final Fairing & Finishing - WEST SYSTEM Epoxy
Final Fairing & Finishing - WEST SYSTEM Epoxy
Final Fairing & Finishing - WEST SYSTEM Epoxy

You also want an ePaper? Increase the reach of your titles
YUMPU automatically turns print PDFs into web optimized ePapers that Google loves.
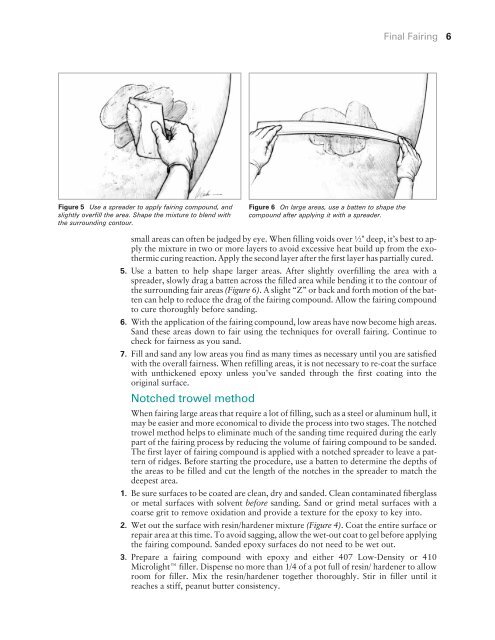
Figure 5 Use a spreader to apply fairing compound, and<br />
slightly overfill the area. Shape the mixture to blend with<br />
the surrounding contour.<br />
small areas can often be judged by eye. When filling voids over ½" deep, it’s best to apply<br />
the mixture in two or more layers to avoid excessive heat build up from the exothermic<br />
curing reaction. Apply the second layer after the first layer has partially cured.<br />
5. Use a batten to help shape larger areas. After slightly overfilling the area with a<br />
spreader, slowly drag a batten across the filled area while bending it to the contour of<br />
the surrounding fair areas (Figure 6). A slight “Z” or back and forth motion of the batten<br />
can help to reduce the drag of the fairing compound. Allow the fairing compound<br />
to cure thoroughly before sanding.<br />
6. With the application of the fairing compound, low areas have now become high areas.<br />
Sand these areas down to fair using the techniques for overall fairing. Continue to<br />
check for fairness as you sand.<br />
7. Fill and sand any low areas you find as many times as necessary until you are satisfied<br />
with the overall fairness. When refilling areas, it is not necessary to re-coat the surface<br />
with unthickened epoxy unless you’ve sanded through the first coating into the<br />
original surface.<br />
Notched trowel method<br />
Figure 6 On large areas, use a batten to shape the<br />
compound after applying it with a spreader.<br />
<strong>Final</strong> <strong>Fairing</strong> 6<br />
When fairing large areas that require a lot of filling, such as a steel or aluminum hull, it<br />
may be easier and more economical to divide the process into two stages. The notched<br />
trowel method helps to eliminate much of the sanding time required during the early<br />
part of the fairing process by reducing the volume of fairing compound to be sanded.<br />
The first layer of fairing compound is applied with a notched spreader to leave a pattern<br />
of ridges. Before starting the procedure, use a batten to determine the depths of<br />
the areas to be filled and cut the length of the notches in the spreader to match the<br />
deepest area.<br />
1. Be sure surfaces to be coated are clean, dry and sanded. Clean contaminated fiberglass<br />
or metal surfaces with solvent before sanding. Sand or grind metal surfaces with a<br />
coarse grit to remove oxidation and provide a texture for the epoxy to key into.<br />
2. Wet out the surface with resin/hardener mixture (Figure 4). Coat the entire surface or<br />
repair area at this time. To avoid sagging, allow the wet-out coat to gel before applying<br />
the fairing compound. Sanded epoxy surfaces do not need to be wet out.<br />
3. Prepare a fairing compound with epoxy and either 407 Low-Density or 410<br />
Microlight filler. Dispense no more than 1/4 of a pot full of resin/ hardener to allow<br />
room for filler. Mix the resin/hardener together thoroughly. Stir in filler until it<br />
reaches a stiff, peanut butter consistency.


