

Final Fairing & Finishing - WEST SYSTEM Epoxy
Final Fairing & Finishing - WEST SYSTEM Epoxy
Final Fairing & Finishing - WEST SYSTEM Epoxy

Create successful ePaper yourself
Turn your PDF publications into a flip-book with our unique Google optimized e-Paper software.
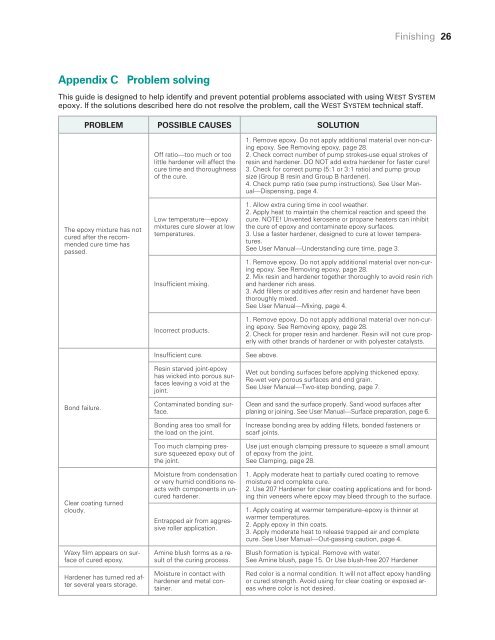
Appendix C Problem solving<br />
<strong>Finishing</strong> 26<br />
This guide is designed to help identify and prevent potential problems associated with using <strong>WEST</strong> <strong>SYSTEM</strong><br />
epoxy. If the solutions described here do not resolve the problem, call the <strong>WEST</strong> <strong>SYSTEM</strong> technical staff.<br />
PROBLEM POSSIBLE CAUSES SOLUTION<br />
The epoxy mixture has not<br />
cured after the recommended<br />
cure time has<br />
passed.<br />
Bond failure.<br />
Clear coating turned<br />
cloudy.<br />
Waxy film appears on surface<br />
of cured epoxy.<br />
Hardener has turned red after<br />
several years storage.<br />
Off ratio—too much or too<br />
little hardener will affect the<br />
cure time and thoroughness<br />
of the cure.<br />
Low temperature—epoxy<br />
mixtures cure slower at low<br />
temperatures.<br />
Insufficient mixing.<br />
Incorrect products.<br />
Insufficient cure. See above.<br />
Resin starved joint-epoxy<br />
has wicked into porous surfaces<br />
leaving a void at the<br />
joint.<br />
Contaminated bonding surface.<br />
Bonding area too small for<br />
the load on the joint.<br />
Too much clamping pressure<br />
squeezed epoxy out of<br />
the joint.<br />
Moisture from condensation<br />
or very humid conditions reacts<br />
with components in uncured<br />
hardener.<br />
Entrapped air from aggressive<br />
roller application.<br />
Amine blush forms as a result<br />
of the curing process.<br />
Moisture in contact with<br />
hardener and metal container.<br />
1. Remove epoxy. Do not apply additional material over non-curing<br />
epoxy. See Removing epoxy, page 28.<br />
2. Check correct number of pump strokes-use equal strokes of<br />
resin and hardener. DO NOT add extra hardener for faster cure!<br />
3. Check for correct pump (5:1 or 3:1 ratio) and pump group<br />
size (Group B resin and Group B hardener).<br />
4. Check pump ratio (see pump instructions). See User Manual—Dispensing,<br />
page 4.<br />
1. Allow extra curing time in cool weather.<br />
2. Apply heat to maintain the chemical reaction and speed the<br />
cure. NOTE! Unvented kerosene or propane heaters can inhibit<br />
the cure of epoxy and contaminate epoxy surfaces.<br />
3. Use a faster hardener, designed to cure at lower temperatures.<br />
See User Manual—Understanding cure time, page 3.<br />
1. Remove epoxy. Do not apply additional material over non-curing<br />
epoxy. See Removing epoxy, page 28.<br />
2. Mix resin and hardener together thoroughly to avoid resin rich<br />
and hardener rich areas.<br />
3. Add fillers or additives after resin and hardener have been<br />
thoroughly mixed.<br />
See User Manual—Mixing, page 4.<br />
1. Remove epoxy. Do not apply additional material over non-curing<br />
epoxy. See Removing epoxy, page 28.<br />
2. Check for proper resin and hardener. Resin will not cure properly<br />
with other brands of hardener or with polyester catalysts.<br />
Wet out bonding surfaces before applying thickened epoxy.<br />
Re-wet very porous surfaces and end grain.<br />
See User Manual—Two-step bonding, page 7.<br />
Clean and sand the surface properly. Sand wood surfaces after<br />
planing or joining. See User Manual—Surface preparation, page 6.<br />
Increase bonding area by adding fillets, bonded fasteners or<br />
scarf joints.<br />
Use just enough clamping pressure to squeeze a small amount<br />
of epoxy from the joint.<br />
See Clamping, page 28.<br />
1. Apply moderate heat to partially cured coating to remove<br />
moisture and complete cure.<br />
2. Use 207 Hardener for clear coating applications and for bonding<br />
thin veneers where epoxy may bleed through to the surface.<br />
1. Apply coating at warmer temperature–epoxy is thinner at<br />
warmer temperatures.<br />
2. Apply epoxy in thin coats.<br />
3. Apply moderate heat to release trapped air and complete<br />
cure. See User Manual—Out-gassing caution, page 4.<br />
Blush formation is typical. Remove with water.<br />
See Amine blush, page 15. Or Use blush-free 207 Hardener<br />
Red color is a normal condition. It will not affect epoxy handling<br />
or cured strength. Avoid using for clear coating or exposed areas<br />
where color is not desired.


