Download PDF: AKVIS Enhancer
Download PDF: AKVIS Enhancer
Download PDF: AKVIS Enhancer

You also want an ePaper? Increase the reach of your titles
YUMPU automatically turns print PDFs into web optimized ePapers that Google loves.
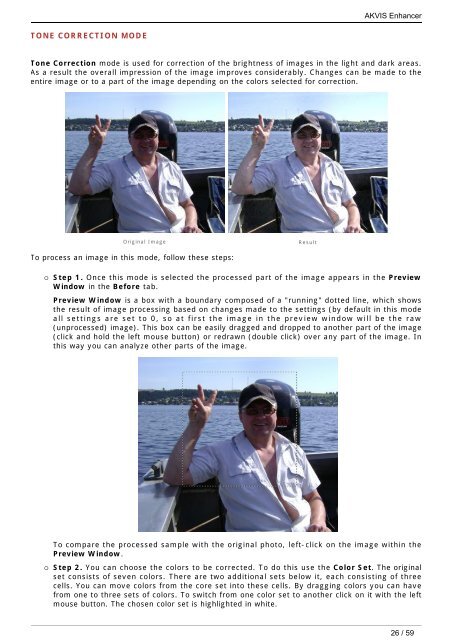
TONE CORRECTION MODE<br />
Tone Correction mode is used for correction of the brightness of images in the light and dark areas.<br />
As a result the overall impression of the image improves considerably. Changes can be made to the<br />
entire image or to a part of the image depending on the colors selected for correction.<br />
Original Image Result<br />
To process an image in this mode, follow these steps:<br />
<strong>AKVIS</strong> <strong>Enhancer</strong><br />
¡ Step 1. Once this mode is selected the processed part of the image appears in the Preview<br />
Window in the Before tab.<br />
Preview Window is a box with a boundary composed of a "running" dotted line, which shows<br />
the result of image processing based on changes made to the settings (by default in this mode<br />
all settings are set to 0, so at first the image in the preview window will be the raw<br />
(unprocessed) image). This box can be easily dragged and dropped to another part of the image<br />
(click and hold the left mouse button) or redrawn (double click) over any part of the image. In<br />
this way you can analyze other parts of the image.<br />
To compare the processed sample with the original photo, left-click on the image within the<br />
Preview Window.<br />
¡ Step 2. You can choose the colors to be corrected. To do this use the Color Set. The original<br />
set consists of seven colors. There are two additional sets below it, each consisting of three<br />
cells. You can move colors from the core set into these cells. By dragging colors you can have<br />
from one to three sets of colors. To switch from one color set to another click on it with the left<br />
mouse button. The chosen color set is highlighted in white.<br />
26 / 59