Download PDF: AKVIS Enhancer
Download PDF: AKVIS Enhancer
Download PDF: AKVIS Enhancer

You also want an ePaper? Increase the reach of your titles
YUMPU automatically turns print PDFs into web optimized ePapers that Google loves.
POST PROCESSING<br />
Use one of the modes in <strong>AKVIS</strong> <strong>Enhancer</strong> to improve a photo. For further image correction you can<br />
use the Post Processing tab. It is available only in the standalone edition because any image editor<br />
offers these features, so there is no reason to use this section in the plugin.<br />
Before Post Processing After Post Processing<br />
The Post Processing tab contains a Histogram and four parameters: Brightness, Contrast,<br />
Gamma and Saturation.<br />
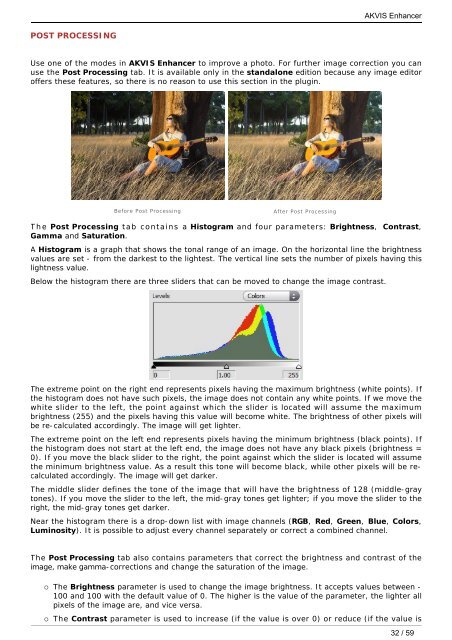
A Histogram is a graph that shows the tonal range of an image. On the horizontal line the brightness<br />
values are set - from the darkest to the lightest. The vertical line sets the number of pixels having this<br />
lightness value.<br />
Below the histogram there are three sliders that can be moved to change the image contrast.<br />
<strong>AKVIS</strong> <strong>Enhancer</strong><br />
The extreme point on the right end represents pixels having the maximum brightness (white points). If<br />
the histogram does not have such pixels, the image does not contain any white points. If we move the<br />
white slider to the left, the point against which the slider is located will assume the maximum<br />
brightness (255) and the pixels having this value will become white. The brightness of other pixels will<br />
be re-calculated accordingly. The image will get lighter.<br />
The extreme point on the left end represents pixels having the minimum brightness (black points). If<br />
the histogram does not start at the left end, the image does not have any black pixels (brightness =<br />
0). If you move the black slider to the right, the point against which the slider is located will assume<br />
the minimum brightness value. As a result this tone will become black, while other pixels will be recalculated<br />
accordingly. The image will get darker.<br />
The middle slider defines the tone of the image that will have the brightness of 128 (middle-gray<br />
tones). If you move the slider to the left, the mid-gray tones get lighter; if you move the slider to the<br />
right, the mid-gray tones get darker.<br />
Near the histogram there is a drop-down list with image channels (RGB, Red, Green, Blue, Colors,<br />
Luminosity). It is possible to adjust every channel separately or correct a combined channel.<br />
The Post Processing tab also contains parameters that correct the brightness and contrast of the<br />
image, make gamma-corrections and change the saturation of the image.<br />
¡ The Brightness parameter is used to change the image brightness. It accepts values between -<br />
100 and 100 with the default value of 0. The higher is the value of the parameter, the lighter all<br />
pixels of the image are, and vice versa.<br />
¡ The Contrast parameter is used to increase (if the value is over 0) or reduce (if the value is<br />
32 / 59