


Create successful ePaper yourself
Turn your PDF publications into a flip-book with our unique Google optimized e-Paper software.
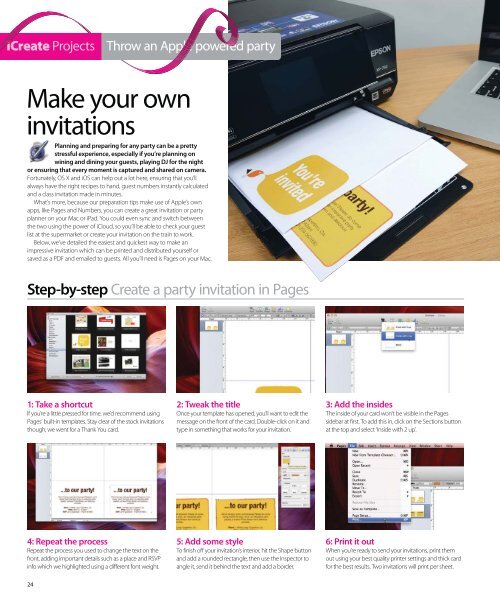
iCreate Projects Throw an Apple powered party<br />
Make your own<br />
invitations<br />
Planning and preparing for any party can be a pretty<br />
stressful experience, especially if you’re planning on<br />
wining and dining your guests, playing DJ for the night<br />
or ensuring that every moment is captured and shared on camera.<br />
Fortunately, OS X and iOS can help out a lot here, ensuring that you’ll<br />
always have the right recipes to hand, guest numbers instantly calculated<br />
and a class invitation made in minutes.<br />
What’s more, because our preparation tips make use of Apple’s own<br />
apps, like Pages and Numbers, you can create a great invitation or party<br />
planner on your Mac or iPad. You could even sync and switch between<br />
the two using the power of iCloud, so you’ll be able to check your guest<br />
list at the supermarket or create your invitation on the train to work.<br />
Below, we’ve detailed the easiest and quickest way to make an<br />
impressive invitation which can be printed and distributed yourself or<br />
saved as a PDF and emailed to guests. All you’ll need is Pages on your Mac.<br />
Step-by-step Create a party invitation in Pages<br />
1: Take a shortcut<br />
If you’re a little pressed for time, we’d recommend using<br />
Pages’ built-in templates. Stay clear of the stock invitations<br />
though; we went for a Thank You card.<br />
4: Repeat the process<br />
Repeat the process you used to change the text on the<br />
front, adding important details such as a place and RSVP<br />
info which we highlighted using a different font weight.<br />
24<br />
2: Tweak the title<br />
Once your template has opened, you’ll want to edit the<br />
message on the front of the card. Double-click on it and<br />
type in something that works for your invitation.<br />
5: Add some style<br />
To finish off your invitation’s interior, hit the Shape button<br />
and add a rounded rectangle, then use the Inspector to<br />
angle it, send it behind the text and add a border.<br />
3: Add the insides<br />
The inside of your card won’t be visible in the Pages<br />
sidebar at first. To add this in, click on the Sections button<br />
at the top and select ‘Inside with 2 up’.<br />
6: Print it out<br />
When you’re ready to send your invitations, print them<br />
out using your best quality printer settings and thick card<br />
for the best results. Two invitations will print per sheet.